Category: Applications

Graphing Data from a Weather Station via RTL-SDR and Home Assistant

Over on YouTube user mostlychris has uploaded a helpful tutorial video show how to use an RTL-SDR to collect data coming from a personal weather station and graph it on the home automation software known as Home Assistant.

To do this he uses an RTL-SDR on a Raspberry Pi running rtl_433 which receives and decodes the weather station data. He then configures rtl_433 to output data in the MQTT protocol which Home Assistant can receive and understand.  Finally he configures Home Assistant to plot the received data. The tutorial is comprehensive covering every step required from start to finish.

Take charge of your own Ambient weather data with Raspberry Pi, MQTT, and Home Assistant.

33% OFF Sale: Ultra Stable Bullseye LNB for QO-100/Es’Hail-2

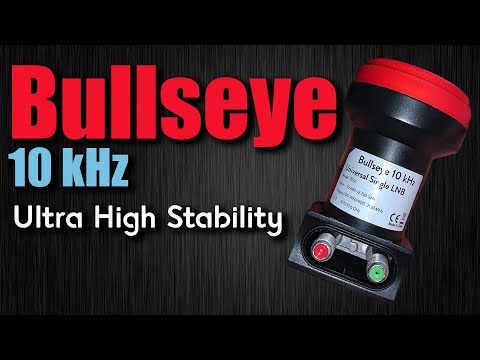
Back in May we started selling the Bullseye LNB on our store, which is an ultra stable LNB for receiving QO-100 and other Ku-Band satellites/applications. We have recently managed to secure a good deal from the supplier. However, our storage warehouse is now low on space and we are hence running a 33% off stock clearance sale with the unit now priced at only US$19.97 including free worldwide shipping to most countries. 

To order the product, please go to our store, and scroll down until you see the QO-100 Bullseye TCXO LNB heading. Alternatively we also have stock via our Aliexpress store or on eBay.

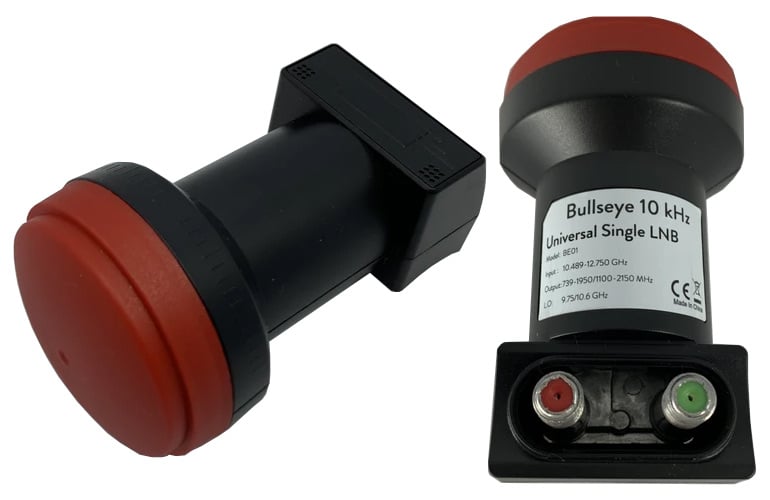
What is QO-100 and an LNB?

QO-100 / Es'hail-2 is a geostationary satellite at at 25.5°E (covering Africa, Europe, the Middle East, India, eastern Brazil and the west half of Russia/Asia) providing broadcasting services. However, as a bonus it also has the world's first amateur radio repeater in geostationary orbit. Uplink is at 2.4 GHz and downlink is at 10.5 GHz.

Most SDRs do not tune all the way up to 10.5 GHz, so an LNB (low noise block) is typically used, which contains the feed, an LNA, and a downconverter which converts the 10.5 GHz frequency into a much lower one that can be received by most SDRs.

What's special about the Bullseye LNB?

In order to properly monitor signals on QO-100 an LNB with a Temperature Compensated Oscillator (TCXO) or other stabilization method is required. Most LNBs have non-stabilized crystals which will drift significantly over time on the order of 300 PPM with temperature changes.  This means that the narrowband signals used on QO-100 can easily drift out of the receive band or cause distorted reception. Software drift compensation can be used to an extent, but it works best if the LNB is somewhat stable in the first place. It is possible to hand modify a standard Ku-band LNB by soldering on a replacement TCXO or hacking in connections to a GPSDO, but the Bullseye LNB ready to use with a built in 1PPM TCXO and is cheap.

Reviews

In the past Tech Minds has reviewed this product favourably in the video shown below. In a second video he has also shown how the Bullseye can be combined with a transmit helix in order to create a dual feed uplink + downlink capable antenna.

Ultra Stable Bullseye LNB For QO-100 Es Hail2 10 kHz

F4DAV has also reviewed the unit on his website, concluding with the following statement:

As far as I know the BE01 is the first affordable mass-produced Ku-band TCXO LNB. These early tests suggest that it can be a game changer for amateur radio and other narrowband applications in the 10 GHz band. The stability and ability to recalibrate should allow even unsophisticated analog stations to tune to a 5 kHz channel and remain there for hours at a time. For SDR stations with beacon-based frequency correction, the absolute accuracy removes the need to oversample by several hundred kHz or to scan for the initial frequency offset.

There are also several posts on Twitter by customers noting good performance

Official Feature List + Specs

Features

  • Bullseye 10 kHz BE01
  • Universal single output LNB
  • Frequency stability within 10 kHz in normal outdoor environment
  • Phase locked loop with 2 PPM TCXO
  • Factory calibration within 1 kHz utilizing GPS-locked spectrum analyzers
  • Ultra high precision PLL employing proprietary frequency control system (patent pending)
  • Digitally controlled carrier offset with optional programmer
  • 25 MHz output reference available on secondary F-connector (red)

Specifications 

  • Input frequency: 10489 - 12750 MHz
  • LO frequency 9750/10600 MHz
  • LO frequency stability at 23C: +/- 10 kHz
  • LO frequency stability -20 - 60C: +/- 30 kHz
  • Gain: 50 - 66 dB
  • Output frequency: 739 - 1950 MHz (low band) and 1100 - 2150 (high band)
  • Return loss of 8 dB (739 - 1950 MHz) and 10 dB (1100 - 2150 MHz)
  • Noise figure: 0.5 dB

We note that an external bias tee power injector is required to power the LNB as it requires 11.5V - 14V to operate in vertical polarization and 16V - 19V to operate with horizontal polarization. The bias tee on the RTL-SDR Blog V3 outputs 4.5V so it is not suitable.

DragonOS: KerberosSDR Bearing Server Setup with RDFMapper

DragonOS is a ready to use Linux OS image that includes many SDR programs preinstalled and ready to use. The creator Aaron also runs a YouTube channel that has multiple tutorial videos demonstrating software built into DragonOS.

In a recent video Aaron has provided a two part tutorial showing how to set up and use KerberosSDR with the RDFMapper software on DragonOS. This allows you to network multiple KerberosSDR units together and display each units radio bearing on the same map. Two or more bearings crossing can be used to determine the location of a transmitter. In the future Aaron will use this setup to have multiple mobile and fixed  KerberosSDR units connected together via Zero Tier. Aaron writes:

In this first video I show how to install software to control the KerberosSDR – A 4-Channel Phase Coherent RTL-SDR for Passive Radar, Direction Finding and more onto DragonOS Focal (Lubuntu 20.04 based). A fork of the main code is required due to some changes in dependencies and packages. This fork is only meant for or at least tested on Ubuntu, Kubuntu, and Lubuntu 20.04.

I also show some issues you may experience due to poor quality USB cables, insufficient power, and/or issues with USB ports being used to power the KerberosSDR or connect to it.

In this second video I show how to install and use RDFMapper with the KerberosSDR software and Android App. I also cover some common problems I've experienced with the current KerberosSDR Android App.

Recommended to watch the first video if you are planning to run the KerberosSDR on a PC or a SBC like the Raspberry Pi. This video and setup procedure can be adapted to use the Raspberry Pi/Android App instead of a PC. 

I plan to make a couple more videos on this topic. By the end, it should be possible to have multiple KerberosSDR stations, both mobile and stationary, linked to one instance of RDFMapper over Zero Tier all simultaneously performing direction finding on one frequency.

KerberosSDR is our 4-channel phase coherent capable RTL-SDR unit that we previously successfully crowdfunded back in 2018.  With a 4-channel phase coherent RTL-SDR interesting applications like radio direction findingpassive radar and beam forming become possible. It can also be used as 4 separate RTL-SDRs for multichannel monitoring. KerberosSDR is currently in stock and available on the Othernet store.

DragonOS Focal KerberosSDR setup (20.04 fork, x86_64 Laptop) part 1

DragonOS Focal KerberosSDR w/ Bearing Server setup (RDFMapper, Android App, x86_64 Laptop) part 2

Setting up a Raspberry Pi for Ham Radio with RTL-SDR

Over on his blog F4GOH has posted a rather comprehensive tutorial consisting of seven PDF documents showing how he's set up his Raspberry Pi for ham radio and other RF projects. The PDF's essentially form a book that starts with the very basics like preparing an OS for the Pi SD Card, powering on the Pi, finding the IP address and connecting to it with SSH or VNC.

The tutorials move on to installing and using various ham radio programs like Fldigi, WSJT-X , GQRX, GNU Radio, before going on to teach some more Linux concepts. The final two PDF tutorials cover the installation and use of OpenWebRX for remote RTL-SDR use, R2Cloud for decoding weather satellites, and finally Radiosonde Auto RX for decoding radiosonde's on weather balloons.

[Also seen on Hackaday]

Raspberry Pi for Ham Radio

Reminder: Register for the GNU Radio Online Conference on September 14-18

This is just a reminder that the 2020 GNU Radio Conference will be held online in a few days time starting on September 14 and ending September 18 2020. Viewing the live talks and participation in the discussion forums is free for everyone around the world, however you must register first via their site. The paid $50 workshops are all currently booked however you can go on the waiting list in case more spaces are opened.

GNU Radio Conference (GRCon) is the annual conference for the GNU Radio project & community, and has established itself as one of the premier industry events for Software Radio. It is a week-long conference that includes high-quality technical content and valuable networking opportunities. GRCon is a venue that highlights design, implementation, and theory that has been practically applied in a useful way. GRCon attendees come from a large variety of backgrounds, including industry, academia, government, and hobbyists.

GRCon20 will be held starting September 14, 2020 online as a virtual event. The organizing team is hard at work to create a fun and interactive experience.

Our keynote speakers include: Becky Schoenfeld W1BXY, managing editor of QST magazine, Oona Räisänen [ windytan ] hacker of signals and computer programmer, and Jim St. Leger, Director Open Source, Intel.

With an annual program that has broad appeal, GRCon attracts people new to Software Radio just looking to learn more, experts that want to keep their finger on the pulse & direction of the industry, and seasoned developers ready to show off their latest work.

Titles of the talks scheduled are shown below. The full list of talks, workshops and descriptions can be found here

  • Oona Räisänen - Video Decoding Adventure
  • Introducing OpenCPI as an Infrastructure for GNU Radio and GNU Radio Companion
  • How Strong is my SDR Signal?
  • Introducing the Radio Resiliency Competition
  • Are We Alone? How GNU Radio Can Help Us Find ET
  • A Conversation with the Ettus Research / NI SDR R&D Team
  • Enabling Performance Portability of GnuRadio on Heterogeneous Systems
  • Architecture Update - Marcus Mueller
  • Becky Schoenfeld - Keeping Ham Radio Alive and Well: ARRL’s Education Initiatives
  • ESA's OPS-SAT Mission: Powered by GNU Radio
  • Designing a Narrowband Radar using GNU Radio and Software Defined Radio for Tomography and Indoor Sensing
  • The De-Swiggification of GNU Radio
  • Exploring RFNoC with the UHD Python API
  • Teaching the Principles of Time Delay Spectrometry Ultrasound with GNU Radio
  • Ultra-cheap SDR Digital Television Transmission: ISDB-T with an osmo-fl2k and an RTL-SDR
  • Software defined radio based Synthetic Aperture noise and OFDM (WiFi) RADAR mapping
  • Community Continuous Integration (CI) for GNU Radio
  • RadEOT: The Radio Education Outreach Tool
  • Software defined radio based Global Navigation Satellite System real time spoofing detection and cancellation
  • SDR to GPU Peer-to-Peer Data Streaming for Cognitive Radar and EW Use-Case
  • Security Analysis of Zigbee Networks with Zigator and GNU Radio
  • Using GNU Radio in Amateur Radio
  • GR Wiki Block Docs: What's Important?

Comparing Shortwave Antennas with an RTL-SDR and FT8 Monitoring

Eric had an inverted L and T3FD antenna set up in his backyard and he wanted to test both at the same time to see which received HF better overall. Rather than relying on subjective 'by ear' measurements he decided to use the digital FT8 mode as his comparison signal. FT8 is quite useful for this purpose as the decoded data includes a calculated signal-to-noise (SNR) reading which is a non subjective measure that can be used for comparisons. It also contains information about the location of the signal which can be used for determining the DX capability of the antenna. 

To perform the comparison he used two or our RTL-SDR Blog V3 dongles running in direct sampling mode, and also added an additional low pass filter to prevent excessively strong TV and FM signals from overloading the input. Each antenna is connected to it's own RTL-SDR, and a modified version of GQRX with remote UDP control is used to switch between multiple FT8 frequencies so that multiple bands can be covered in the experiment. WSJT-X is used for decoding the FT8 packets.

After logging SNR values for several days he was able to plot and compare the number of packets received by each antenna, the maximum distance received by each antenna. His results showed that his inverted L antenna was best in both regards. He then performed a relative comparison with the SNR readings and found that the inverted L performed best apart from at 14 MHz, where the T3FD performed better.

In further tests he also compared the antennas on which signal headings they were receiving best from. The results showed that Erics inverted L was receiving best from one direction only, whereas the T3FD received signals from more headings.

Eric's post includes full instructions on the software setup and also Python code which can be used to replicate his experiments. We think that this is a great way to objectively compare two types of antennas.

Antenna directionality measurements via FT8 received headings

Unlocking a Car with an RTL-SDR and Yardstick One

Over on his YouTube channel Kalle Hallden has uploaded a video demonstrating how to perform a replay and "rolljam" attack on a wireless car key with an RTL-SDR and Yardstick One. His first experiment is a simple replay attack which involves recording the unlock signal from the car key with the Yardstick One in a place far away from the car so that it is not received, then replaying it close by.

This works well, but Kalle then explains rolling code security and how this would easily thwart any replay attack in the real world. However, he then goes on to explain and demonstrate the "rolljam" technique, which is one known way to get around rolling code security. The demonstrations are obviously not full tutorials, but are just high level overviews of how wireless security can be defeated.

TechMinds: Decoding GPS with an RTL-SDR

Over on his YouTube channel Tech Minds has uploaded a video showing how it's possible to receive and decode GPS signals with an RTL-SDR. To do this he uses one of our RTL-SDR Blog V3 dongles and a GPS patch antenna which is powered via the bias tee on the dongle.

On the software side he uses GNSS-SDRLIB and RTKLIB to decode the GPS signal. The result of the two programs is your current GPS coordinates which can be plotted on a map. Unfortunately in the video Tech Minds was unable to get the Google Maps display to work, but you can easily type the coordinates into Google maps yourself.

Decoding GPS using an RTL SDR Receiver