Over on YouTube user knoxieman has uploaded a video that provides a few tips on using DSD+ and an RTL-SDR for listening to DMR digital voice signals. The video is designed as a companion to Tech Minds' video which shows a full set up procedure for DSD+.
Knoxieman's video includes some tips on SDR# settings, virtual audio cable setup, and using a program called "DisplayFusion" to keep the DSD+ event windows permanently on top of the SDR# window.
Tips on using SDR Plus and DSDPLUS to listen to DMR/DIGITAL conversations.
HRPT is a high resolution weather satellite image that is broadcast by the NOAA satellites. Receiving HRPT weather satellite signals is a little different to the more commonly received NOAA APT or Meteor M2 LRPT images which most readers may already be familiar with. HRPT is broadcast by the same NOAA satellites that provide the APT signal at 137 MHz, but is found in the L-band at around 1.7 GHz. The signal is much weaker, so a high gain dish antenna with motorized tracking mount, LNA and high bandwidth SDR like an Airspy is required. The payoff is that HRPT images are much higher in resolution compared to APT.
Manuel lives in Germany and on Twitter he found that he had a follower in Canada who was also receiving HRPT images. So he asked his follower to provide him with HRPT weather images that were received shortly after the pass in Germany. He then stitched the images together, and color corrected them which resulted in a nice large image covering Europe, the Atlantic, Canada and Florida.
[EN subs] HRPT over The Ocean - Ein Bild von Köln nach Kanada
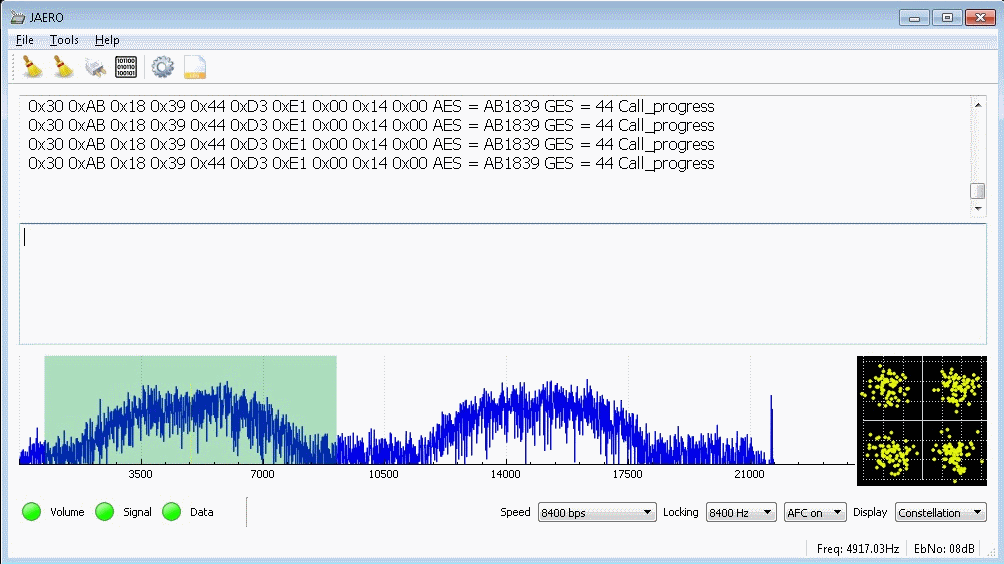
JAERO was recently updated by programmer Jonti, and it now supports the decoding of AERO C-Channels which are voice audio channels that exist on both the L-Band and C-Band frequencies of AERO. AERO is a satellite based communications service used by modern aircraft. The information transferred are normally things like aircraft telemetry, short crew messages, weather reports and flight plans. It is similar information to what is found on VHF/HF ACARS.
Jonti notes that these C-Channel voice signals are very weak as they are spot beams, so a good antenna system is required to receive them. Over on Jonti's JAERO website there is now some information about these C-Channels (scroll all the way down to the C-Channel heading and read to the end of the page), as well as a frequency list. An excerpt of the information is pasted below:
Inmarsat C and in particular AERO C channels provide circuit switched telephony services to aircraft. The channels of interest are those that carry AMBE compressed audio at a channel rate 8400 bps and voice rate of 4800bps. There is also an older speech codec still in use, LPC at a voice rate of 9600 bps and an overall channel rate of 21000bps.
Telephone channels are two-way duplex. In the from-aircraft direction transmissions are roughly in the 1646 to 1652 Mhz range. The satellite up-converts these transmissions to C band, similar to T and R channel burst transmissions. So it is possible to receive the from-aircraft transmissions although it is significantly more difficult than those in the to-aircraft direction on the L band. So for those who want to get started receiving these transmissions the L band is by far the easiest place to start.
Another aspect of the C channels is that they most often use spot beams rather than global beams which makes it more difficult to receive transmissions for aircraft using a spot beam that is aimed at another region. However if you are inside the spot beam the transmissions are relatively easily received on L band. A 60 cm dish with an LHCP helical and L band LNA will provide excellent results but even with a patch antenna it can be done.
Decoding these channels to audio in JAERO takes a little effort to setup. Due to the uncertain legal status of the digital audio AMBE codec, the codec code needs to be compiled manually first, and then placed into the JAERO directory. Jontio has uploaded the AERO AMBE codec source code at https://github.com/jontio/libaeroambe. Since JAERO is a Windows program, compilation of libaeroambe involves using MSYS2.
Once fully set up with the audio codec, the audio will come out of default soundcard set in Windows audio properties, so ensure that any Virtual Audio Cables are not set as the default device.
On the L-band link you can get conversations from the ground to the plane. The C-band link would get you the plane to ground side of the conversation too, but that is a challenging signal that would require a large dish and Jonti doesn't know of anyone who has managed to receive that before. Typically the conversation topics are things like Medlink which is a multilingual medical support line that can provide backup to doctors or aircrew handling medical emergencies in the air. In Europe the USAF also apparently use C-Channel.
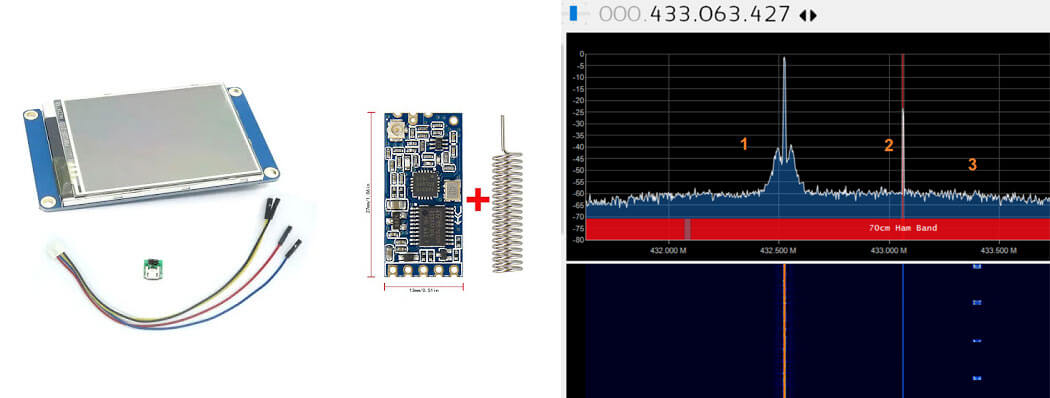
Thanks to Steve K2GOG of The Hudson Valley Digital Network (HVDN) for submitting his post on how to create a wireless display for Pi-Star. Pi-Star is a pre-built Raspberry Pi image for amateur radio users experimenting with digital voice communications like D-STAR and DMR. They write that it can be used for applications such as a "single mode hotspot running simplex providing you with access to the increasing number of Digital Voice networks, [or a] public duplex multimode repeater".
Pi-Star is compatible with serial based LED displays with built in GUIs like the Nextion. The displays are usually connected directly to the Raspberry Pi, but Steve wanted to use the display remotely. To do this he used a simple and inexpensive 70cm band HC-12 wireless serial port adapter. With the wireless adapters connected to the Pi he was able to see the pulses in SDR# via his RTL-SDR to confirm that the wireless serial signal was being sent. He then connected the second wireless adapter to the Nextion display via a few diodes to drop the voltage, and was able to get the display updating as if it was connected directly.
In the post Steve mentions that HVDN are also giving away an HC-12 and RTL-SDR to the first person to submit some progress with this idea.
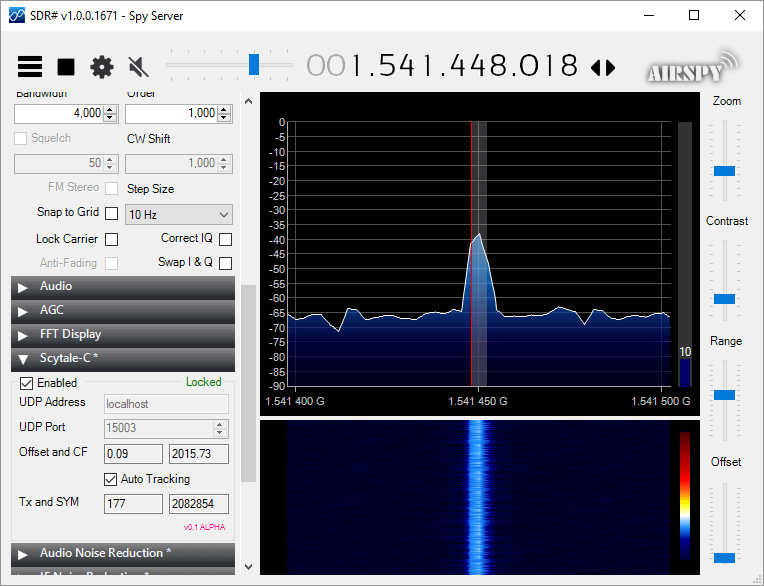
Microp11, the programmer of Scytale-C a standalone Inmarsat decoder has just released a new Inmarsat decoder SDR# plugin. The plugin is currently in the "pre-alpha" stages, so is still missing some functionality and may be buggy. However, it does appear to be functional at this point in time. It can be used with RTL-SDRs, and any other SDR# compatible SDR including units running on remote SpyServers. Microp11 writes:
I ran it with SDR# version v1.0.0.1761.
If it crashes you SDR# I apologize in advance.
The auto-tracking (default on) will alter your SDR# frequency and follow the signal’s CF. When the SNR is very low, please disable it and manually tune the SDR# to try to get the CF as close to 2000 as possible.The demodulator still has plenty ideas of its own.
Use USB mode with 4000 Hz bandwidth.
For now the interface is missing the usual scatter plots.
UDP Address and UDP Port are for sending the decoded frames to the Scytale-C UI.
Offset and CF are the difference from zero error and the CF frequency of the demodulated BPSK signal.
Tx and SYM are the transmitted over UDP frames and SYM is showing the number of demodulated symbols.
A bunch of libraries are attached as extra files. Please be gentle and accept the package as it. Will clean-up in the future.
Use in conjunction with the Scytale-C UI from the archive: “x64-UI1.6-Decoder1.4.zip” (link below)
The magic line is included in the archive: “SDRSharp.ScytaleC-1.0-alpha.zip”
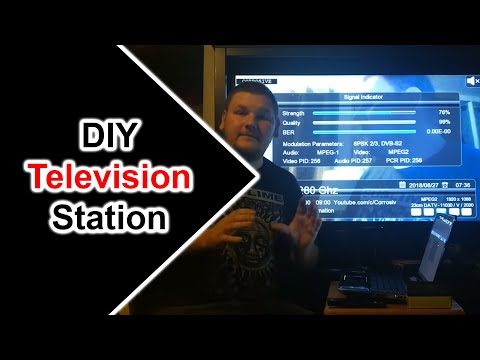
Over on YouTube user Corrosive has uploaded a video showing how he can use the recently updated DATV Express software to transmit Digital Amateur TV (DATV) with a LimeSDR Mini, and receive it with a cheap US$20 DVB-S satellite set top box that he's modified with a custom firmware update. Corrosives work is excellent as it allows anyone to get started in DATV amateur radio cheaply. He writes:
Last week I noticed the windows DATV express software for windows had been updated to include several SDR platforms [appears to now support the LimeSDR and LimeSDR Mini, as well as the PlutoSDR] https://www.datv-express.com/CustomPage/Downloads
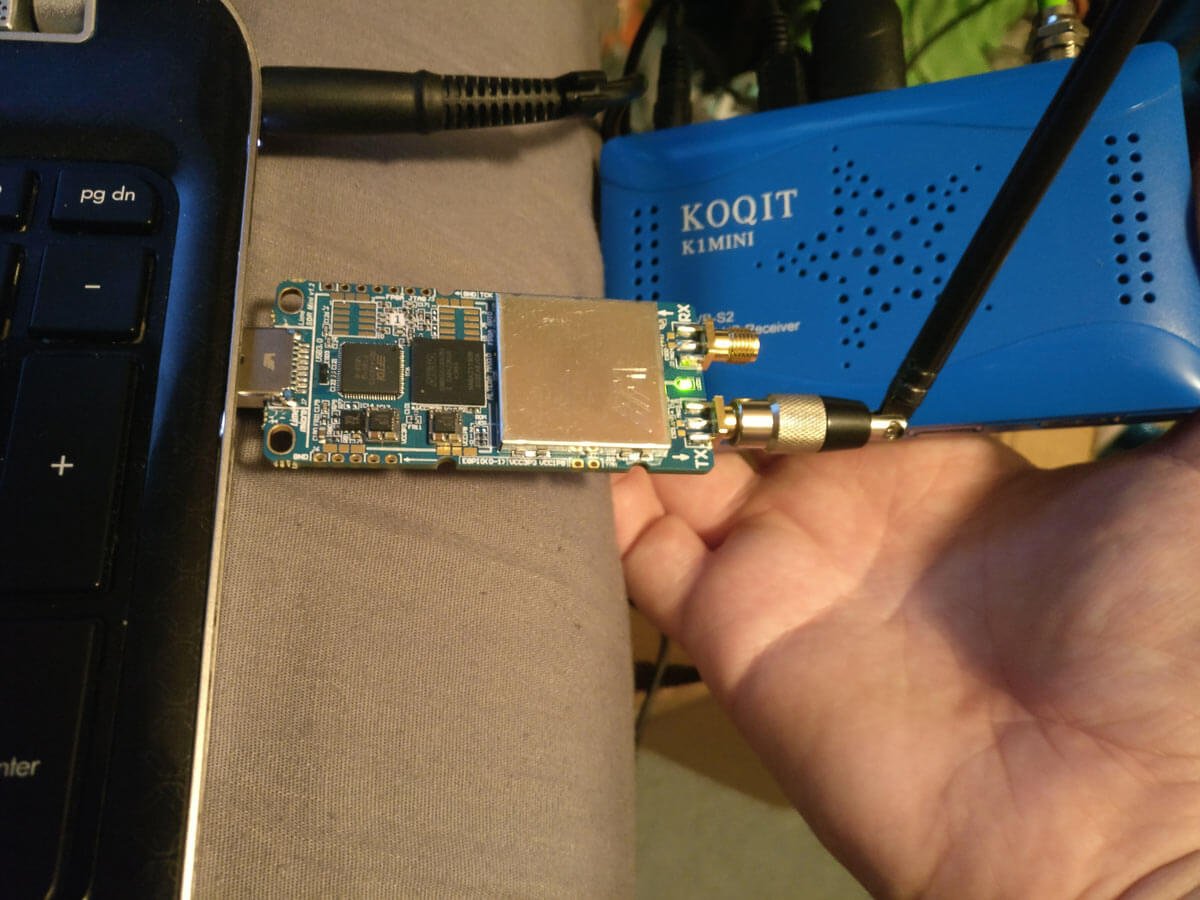
Using my new LimeSDR Mini I wanted to try this out. I went online and purchased a cheap DVB-S Satellite set top box on eBay branded as a KOQIT K1Mini.
In order to allow the KOQIT K1Mini DVB-S set top box to receive DATV frequencies, Corrosive has released a firmware update on GitHub that removes all satellites listed in the receiver, and replaces it with six DATV channels for amateur television use. He writes:
I decided to split the 3 23cm ATV frequencies into 6 at half the bandwidth for digital.
The receiver with my firmware configures the device to see a 9750LO LNB, by placing a simple antenna on the receiver instead of an LNB the 1.2 ghz amateur frequencies are shifted by 9750mhz and can be scanned as if they were a satellite transponder.
If you don't have a TX capable or DATV Express compatible SDR like the LimeSDR or Pluto, then we note that RPiTX (software that allows a Raspberry Pi to transmit RF without any additional hardware) also has DATV transmit capabilities that could in used in their place.
Make Your Own TV Station Using Amateur Radio With LimeSDR Mini and a Satellite Receiver 23CM 1.2GHz
Over on YouTube user knoxieman has uploaded a video that provides a few tips on using DSD+ and an RTL-SDR for listening to DMR digital voice signals. The video is designed as a companion to Tech Minds' video which shows a full set up procedure for DSD+.
Knoxieman's video includes some tips on SDR# settings, virtual audio cable setup, and using a program called "DisplayFusion" to keep the DSD+ event windows permanently on top of the SDR# window.
Tips on using SDR Plus and DSDPLUS to listen to DMR/DIGITAL conversations.
HRPT is a high resolution weather satellite image that is broadcast by the NOAA satellites. Receiving HRPT weather satellite signals is a little different to the more commonly received NOAA APT or Meteor M2 LRPT images which most readers may already be familiar with. HRPT is broadcast by the same NOAA satellites that provide the APT signal at 137 MHz, but is found in the L-band at around 1.7 GHz. The signal is much weaker, so a high gain dish antenna with motorized tracking mount, LNA and high bandwidth SDR like an Airspy is required. The payoff is that HRPT images are much higher in resolution compared to APT.
Manuel lives in Germany and on Twitter he found that he had a follower in Canada who was also receiving HRPT images. So he asked his follower to provide him with HRPT weather images that were received shortly after the pass in Germany. He then stitched the images together, and color corrected them which resulted in a nice large image covering Europe, the Atlantic, Canada and Florida.
[EN subs] HRPT over The Ocean - Ein Bild von Köln nach Kanada
JAERO was recently updated by programmer Jonti, and it now supports the decoding of AERO C-Channels which are voice audio channels that exist on both the L-Band and C-Band frequencies of AERO. AERO is a satellite based communications service used by modern aircraft. The information transferred are normally things like aircraft telemetry, short crew messages, weather reports and flight plans. It is similar information to what is found on VHF/HF ACARS.
Jonti notes that these C-Channel voice signals are very weak as they are spot beams, so a good antenna system is required to receive them. Over on Jonti's JAERO website there is now some information about these C-Channels (scroll all the way down to the C-Channel heading and read to the end of the page), as well as a frequency list. An excerpt of the information is pasted below:
Inmarsat C and in particular AERO C channels provide circuit switched telephony services to aircraft. The channels of interest are those that carry AMBE compressed audio at a channel rate 8400 bps and voice rate of 4800bps. There is also an older speech codec still in use, LPC at a voice rate of 9600 bps and an overall channel rate of 21000bps.
Telephone channels are two-way duplex. In the from-aircraft direction transmissions are roughly in the 1646 to 1652 Mhz range. The satellite up-converts these transmissions to C band, similar to T and R channel burst transmissions. So it is possible to receive the from-aircraft transmissions although it is significantly more difficult than those in the to-aircraft direction on the L band. So for those who want to get started receiving these transmissions the L band is by far the easiest place to start.
Another aspect of the C channels is that they most often use spot beams rather than global beams which makes it more difficult to receive transmissions for aircraft using a spot beam that is aimed at another region. However if you are inside the spot beam the transmissions are relatively easily received on L band. A 60 cm dish with an LHCP helical and L band LNA will provide excellent results but even with a patch antenna it can be done.
Decoding these channels to audio in JAERO takes a little effort to setup. Due to the uncertain legal status of the digital audio AMBE codec, the codec code needs to be compiled manually first, and then placed into the JAERO directory. Jontio has uploaded the AERO AMBE codec source code at https://github.com/jontio/libaeroambe. Since JAERO is a Windows program, compilation of libaeroambe involves using MSYS2.
Once fully set up with the audio codec, the audio will come out of default soundcard set in Windows audio properties, so ensure that any Virtual Audio Cables are not set as the default device.
On the L-band link you can get conversations from the ground to the plane. The C-band link would get you the plane to ground side of the conversation too, but that is a challenging signal that would require a large dish and Jonti doesn't know of anyone who has managed to receive that before. Typically the conversation topics are things like Medlink which is a multilingual medical support line that can provide backup to doctors or aircrew handling medical emergencies in the air. In Europe the USAF also apparently use C-Channel.
Thanks to Steve K2GOG of The Hudson Valley Digital Network (HVDN) for submitting his post on how to create a wireless display for Pi-Star. Pi-Star is a pre-built Raspberry Pi image for amateur radio users experimenting with digital voice communications like D-STAR and DMR. They write that it can be used for applications such as a "single mode hotspot running simplex providing you with access to the increasing number of Digital Voice networks, [or a] public duplex multimode repeater".
Pi-Star is compatible with serial based LED displays with built in GUIs like the Nextion. The displays are usually connected directly to the Raspberry Pi, but Steve wanted to use the display remotely. To do this he used a simple and inexpensive 70cm band HC-12 wireless serial port adapter. With the wireless adapters connected to the Pi he was able to see the pulses in SDR# via his RTL-SDR to confirm that the wireless serial signal was being sent. He then connected the second wireless adapter to the Nextion display via a few diodes to drop the voltage, and was able to get the display updating as if it was connected directly.
In the post Steve mentions that HVDN are also giving away an HC-12 and RTL-SDR to the first person to submit some progress with this idea.
Microp11, the programmer of Scytale-C a standalone Inmarsat decoder has just released a new Inmarsat decoder SDR# plugin. The plugin is currently in the "pre-alpha" stages, so is still missing some functionality and may be buggy. However, it does appear to be functional at this point in time. It can be used with RTL-SDRs, and any other SDR# compatible SDR including units running on remote SpyServers. Microp11 writes:
I ran it with SDR# version v1.0.0.1761.
If it crashes you SDR# I apologize in advance.
The auto-tracking (default on) will alter your SDR# frequency and follow the signal’s CF. When the SNR is very low, please disable it and manually tune the SDR# to try to get the CF as close to 2000 as possible.The demodulator still has plenty ideas of its own.
Use USB mode with 4000 Hz bandwidth.
For now the interface is missing the usual scatter plots.
UDP Address and UDP Port are for sending the decoded frames to the Scytale-C UI.
Offset and CF are the difference from zero error and the CF frequency of the demodulated BPSK signal.
Tx and SYM are the transmitted over UDP frames and SYM is showing the number of demodulated symbols.
A bunch of libraries are attached as extra files. Please be gentle and accept the package as it. Will clean-up in the future.
Use in conjunction with the Scytale-C UI from the archive: “x64-UI1.6-Decoder1.4.zip” (link below)
The magic line is included in the archive: “SDRSharp.ScytaleC-1.0-alpha.zip”
Over on YouTube user Corrosive has uploaded a video showing how he can use the recently updated DATV Express software to transmit Digital Amateur TV (DATV) with a LimeSDR Mini, and receive it with a cheap US$20 DVB-S satellite set top box that he's modified with a custom firmware update. Corrosives work is excellent as it allows anyone to get started in DATV amateur radio cheaply. He writes:
Last week I noticed the windows DATV express software for windows had been updated to include several SDR platforms [appears to now support the LimeSDR and LimeSDR Mini, as well as the PlutoSDR] https://www.datv-express.com/CustomPage/Downloads
Using my new LimeSDR Mini I wanted to try this out. I went online and purchased a cheap DVB-S Satellite set top box on eBay branded as a KOQIT K1Mini.
In order to allow the KOQIT K1Mini DVB-S set top box to receive DATV frequencies, Corrosive has released a firmware update on GitHub that removes all satellites listed in the receiver, and replaces it with six DATV channels for amateur television use. He writes:
I decided to split the 3 23cm ATV frequencies into 6 at half the bandwidth for digital.
The receiver with my firmware configures the device to see a 9750LO LNB, by placing a simple antenna on the receiver instead of an LNB the 1.2 ghz amateur frequencies are shifted by 9750mhz and can be scanned as if they were a satellite transponder.
If you don't have a TX capable or DATV Express compatible SDR like the LimeSDR or Pluto, then we note that RPiTX (software that allows a Raspberry Pi to transmit RF without any additional hardware) also has DATV transmit capabilities that could in used in their place.
Make Your Own TV Station Using Amateur Radio With LimeSDR Mini and a Satellite Receiver 23CM 1.2GHz
Thanks to Tony C who wrote in and wanted to share a method that he's found to listen to multiple DMR digital voice channels in Linux. DSD+ is a Windows program that can be used to decode DMR. Although for Windows it is possible to use in Linux via the emulator known as Wine, and pipe the digital audio to it from GQRX. In the quote below, DSD+ "FL" is short for "Fast Lane" which is DSD+'s paid beta service that you can join to get newer code with more features. Tony writes:
I believe that can bridge the gap between using Linux with the ease of use programs of windows. As I am sure we both can attest that setting up trunk tracking / anything SDR is not as easy on Linux as it is on windows. For example, DSDplus FL makes it extremely easy to identify/decode DMR networks. There are similar things that can be done on Linux, but as I stated, it isn’t as easy to setup.
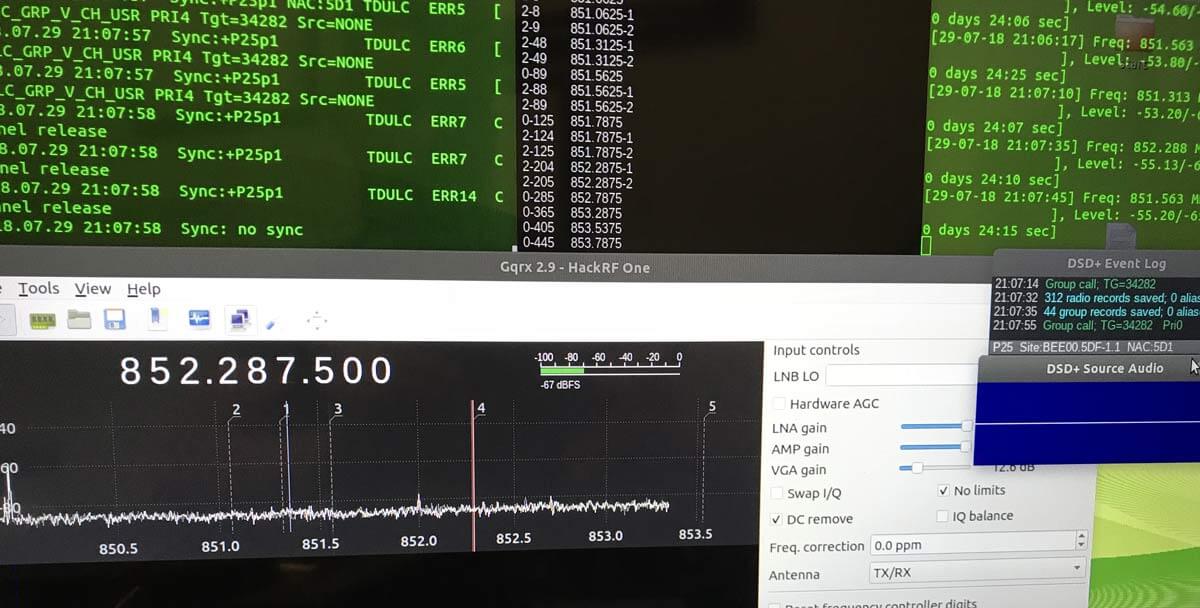
So the method that I setup and have been using successfully, using Ubuntu and a HackRF, setting up DSDplus 2.98 on wine, that gets audio piped from GQRX using a virtual sink as outlined in https://www.hagensieker.com/wordpress/2018/04/29/dsd-in-ubuntu-18-04/. It was a great blog, but I felt that it was incomplete when trying to get all the voice traffic passed on a network, as it only works on 1 channel at a time.
So I found the control channel for the network and created 5 bookmarks in GQRX and gave them the tag “DMR”. From there I downloaded gqrx scanner https://github.com/neural75/gqrx-scanner followed the install and setup instructions. From there I activated the scanner and GQRX will cycle through the frequencies and when voice traffic is passed, it will stop, and DSDPLUS via wine will decode and record the audio.
[The screenshot] example was for P25, but it has worked in connect+ as well, the only thing is that you cannot bookmark the control channel. I know other options exist out there such as SDRtrunk / op25 which I have used, but I believe this provides a good alternative to those who have used windows and are comfortable with the ease of use of dsdplus FL but want to be on the Linux OS.
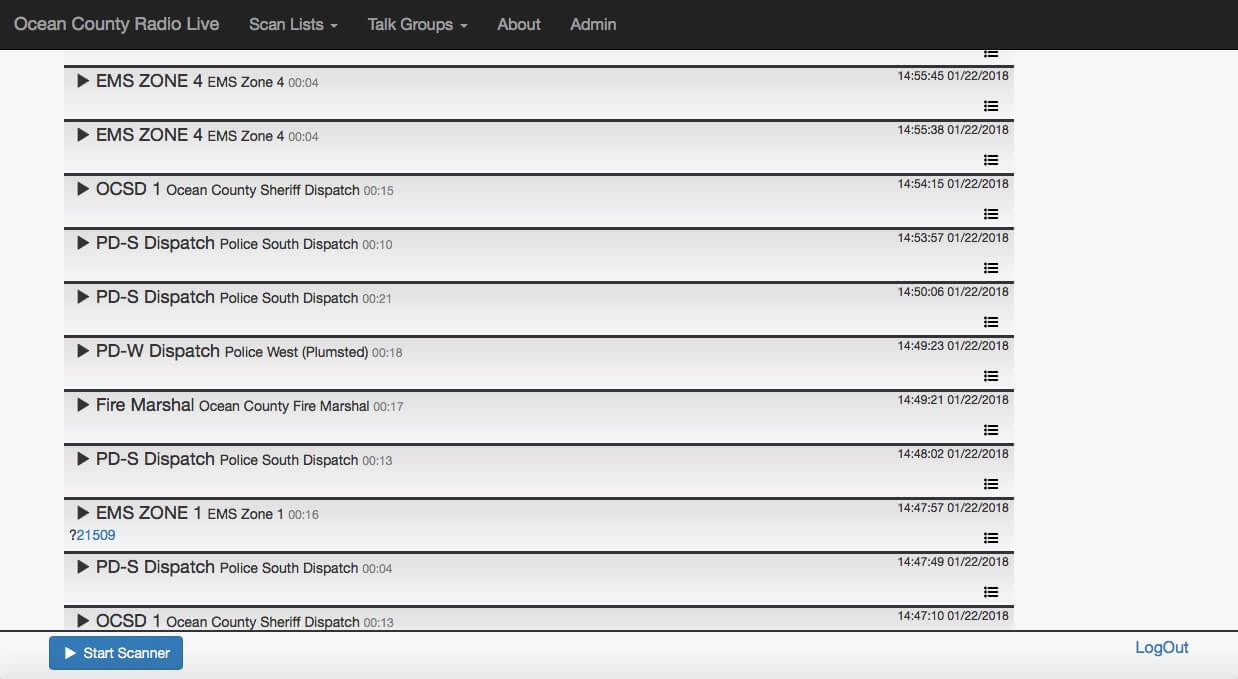
During the Cyberspectrum Wireless Village talks a few days ago Gavin Rozzi gave a talk about his online RTLSDR-based trunking scanner website at ocradio.live. Recently he wrote in and wanted to share a little more about his system. He writes:
[The talk focuses] on my experience implementing several open source software packages to create an online RTLSDR-based trunking scanner website, https://ocradio.live/ that serves the part of New Jersey that I live in. Using multiple RTLSDR receiving locations, the site is demodulating, recording, and timeshifting multiple talkgroups of local and state trunked radio systems to create a live streaming service and archive of past scanner calls. Data from the site is also accessible over a REST API and we allow the creation of custom scan lists. My presentation is going to center on the advantages the site has over traditional hardware scanners and some of the technical challenges that we had to overcome to get the project off the ground.

![[EN subs] HRPT over The Ocean - Ein Bild von Köln nach Kanada](https://www.rtl-sdr.com/wp-content/plugins/wp-youtube-lyte/lyteCache.php?origThumbUrl=https%3A%2F%2Fi.ytimg.com%2Fvi%2FhbvsSyplsDk%2F0.jpg)