Akos from the RTLSDR4Everyone blog has recently released two new posts. The first post is a tutorial on the set up and use of SDRUno. SDRUno is the official software of the SDRplay, but supports the RTL-SDR too, albeit with an artificial 0.96MSPS (1 MHz) sampling rate/bandwidth limit. The guide starts from the download of SDRUno, shows how to select the 0.96 MSPS sampling rate and goes over the interface and some of the features of the software.
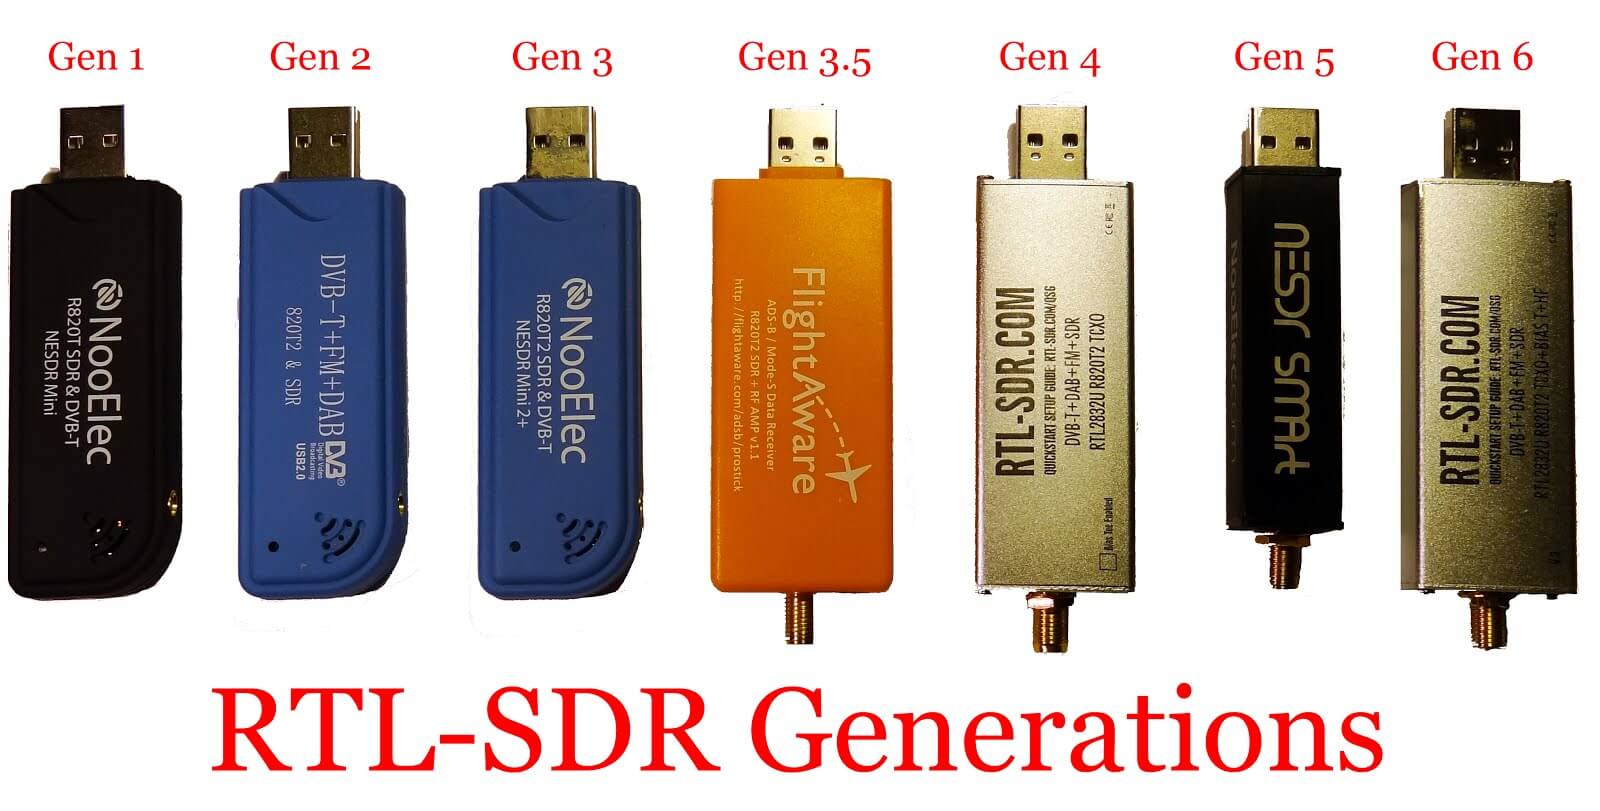
In his second post Akos discusses the topic of what he feels is the different generations of RTL-SDR dongles that we’ve seen come out over the years. He also speculates at what new features we might see coming in the future.
A panadapter is a device that connects to a standard hardware radio and allows you to visually see the RF signals on a waterfall. Since SDR’s run on the PC, they naturally have the ability to display a panadapter screen, and most software like SDR#, HDSDR and SDR-Console already provide this. The RTL-SDR can also be used to add panadapter capabilities to a regular hardware radio.
Gary Rondeau has been using the RTL-SDR as a panadapter for his IC-751A, which is a high quality ham radio transceiver. In his first post, Gary shows how he connected the RTL-SDR in a block diagram, and then shows how he interfaces the RTL-SDR and IC-751A together using HDSDR and the Omnirig software.
Block diagram showing the RTL-SDR as a Panadapter with the IC-751A and HDSDR.
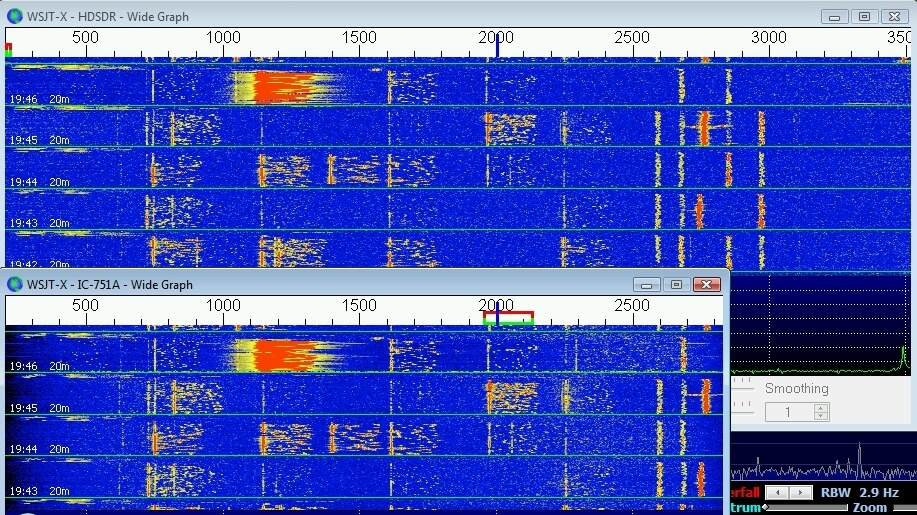
In his second post he shows a comparison between decoding JT65 and JT9 signals directly from the IC-751A audio output, vs via the RTL-SDR & HDSDR panadapter connection. His results show that as long as there is sufficient signal level, the RTL-SDR as a panadapter can match the performance of the raw IC-751A audio output, even producing less signal splatter on strong signals due to the pure numerical vs analogue mixing strategies of SDRs vs analogue radios.
RTL-SDR (top) vs raw audio from IC-751A below. RTL-SDR has a wider bandwidth, and less splatter at 2200 kHz when the strong signal came in.
Finally, in his third post he shows some more benefits of using the RTL-SDR as a panadapter, including rapid SSB tuning, RFI identification and signatures, helping work a pile up, monitor SSB net while working PSK on the parent radio, monitor the JT65 & JT9 band while working PSK – or vise versa and finally leave the radios on and monitor PSK, RTTY, JT65 & JT9 traffic for PSK Reporter.
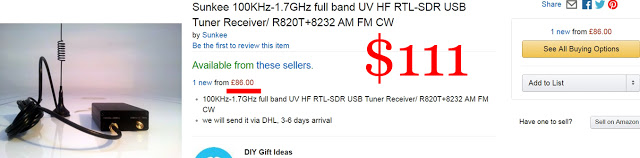
Akos from the rtlsdr4everyone blog has been busy uploading new posts over the past few days. His first post is part three in a series that discusses how to avoid ripoffs when buying RTL-SDR dongles. The RTL-SDR market has recently become quite saturated, and it is now easy to purchase something that most experienced users would consider a ripoff. His post shows some examples of what he considers to be poor value choices available on eBay.
An example of a ripoff price.
His second post discusses his methodology for testing dongles on their ADS-B performance. The second post then leads into the third post in which he compares four antennas on ADS-B reception. He compares two telescopic whip antennas, one set to 1/2 wave length, and the other set to 1/4 wave, a NooElec 5dBi whip antenna, and the FlightAware ADS-B antenna. His results show that the FlightAware antenna was the best performer, followed by the 1/2 wave telescopic whip, then the NooElec 5dBi whip and finally the 1/4 wave telescopic whip. The fourth post continues the ADS-B topic, and he reviews the NooElec 5dBi ADS-B antenna. Although the performance is not as good as the FlightAware antenna he mentions that it is much smaller and great for portable use. If you are interested, we have also a review of the FlightAware antenna, and we also found its performance to be excellent.
The four ADS-B antennas tested in Akos’ review.
In his fifth post Akos shows what his RTL-SDR travel kit consists of. In this post he recommends both our RTL-SDR V3 dongle as well as the NooElec SMArt. For a portable computer, he takes along a Raspberry Pi 3 and a 20,000 mAh battery bank with solar charger. (Though we’d be interested to hear from Akos how long it takes for that small solar panel to charge the battery bank, probably takes days to charge?) For antennas he prefers to take along our large 1.5m telescopic antenna, the NooElec 5dBi ADS-B antenna, a medium telescopic antenna and a Nagoya knock-off telescopic antenna.
Akos’ Mobile ADS-B Station.
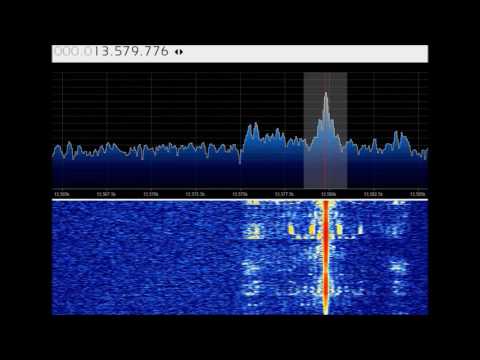
Finally in the sixth post he shows a video that compares the differences between a generic dongle modded with direct sampling (without any impedance matching circuitry), an RTL-SDR dongle with ham-it-up upconverter and an SDRplay. Unsurprisingly the upconverter and SDRplay performs best.
Direct sampling vs upconverter vs SDRPlay on shortwave broadcast stations - 16 mins
As a bonus, Akos also has done an interesting stress test on the metal case of our RTL-SDR dongles, where he runs it over with a bus to see if it will survive. The case is mangled afterwards, but the dongle and functionality survives!
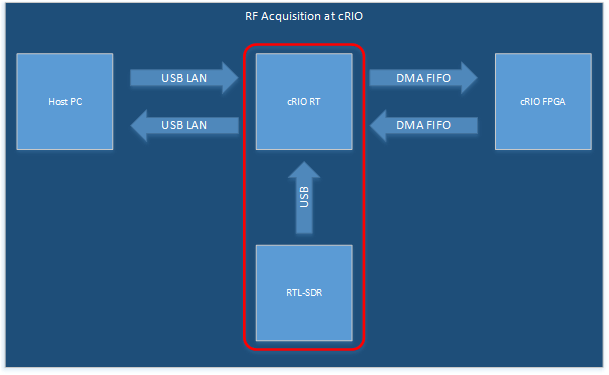
Back in August we posted how Albert Lederer had created a RTL-SDR interface for the LabVIEW visual programming language which could be run on a host PC. LabVIEW is a visual programming language which is used commonly by engineers and scientists to quickly build applications for things like product testing, system monitoring, instrument control etc.
In his latest post/tutorial uploaded a few days ago he shows how to run the RTL-SDR RF acquisition on a myRIO, which is a development processing board that can run Linux and has an on board FPGA. LabVIEW can then be used to control the RTL-SDR from the host PC.
The whole point of running the RTL-SDR on the myRIO is to eventually make use of the on board FPGA. In future posts he hopes to show us how to use the on board FPGA to offload digital signal processing (DSP) tasks, which would significantly speed up applications.
Data flow for offloading RTL-SDR DSP tasks onto the FPGA
ThumbSat is a company that aims to help experimenters design and launch experiments on their mini satellites (10x smaller than a regular cubesat with most of the same functionality) into orbit. They write that for about $20k they will fully design a satellite based experiment and launch it into orbit – all you need to do is provide the orbital experiment that you would like done.
To aide with the reception, they also have the ThumbNet project which aims to setup a network of satellite receivers around the world. They do this by providing school students around the world with low cost satellite receivers. The satellite receivers consist of modified/upgraded RTL-SDR dongles and satellite antennas.
Today the ThumbNet project announced the latest iteration of their RTL-SDR dongle, called the ThumbNet N3 SDR Receiver. This receiver has some interesting design changes when compared to any other dongle that we’ve seen so far. The biggest change appears to be that this dongle uses an external power port for power. They also replaced the 1.2V switching regulator with a 1.2V linear regulator for lower noise operation. This is useful because switching regulators can cause noise, whilst linear regulators are much cleaner. However, using a linear regulator increases the power consumption significantly, and the new dongle draws 450mA of current (vs 250-280 mA on standard or our V3 dongles), meaning that some USB ports may be unable to power the device unless the external power supply port is used.
The other interesting change is that they have changed the PCB form factor, and it can now fit into a common 1455 aluminum case. Also, similarly to our V3 RTL-SDR dongles, they have decided to add a common mode choke to the USB lines, which significantly reduces USB noise. To add ESD protection they also added a static bleed resistor. Finally, like their previous receivers they continue to use a F-type RF connector and a TCXO for frequency stability.
The price is $25.75 each plus flat rate global shipping of $4.50 and the receivers are expected to ship in mid-October. While we have not yet tested this model, it looks to be like a good receiver for those who need very low noise, or external power options.
They write:
The next Generation, ThumbNet N3 is designed from the ground up to be as simple to use as older generation dongles, but with powerful hardware features for advanced hobbyists and experimenters.
We removed all of the excess components that were sources of noise or interference in other dongles, and optimized the circuit for simplicity, sensitivity and selectability. Then we added a port to use a cable with the extremely common mini-USB connection so that the N3 is less prone to noise from the host computer than a traditional dongle. Finally, the use of standard Surface Mount 0603 or larger components makes it simple for testing or modification.
We built them for our own use, then decided to offer them to everyone.
A quick list of the features of the N3:
– Full backward compatibility with existing RTL-SDR dongles and software – High stability TCXO (+/-0.5ppm) (ensuring rock-solid stability from start-up and over a wide range of temperatures) – Standard R820T2 + RTL2832U (plus 24C02 EEPROM) chipset – Improved/enhanced decoupling. (Common-mode choke on USB port) – Low-noise, linear only power regulation (separate 1.2v and 3.3v regulators) – External DC (+5v, 450mA) supply connector – Mini-USB connection (allows easy separation of the RF unit from the noisy PC) – F type RF connector (very common and compatible with existing ThumbNet tracking stations) – Large (6x4cm) contiguous ground-plane (for better thermal dissipation) – Static drain-away resistor on the RF input (1K to ground) – All unnecessary parts (IR receiver, high-current LED etc.) eliminated to reduce parts count and noise – Circuit board can be mounted into a common 1455 case
Ideal for experimentation:
– Can be connected to an external power supply for very clean power – All of the important tracks are visible on the top side of the board for easy access – All of the RF parts are on the top of the board (only regulators and decouplers on the back) – Logical, simple layout using 0603 (or larger) SMT parts – IF port break in connector (between front end and IF/USB chip) provided
While not required for operation, the N3 receiver is designed to be able to utilize a clean source of power from an external 5v power supply, instead of using the noisy power line coming from the computer’s USB port. This gives a tremendous advantage to the purist or experimenter who wants to utilize power from the N3 to power any external experiments. (When the external power supply is active, no power is drawn from the USB port to power the N3.)
PLEASE NOTE: The N3 draws approximately 450mA of current and care should be taken, even when using a powered USB hub, as it could possibly exceed the current limit of the USB port.
The ThumbNet N3The ThumbNet N3 inside its optional 1455 aluminum enclosure.
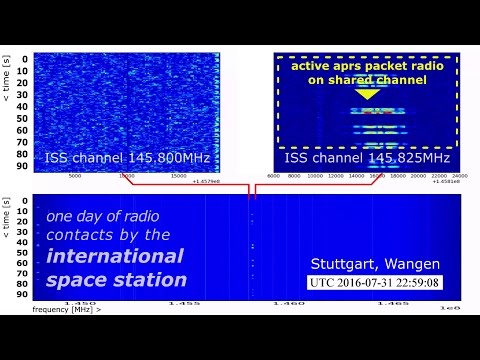
Over on hackaday.io there is a project blog for the “Distributed Ground Station Network”. This is essentially an idea to build a large network of distributed RF receivers which automatically receive signals from sources like cube satellites and other beacons. The project mainly uses RTL-SDR dongles at the moment for their RF receivers. In some ways it appears to be similar to the SatNOGs project which won the hackaday prize two years ago but the DGSN appears to be more focused on “reverse GPS” which allows the detection and tracking of the location of small satellite signals through distributed receivers.
They write:
The Distributed Ground Station Network (DGSN) is a novel network concept of small ground-stations and connected via the internet for performing automatic scans for cubesats and other beacon signals. By correlating the received signal with the precise, GNSS synchronized reception times of at least 5 ground stations, it enables the positioning of the signal’s origin. Thus a global tracking of small satellites becomes possible in this “reverse GPS” mode. It allows mission operators to position and track their small satellites faster after piggy-back commissioning, when the final orbit is yet undefined and could differ from the specified orbit. Furthermore it allows permanent communication in “data-dump” mode. In this mode, DGSN ground-stations relay the received data to the servers and thus to the operator. Let’s track everything, together!
The thing I like most is that I can replay past transmissions by clicking in the waterfall history. Using other SDR software, when a new transmission pops up, I feel like I’m in a race to tune to it before it ends so that I can at least hear some of it, but in my software, I don’t even have to pay attention to what’s happening now, and so I seldom do. Usually I don’t notice transmissions on new frequencies until they’ve ended, but I still get to listen to them.
I also put some effort into trying to make sure AM and FM transmissions were equal in volume, as well as at the correct volume according to how well they were modulated, in that I aimed for 100% modulation leading to audio output that’s 6 dB below the ceiling. It seemed as if it was quite random in other software, as switching from AM to FM might cause a huge jump or drop in audio volume. I don’t like to play with my volume controls, so I did my best to make it so that I don’t have to. I’m also not at all fond of the “click the numbers” method of changing the center frequency which seems to be so common. So in mine, I just type in the MHz on the number keypad and press enter.
I’m also much more fond of my waterfall coloring scheme than any other I’ve seen. It seems much smoother and more informative, at least to me anyway. I suppose that’s rather subjective.
…but it’s rather hard to compare it to other software given that I only got to use other software for two or three days. I rather soon knew I wanted to write my own, and I wanted to use the V4L2 API (that dvb_usb_rtl28xxu module you have to blacklist to use rtl-sdr is an SDR driver, not a video driver), but I had to upgrade to Linux Mint 18 to get access to it since it’s a new API, and after doing so, I haven’t been able to get any of the existing SDR software to both compile and work after it’s compiled. So I just focused on writing my own, since I was wanting to do so anyway. (No support for that V4L2 API though, as it turns out its buggy and offers no way to control the dongle’s gain, so it’s basically unusable.)
Akos from the RTLSDR4Everyone blog has recently uploaded a review of the FlightAware ADS-B ProStick RTL-SDR dongle. The FlightAware (FA) dongle is a standard RTL-SDR with SMA connector, but with a very low noise figure LNA built into the front end. This low noise figure helps improve the SNR of ADS-B signals, resulting in more decodes and further range. We previously reviewed the FlightAware dongle in our own review available here.
In his post Akos reviews the FA dongle on its use as a general RTL-SDR as well as an ADS-B receiver. His review is initially critical to some of the misinformed advertising claims made by FA. He then goes on to show some noise floor scans and some ADS-B reception comparisons. Finally he shows some modifications that can be made to improve the cooling of the PCB.
He concludes that the FA ProStick works very well on improving ADS-B performance, but that overloading due to the increased gain is common.