Using a KerberosSDR to Monitor Air Traffic Control Voice, ADS-B, ACARS & VDL2 Simultaneously on a Raspberry Pi 3B+

The KerberosSDR is our 4-channel phase coherent capable RTL-SDR unit that we previously crowdfunded back in 2018.  With a 4-channel phase coherent RTL-SDR interesting applications like radio direction finding, passive radar and beam forming become possible. KerberosSDR is currently available from the Othernet store and Hacker Warehouse for US$149.95.

Although the KerberosSDR was mostly created to help unlock projects requiring phase coherency, we've had interest from multiple users asking for information on how to use the KerberosSDR as a tool for monitoring multiple separate signals at once.

Doing this is actually very simple. If you ignore the extra circuitry to make the KerberosSDR phase coherent, the KerberosSDR is at it's core just 4 separate RTL-SDR dongles connected to a quality USB hub. So if you're not using our coherent demo software, then plugging a KerberosSDR into a PC or single board PC will result in four RTL-SDR dongles that can be accessed individually.

The tutorial below could also be done with four individual RTL-SDR dongles, but you would also want to have a reliable powered USB hub.

Example Aviation Radio Monitor

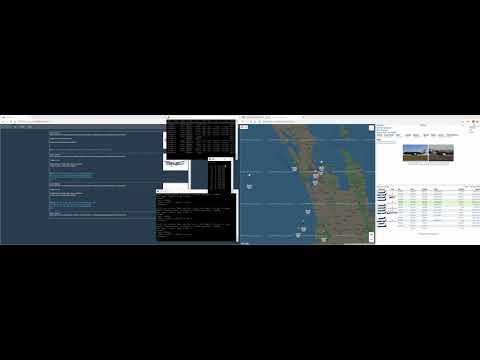
Below we show an example tutorial of how the KerberosSDR could be used as a 4-channel aviation monitor for monitoring air traffic control, ADS-B, ACARS and VDL2 simultaneously on a single Raspberry Pi 3B+. The video below shows a demo.

KerberosSDR Monitoring Air Traffic Control Voice, ADS-B, ACARS & VDL2 on a Raspberry Pi 3 B+

The first step is to simply burn the latest Raspbian Buster to an SD Card, and set up your WiFi wpa_supplicant file as you would on any standard Raspbian install. Also add a blank file called "SSH" or "SSH.txt" to the boot directly to enable an SSH connection. Alternatively you could set this up with a monitor. We used Raspbian Buster Lite, as we are not intending to use the desktop GUI.

Next use PuTTY or your preferred terminal software to connect to your Raspberry Pi via SSH. You may need to use your routers config software/page to find the IP address of the Raspberry Pi. The default SSH port is 22.

Finally, update the repos on your install before continuing with the software installation process.

sudo apt update
sudo apt install librtlsdr-dev rtl-sdr

KerberosSDR Hardware Setup

Here we connected a single quarterwave ground plane antenna tuned to the airband frequencies to three input ports on the KerberosSDR via a cheap RF TV splitter. The fourth antenna input was to a RadarBox ADS-B antenna.

The KerberosSDR and Raspberry Pi are powered via two official Raspberry Pi 5V plug packs, and the KerberosSDR is connected to the Pi via a single short high quality USB cable.

Setup Topology
Setup Topology

Installing RTL-Airband

RTLSDR-Airband is an efficient command line based scanner program for the RTL-SDR. It works by rapidly scanning over a set of frequencies and looking for active signals, and playing the active AM or FM transmission. When an active signal is found it can be configured to stream the audio to an Icecast server, record to a file, or to play directly to your speakers. Alternatively you can also configure it to stream multiple channels simultaneously. If set up to stream to an Icecast server you can listen to the scanned audio from any device on your network with an internet browser.

Here we will use RTL-Airband to scan the air traffic control voice bands which are used by air traffic controllers and pilots to communicate by voice with one another. The transmissions are in AM and are found between 118–136.975 MHz.

First install the pre-requisites, and then install RTL-Airband.

sudo apt-get install -y build-essential libmp3lame-dev libshout3-dev libconfig++-dev libraspberrypi-dev librtlsdr-dev

cd
wget -O RTLSDR-Airband-3.0.1.tar.gz https://github.com/szpajder/RTLSDR-Airband/archive/v3.0.1.tar.gz
tar xvfz RTLSDR-Airband-3.0.1.tar.gz
cd RTLSDR-Airband-3.0.1
make PLATFORM=rpiv2
sudo make install

Next install an Icecast server onto your Raspberry Pi. This will allow us to connect to the Pi via a web browser to listen in to the audio.

sudo apt-get install icecast2 -y

The install steps will ask you to input admin passwords of your choice, make sure you remember or write these down.

Now edit the rtl_airband.conf file with:

sudo nano /usr/local/etc/rtl_airband.conf

Paste in the configuration below making sure to set the actual frequencies used by air traffic control and airlines in your particular area by adding or removing frequencies from the "freqs" line.

Also be sure to set the "index" to whatever antenna input you have used (0 - 3) on your KerberosSDR for your VHF air band antenna. You may want to experiment with the gain value, but for now you can leave it as default.

If you are using another template for the config file, ensure that the "correction" value is set to 0 as the KerberosSDR uses a TCXO and requires no PPM correction.

Finally, don't forget to also set the Icecast server password that you set up in the previous step, making sure to leave the username as "source".

devices:
({
type = "rtlsdr";
index = 2;
gain = 32;
correction = 0;
mode = "scan";
channels:
(
{
freqs = ( 118.1, 118.7, 119.5 );
labels = ( "Tower A", "Tower B", "Tower Control");
outputs: (
{
type = "icecast";
server = "127.0.0.1";
port = 8000;
mountpoint = "stream.mp3";
name = "Airband Voice";
genre = "ATC";
description = "My local airport - aggregated feed";
username = "source";
password = "kerberos";
send_scan_freq_tags = false;
}
);
}
);
}
);

Next set up the Icecast server if required using the instructions here. If the default port and number of source is fine for you, you can leave everything as default.

Now to start RTL-Airband run:

sudo rtl_airband -f

To listen to the scanned audio, browse to http://RASPI_IP_ADDRESS:8000/stream.mp3 on any device connected to the same network

Installing dump1090

Leave the RTL-Airband PuTTy window open, and open a new instance of PuTTy and once again connect to the Raspberry Pi in a new session. We will install the FlightAware branch of dump1090, as this is the most up to date version. dump1090 allows you to track aircraft that are transmitted ADS-B.

sudo apt-get install build-essential debhelper librtlsdr-dev pkg-config dh-systemd libncurses5-dev libbladerf-dev
git clone https://github.com/flightaware/dump1090
cd dump1090
dpkg-buildpackage -b

Now we can run dump1090 with the following line. Make sure to set the "--device 3" flag to the antenna input that you have connected your ADS-B antenna to. In our case we connected it to the last SMA input which is input 3.

./dump1090 --device 3 --interactive --net

Now to view the data on a map, you can install Virtual Radar Server on any Windows PC on the same network. Once installed, add an "AVR or Beast Raw Feed" receiver, with the IP address of your Raspberry Pi and Port 30002.

Installing ACARSDeco2

Again, leave both PuTTy windows open, and open a new PuTTy SSH terminal and connect again. Here we'll install ACARSDeco2 which is a multiband ACARS decoder. ACARS is an acronym for Aircraft Communications Addressing and Reporting System which is a digital communications system that aircraft use to send and receive short messages to and from ground stations. Most messages are unreadable telemetry data intended for computers, but often you will see messages about weather, wind, dangerous cargo warnings, fuel loading information and more.

ACARSDeco2 is not an open source program, so you'll need to first download the compressed file from http://xdeco.org/?page_id=30 on a PC. Make sure to get the Raspberry Pi 2/3 version of ACARSdeco2 for Stretch.

Now use a program like WinSCP to transfer the .tgz file to the Raspberry Pi. In WinSCP select SCP as the file transfer protocol, log in with "pi/raspberry" and drag the file over to the Pi's home folder.

Then back on the Raspberry Pi, simply move the file into it's own folder, and extract the files.

mkdir acarsdeco2
mv acarsdeco2_rpi2-3_debian9_20181201.tgz acarsdeco2
cd acarsdeco2
tar -xvzf acarsdeco.tgz

Now you can run the program with the following command. Make sure to specify the ACARS frequencies used in your area if they are different. Also here we used antenna input 1 for the ACARS antenna and specified that with "--device-index 1". If you are running Virtual Radar Server on your Windows PC as explained in the dump1090 install, you can enter the Windows VRS server IP address, so that location data will be sent back to the ACARSdeco2 server.

./acarsdeco2 --device-index 1 --freq 131550000 --freq 131450000 --gain 34 --http-port 8081 --vrs-url http://192.168.86.36:8081

Now on your Windows PC, open a browser and open PI_IP_ADDR:8081 to view the incoming ACARS messages.

Installing dumpvdl2

Again, leave both PuTTy windows open, and open a new PuTTy SSH terminal and connect again. Here we will install dumpvdl2 which is a VDL2 decoder. VDL2 is a replacement for the aging ACARS system which is being phased out in some areas. In some areas VDL2 is now more common than ACARS, and in some areas it's the opposite.

First install pre-requisites.

sudo apt-get install build-essential cmake git libglib2.0-dev pkg-config librtlsdr-dev

Dumpvdl2 requires libacars to work, so install libacars first:

cd 
git clone https://github.com/szpajder/libacars 
cd libacars
mkdir build 
cd build 
cmake ../ 
make 
sudo make install 
sudo ldconfig

Finally, install dumpvdl2

cd
git clone https://github.com/szpajder/dumpvdl2.git
cd dumpvdl2
mkdir build
cd build
cmake ../
make
sudo make install

Now to run dumpvdl2:

dumpvdl2 --rtlsdr 2 --gain 35

dumpvdl2 has no webserver so it can only be viewed from the terminal window.

Alternative Tools

Stations in the USA could replace one program with dump978, which decodes UAT positional data from smaller aircraft. If you live near a glider range, a FLARM decoder could also be used. You could also run an AIS receiver if you live near a water way.

Further Steps

If setting this up as a permanent station, you might want to go ahead and create a startup script that runs these programs on boot. Then you won't need to open up PuTTy terminals to start all the programs. The easiest way to do this is to use the @reboot code in crontab to run your script. Be sure to use sudo crontab -e for running RTL-Airband as this requires root.

Increasing L-Band Active Patch SNR by using it as a Feed for a Satellite Dish

Recently RTL-SDR.COM reader Bert has been experimenting with our active L-band patch antenna product. He's written in to share that he's found that using it as a feed for a satellite dish works well to improve SNR on those weaker 10500 AERO signals which Bert found that he could not decode from his location due to insufficient SNR. Our active L-band patch antenna receives signals from 1525 - 1637 MHz and can be used for signals from Inmarsat, Iridium and GPS satellites.

To use the patch as a feed Bert used a 40mm drain pipe and mounted the antenna on the end of the pipe. The drain pipe fits perfectly into the LNB holder, and once mounted the distance and polarization rotation can easily be adjusted for best SNR. He also found that adding a secondary sub-reflector about 17x17cm in size helped to boost SNR by about 3-5 dB too.

Build steps to use the Active L-band Patch with a Satellite Dish

Bert has tested the active L-band patch as a feed on a 65cm satellite dish and a smaller 40cm dish, both with good results.

SNR Results
SNR Results

Measuring the Radiation Pattern of a Yagi Antenna with a NanoVNA

On Hackaday we've seen an interesting post about Jephthai who has used a NanoVNA to measure the radiation pattern of a home made Yagi antenna. He began by initially modelling the Yagi using the MMANA software package, then building the antenna and measuring the SWR.

However, SWR is only partial information and tells us nothing about the actual gain and directivity / radiation pattern of the antenna. The radiation pattern tells us in which direction the antenna receives and radiates power best from. For a Yagi, we would expect the best reception gain to come from the front, with much less gain on the sides and rear.

To set up the radiation pattern measurement, Jephthai connected the Yagi to the TX port of the NanoVNA via a long coax cable, and connected an omnidirectional whip antenna to the RX port of the NanoVNA. The NanoVNA and Yagi are separated by a reasonable distance of 18' to ensure that the far-field radiation pattern is measured instead of the near-field pattern. He then measures and collects the S21 reading over multiple rotations of the Yagi.

The data is then plotted revealing a two dimensional radiation pattern for the Yagi. As expected gain is highest in the front, and weaker on the sides and rear. Jephthai notes that the radiation pattern mostly matches what the MMANA antenna modelling software predicted too.

Jephthai's NanoVNA Radiation Pattern Measurement Setup

DSDPlusUI: A Graphical User Interface for DSD+

Over on Twitter Annunaki (@StupotSinders) has been teasing some screenshots of a GUI for DSD+ that he's been developing over the past few weeks. And now he has released the software which is called "DSDPlusUI". DSD+ is mostly command line based, so a GUI could be useful for newbies. The software can be downloaded from the DSDPlusUI groups.io page.

DSD+ (aka Digital Speech Decoder) is a free closed source program that is compatible with RTL-SDR and various other SDRs which is used to decoder digital speech protocols such as P25 P1, DMR, NXDN and more. DSD+ Fastlane is a paid upgrade which allows subscribers to receive the latest updates to the software early. 

DSD+ GUI by Annunaki

A Guide to the NanoVNA: Kindle eBook for $2.99

With the NanoVNA (and upcoming NanoVNA 2.0) being so affordable and readily available many budget focused RF enthusiasts and hams are now adding a tool to their arsenal that used to only be for the wealthy and commercial users. Vector Network Analyzers (VNAs) allow you to do things like make SWR measurements on antennas, characterize RF filters and detect coax cable faults, among other applications.

However, much like the RTL-SDR there is no one company or entity controlling the NanoVNA concept or development. The NanoVNA name now encompasses a mishmash of similar but slightly different hardware created by multiple manufacturers/community members, and multiple firmware and software developed by the community. This can be frustrating for some people as community developed products typically do not have full manuals and support that you would find in products from a larger commercial company. Instead some time to research and understand the product may be required.

Whilst almost plug and play, to use the NanoVNA you still need to understand what a VNA is, how to calibrate it, and how to read it's measurements. And in addition, for the NanoVNA in particular you'll want to know the differences in NanoVNA versions, how to update the firmware and where to find optional PC programs for it.

In order to help people new to VNAs and the NanoVNA, Christoph Schwarzler (OE1CGS) and Maximilian Schwarzler (OE1SML) have written a Kindle eBook called "A guide to the NanoVNA". The guide goes over what a VNA is and how it works, NanoVNA hardware versions and what to avoid, what accessories you might need, how to update the firmware, how to read the various charts, how to navigate the menus, how to calibrate and how to use NanoVNA PC software. The book also goes over some use cases for the NanoVNA, including creating a loading coil for a 40m short vertical antenna, creating a band pass filter, and checking for coax short circuit defects. At only US$2.99 it's a good way to get started with the NanoVNA.

Kindle Book "A Guide to the NanoVNA"

Airspy HF+ Discovery Wins the WRTH 2020 Best Value SDR Award

The World Radio TV Handbook (WRTH) is a directory book (or CD) of world radio stations on LW, MW, SW and VHF broadcast FM which is released yearly. Along with the directory, the WRTH authors often review the latest shortwave listening hardware including SDRs and give out awards to the best units. 

Last year the Airspy HF+ won the WRTH 2019 award for best value HF SDR, and this year the Airspy HF+ Discovery wins the 2020 award. The award comes with a glowing review in the magazine (the review is freely accessible) noting the HF+ Discoveries' "spectacular combination of performance and versatility" as well as it's affordable price point. 

World Radio TV Handbook (WRTH) Reviews the Airspy HF+ Discovery and awards it the 2020 "best value SDR" award.

SDRplay Updates: RSPdx Now Supported by SDR Console V3, RSPdx EXTIO Released

SDRplay have recently released an update regarding third party software support and availability of their latest RSPdx receiver. They write:

Happy new Year from all of us at SDRplay.

Here’s an update on additional software for the RSPdx. SDRplay’s SDRuno fully supports the RSPdx but it takes several weeks for other software to catch up to the capabilities offered on the other RSP models.

Simon Brown has released his latest version of SDR Console V3 which supports the RSPdx (Version 3.0.18 dated January 1st) over on https://www.sdr-radio.com/ (make sure you download the latest API 3.x from our downloads page first)

We have released an EXTIO plugin for the RSPdx which will enable the RSPdx to work with any EXTIO-based software (e.g. HDSDR) although it doesn’t support HDR mode. HDR mode will not be added and the source code for the plugin can be found on our GitHub repository (https://github.com/SDRplay/ExtIO_SDRplay) we will not be supporting the plugin source code or extending the plugins capabilities. They are all free to be modified.

It is important to note that the RSPdx ExtIO plugin does NOT, AND WILL NOT, support HDR mode. If you need HDR mode, then SDRuno is the best option. HDR mode requires the end application to work in a certain way and this is not something that can be controlled via the ExtIO protocol.

Work has also begun on supporting RSPdx for SoapySDR based applications such as Cubic SDR (again this won’t include HDR mode). A Gnu Radio source block for the RSPdx will follow.

We are working with Steve Andrew, author of the Software Analyser software programme (see https://www.sdrplay.com/spectrum-analyser/ ) to help get compatibility for the RSPdx – this is a slightly longer process so this will take several more weeks.

Regarding stocks of the RSPs, SDRplay and most of our resellers on www.sdrplay.com/distributors/ have plenty of stock of RSP1A and the RSPduo. However there continues to be a shortage of the RSPdx whereby many of the resellers have sold out of their first deliveries. SDRplay is queuing up their replacement orders on a first come, first served basis. We also have our own quantity planned in there to allow us to sell direct from our website. We still hope that by the end of January we will have supplied this second wave of RSPdx demand.

The RSPdx
The RSPdx

KiwiSDR Portal SDR.HU Now Requires a Ham Licence + OpenWebRX Development Discontinued

The KiwiSDR is a US$299 HF SDR that can monitor the entire 0 - 30 MHz band at once. It is designed to be web-based and shared, meaning that the KiwiSDR owner, or anyone that they've given access to can tune and listen to it via a web browser over the internet. 

OpenWebRX is code originally created by András Retzler and a modified version runs on the KiwiSDR devices. This code is what allows them to be accessed online by a browser and was popularized by it's use in the KiwiSDR. The original code can also be used by other compatible SDRs such as the RTL-SDR.

Recently András released news that he is discontinuing work on OpenWebRX due to interest in other projects, but it will remain on GitHub as open source code. András also notes that the security of OpenWebRX will soon be in question as it utilizes Python 2, which has been designated end of life on January 1 2020. In addition, if you've been following OpenWebRX since the beginning, you'll know that in the past OpenWebRX was involved in an legal/ethical issue over open source licencing with KiwiSDR. Although the problems with KiwiSDR were resolved amicably, Andras also references his frustrations with similar situations to do with his code being forked again and again. 

We note that maintenance and development of the KiwiSDR OpenWebRX code will continue as they are considered separate projects. Due to some confusion, we importantly reiterate that the KiwiSDR product is unaffected by OpenWebRX being discontinued. Although KiwiSDR is based on OpenWebRX they use their own custom branch of the software that is maintained by the KiwiSDR owners and not by András.

András also runs the popular sdr.hu OpenWebRX/KiwiSDR directory, which was/is considered the main directory for finding and accessing public KiwiSDR and other SDR devices running OpenWebRX. Recently the directory was restricted, and now can only be accessed by those with a ham radio callsign. It is unclear why this decision was made as sdr.hu was very popular with shortwave listeners and radio newbies who are typically not hams. But the sdr.hu FAQ notes "The purpose of the site is to serve amateur radio. I decided to restrict access to the receiver list in order to protect the site and its purpose in the long term."

Fortunately, over on his SWLing.com blog, Thomas has noted that there are still other KiwiSDR directories available such as https://ve3sun.com/KiwiSDR, http://kiwisdr.com/public and http://rx.linkfanel.net.

SDR.HU Requires a Login Now