Over on his YouTube channel, Rob VK8FOES has started a new video series about Iridium Satellite Decoding. Iridium is a constellation of low-earth orbiting satellites that provide voice and data services. Iridium was first decoded with low cost hardware by security researchers back in 2016 as mentioned in this previous post. Being unencrypted it is possible to intercept private text and voice communications.
Rob's video is part of a series, and so far only part one has been uploaded. The first video outlines the hardware and software requirements for Iridium decoding and demonstrates the gr-iridium software. An Airspy and RTL-SDR Blog Patch Antenna are used for the hardware, and the software runs on DragonOS.
Rob writes that in part two he will demonstrate the use of iridium-toolkit, which can be used to extract data and recordings from the Iridium data provided from gr-iridium.
A few days ago SDRSharp version 1920 was released. SDRSharp (SDR#) is a popular Windows program that is affiliated with Airspy SDR dongles, but is compatible with RTL-SDR and various other SDRs as well. The latest version gets rid of the relatively resource heavy Telerik UI library and replaces it with a much lighter weight library.
The author of SDR#, @lambdaprog, notes that v.1920 reduces memory usage by 85% and CPU utilization by 50%. The new version also improves scalability for high sample rates and number of spectrum slices and improves plugin compatibility. Several AOR brand SDRs are also now supported in v.1920.
On the note regarding improved plugin compatibility, we've noticed that in the v.1920 update the IF Average plugin has begun working again. The IF Average plugin is used for Hydrogen line radio astronomy experiments. In the past we had to use older versions of SDR# to make it work. We have updated our Hydrogen line tutorial to reflect this.
Check the latest, greatest, lightest and fastest SDR# release with many performance improvements, new native modern UI, improved plugin compatibility, and a state-of-the-art DSP for difficult signal scenarios.
Over several years Aaron (@cemaxecuter) has been working on DragonOS, a popular Linux distribution that comes preinstalled with many different programs for software defined radios. A Linux distribution like this takes the hassle out of having to figure out how to compile and install various SDR programs, some of which can be quite tricky to get running.
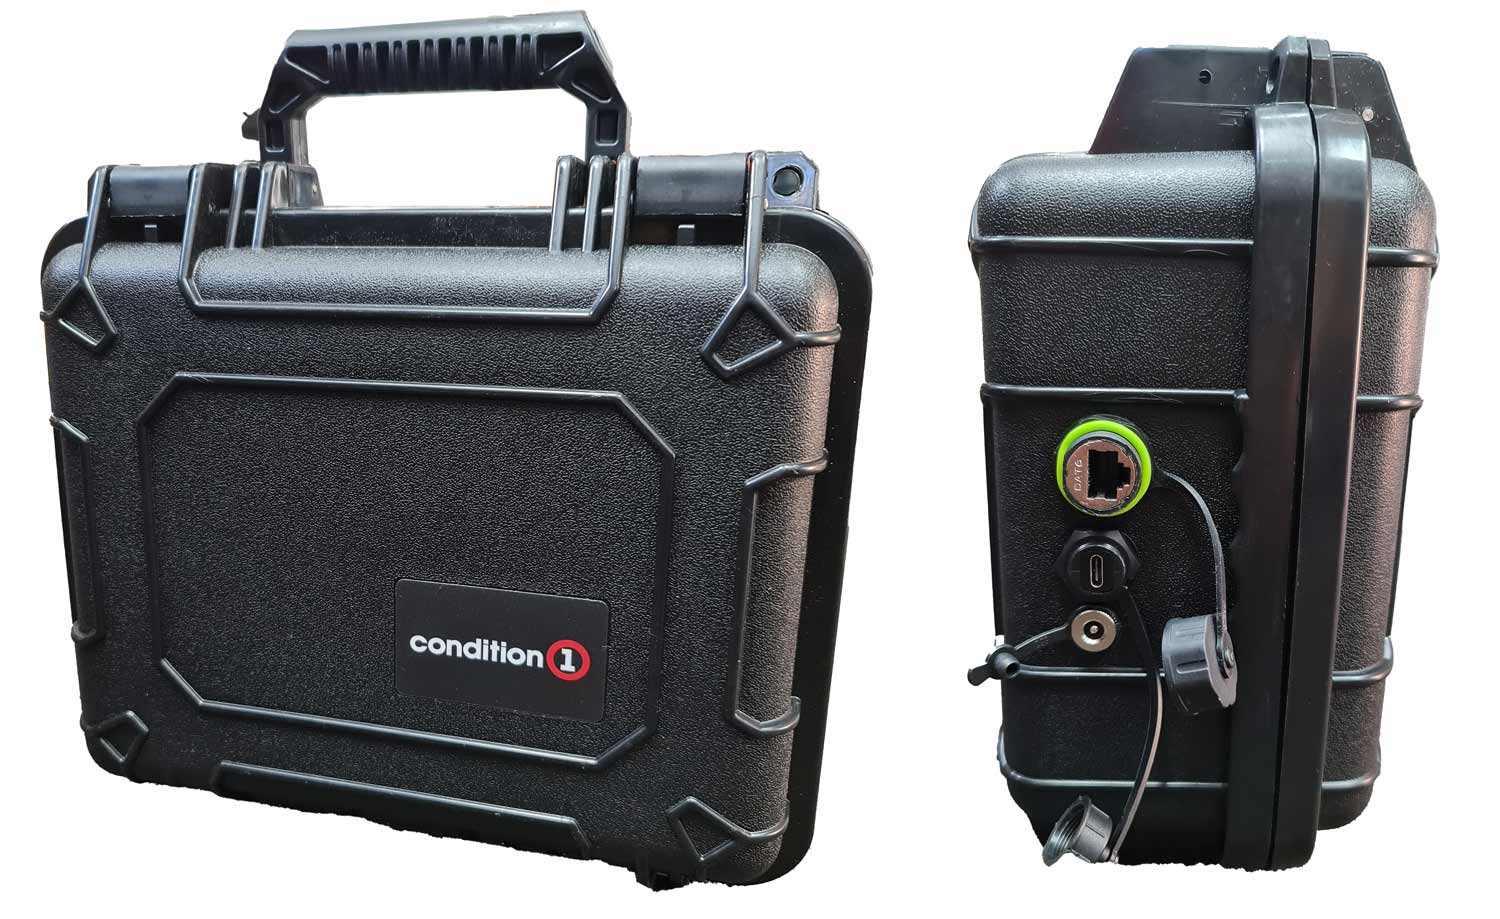
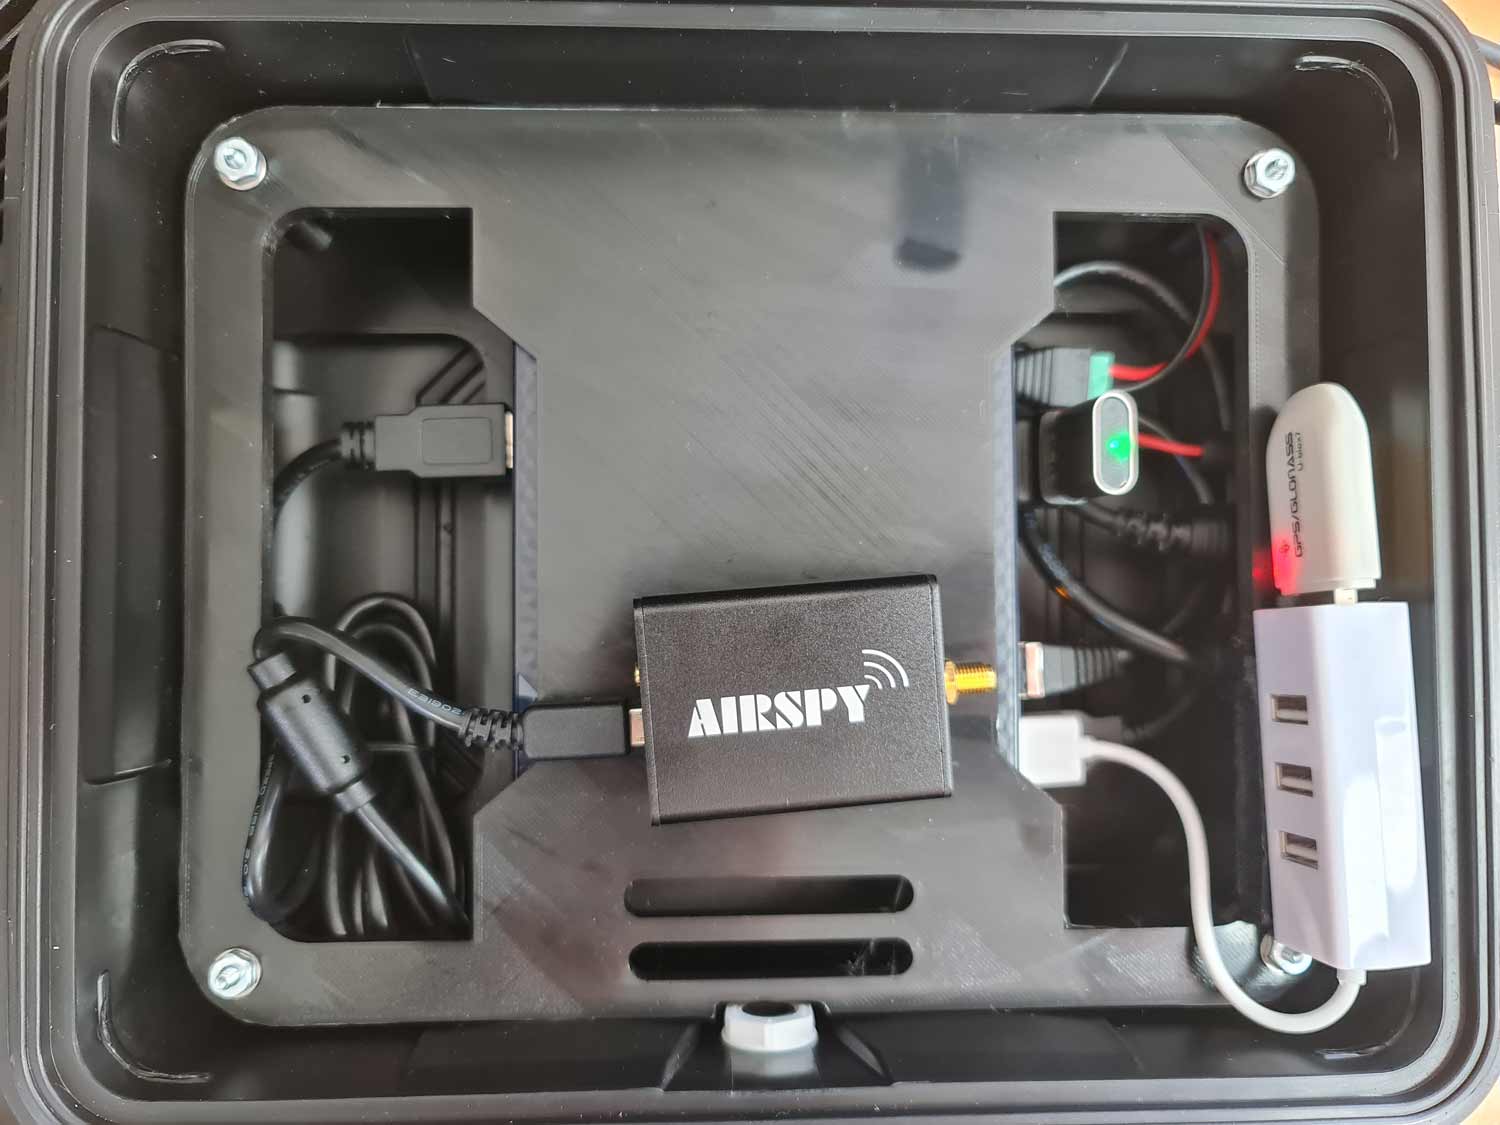
Recently Aaron has also been working on WarDragon, which is a set of components that he's carefully tested and put together as a ready-to-use portable SDR kit. At its core is an Airspy R2 software defined radio and x86 Mini PC that comes with DragonOS pre-installed. It also includes a USB hub and GPS dongle, as well as an HDMI dummy plug for enabling remote desktop. Everything is held together by a 3D printed frame, and enclosed in a plastic carry hard case, with the external Ethernet, USB-C, and power ports routed to the outside of the enclosure.
Aaron kindly sent us a WarDragon for an honest review. We note that we do not get to keep the WarDragon, and it will be forwarded to someone else after this review.
WarDragon Outer EnclosureInside WarDragon (Intel PC hidden underneath)WarDragon with an LCD screen connected
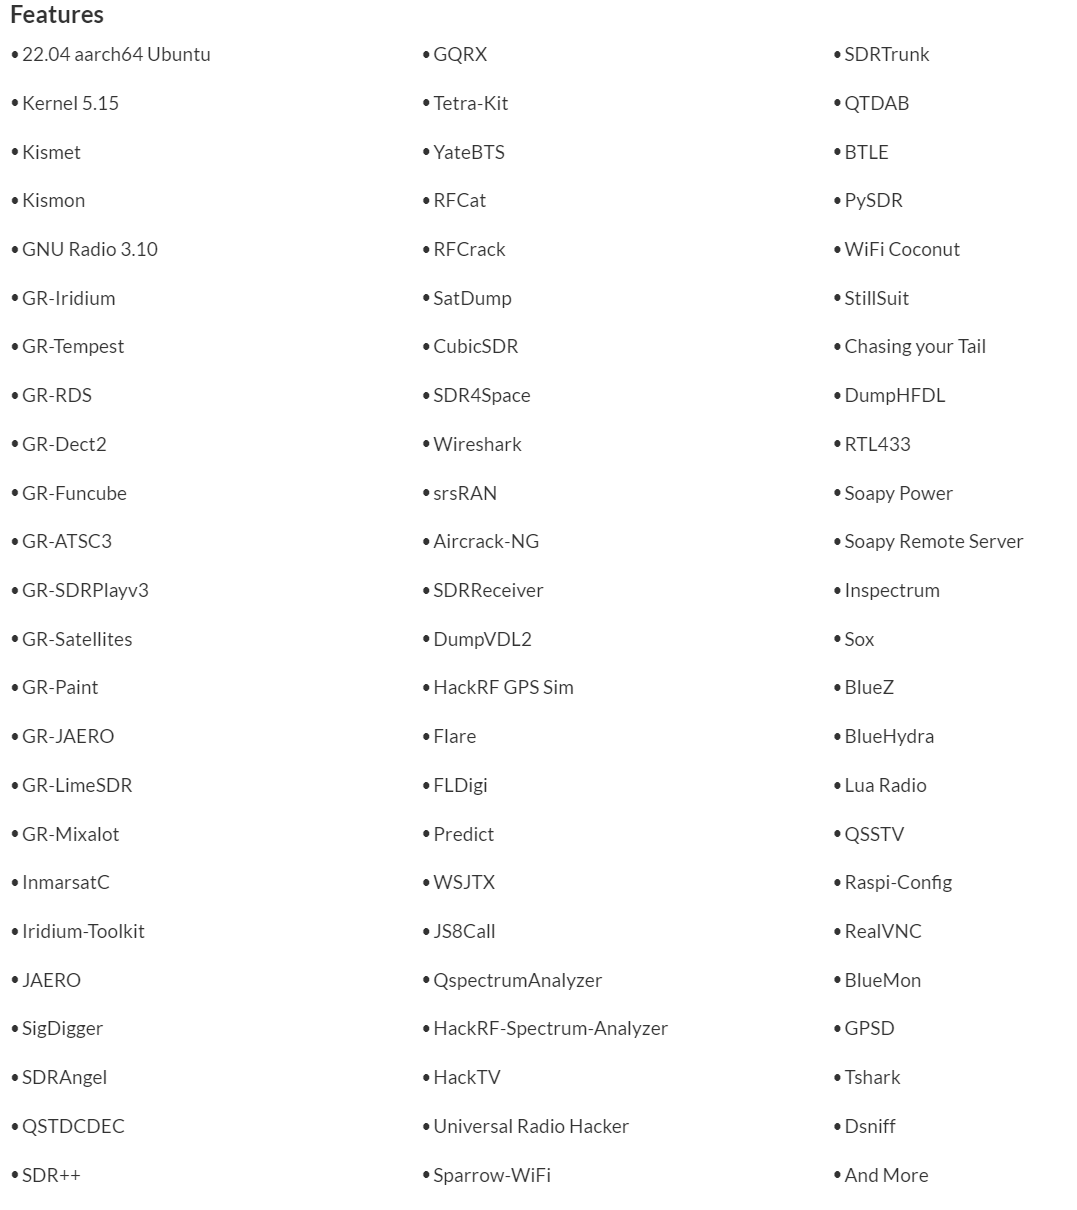
Getting started with WarDragon is simple. Open the hard-shell case, connect an antenna to the Airspy, remove the dummy HDMI plug, connect a monitor to the HDMI port and a keyboard/mouse to a USB port, connect 12V power, and start the mini PC. A few seconds later DragonOS has booted, and you can run any of the programs pre-installed. And there are certainly a lot of programs available to play with as shown below.
List of software pre-installed in DragonOS
To get started with running it remotely we followed the instructions on the desktop to install OpenSSH, and ran the Rustdesk appimage stored in the 'post install' folder on the desktop. This allowed us to connect remotely to the unit via Rustdesk, a remote desktop interface. From there we were able to run software like SDR++, GQRX, and anything else that was preinstalled.
Aaron notes that every WarDragon will come with a free license for SDR4Space which is a command-line SDR tool for satellites. It can be used for scripting various operations, such as "recording IQ samples, predicting satellite passes and to start a record for a specific satellite and correct doppler at the same time".
The KrakenSDR software is also pre-installed on WarDragon, so the Airspy can easily be swapped out for a KrakenSDR too (or almost any other SDR as well). You can also add extra RTL-SDR units on the USB hub if desired.
Once you're done simply unplug everything and put the HDMI dummy plug back in. Close the enclosure up and you're ready to get on the move again.
One minor concern we have is that while the components are contained with the 3D printed frame, the frame itself is not held down inside the enclosure, so it can move a little during transport. Not a big deal if you are sensible about carrying it, but if you are expecting to throw the box around, something could eventually go wrong. Aaron also notes in the instructions that care should be taken to not leave WarDragon exposed to direct sunlight or in a parked car to avoid the 3D printed insert from warping. This could probably be solved by printing in a material like ABS.
Performance
The mini-PC included with WarDragon runs a 12th Generation Intel Alder Lake - N95 that can turbo up to 3.4 GHz, has 8GB of RAM, and a 256GB SSD built-in. These specs are powerful enough that the system is very snappy, software opens quickly, and software runs smoothly, even at the max 10 MHz bandwidth the Airspy supports.
These x86 mini-PCs appear to be quite a bit more powerful than their similarly priced ARM counterparts, but they do draw more power. The mini-PC running SDR++ and Airspy at 10 MHz oscillates around 20-30W of power draw, whereas a Raspberry Pi 5 running SDR++ only draws 5W.
What We'd Like to See Improved
Because the carry case is fully sealed when closed, the mini PC inside cannot be run when the case is closed, as there would be no airflow for cooling. We'd like to see some thought put into adding an external fan, and indeed Aaron has noted that in future versions he will be adding this. However, adding a fan does come at the expense of water tightness but we don't imagine many people would be throwing this in a body of water. As long as rain resistance is kept it should be alright.
We'd also like to see the SMA port brought out to the side, so an external antenna can be connected with the enclosure closed.
We can also imagine that some users might like to see a more expensive version that comes with a small screen and keyboard/mouse as part of the combo too. Aaron does note that the most common use case for operating via SSH or remote desktop via a field laptop though.
Price Review / Value
The Wardragon consists of the following components:
Beelink Mini PC (N95 8G+256G) - US$159 on Amazon.
Airspy R2 - US$169 on iTead.
Condition 1 11" Carry Case - US$36.99 on condition1.com
Other parts (cables, USB hub, USB GPS, HDMI dummy plug, outside connectors, 3D printed frame) - $US35 (estimated)
SDR4Space License - $US???
So that's a total of US$400 in parts (not including shipping costs) plus a bit of value from the SDR4Space license which is usually obtained on an inquiry-only basis. WarDragon currently sells for US$580. So for the extra $180, you are paying for the time to preinstall of DragonOS, drill the external mounting holes, 3D print the mount, the build time, testing time, and the ability to get support directly from Aaron himself. And we can't forget to mention the time Aaron puts into creating YouTube videos for WarDragon.
Obviously, if you are on a tight budget it would make sense to try and build your own system. But overall we think WarDragon is not a bad deal if your time is worth more and you just want a portable system to get up and running with DragonOS ASAP.
The Airspy HF+ and HF+ Discovery are popular and affordable software defined radios that have a focus on excellent reception on the HF bands. Recently @lambdaprog, the creator of Airspy products has released updated firmware for the Airspy HF+ series of products. The announcement on X is shown below.
We're excited to bring you a special firmware update for the #Airspy HF+ series. This release delivers several key enhancements:
✅New, more robust USB streaming stack
✅Smoother and faster tuning
✅Enhanced AGC behavior
Airspy is holding their annual Black Friday sale, this year offering 20% off their range of products. The sale is active at all participating resellers, which includes our own store where we have the YouLoop on sale for US$31.96 including free shipping to most countries in the world, instead of the usual US$39.95. Please note that due to EU VAT collection laws, EU customers must purchase the discounted YouLoop from our eBay or Aliexpress stores.
The YouLoop is a low cost passive loop antenna for HF and VHF. It is based on the Möbius loop design which results in a high degree of noise cancelling. However the main drawback is that it is a non-resonant design, which means that it works best when used with ultra sensitive receivers like the Airspy HF+ Discovery.
Back in 2020 we released a tutorial about how to use a 2.4 GHz WiFi Grid Dish antenna as a radio telescope which can detect and measure the Hydrogen line emissions in our Milky Way galaxy.
Recently matt from the TechMinds channel has uploaded a video showing this same project but using the NooElec mesh antenna that has been slightly modified for improved performance on 1.7G and 1.4G.
In his video Matt sets up a drift sky scan, where the rotation of the earth drifts the Milky Way through the beamwidth of the dish. Matt uses Stellarium to virtually visualize the live sky map, SDR# and the IF average plugin to average the spectrum, and an Airspy software defined radio.
Thank you to RTL-SDR.com reader André for submitting and sharing with us his QO-100 ground station setup. The setup also includes antennas and equipment to receive HF and VHF/UHF. His setup can serve as an example of a well set up permanent installation.
André's set up consists of a 1.8 meter prime focus dish, Raspberry Pi 4, GPIO connected relay, Airspy R2, Ham-it-up upconverter, coaxial relay for switching between Mini-Whip and Discone Antenna, and FM bandstop filter and a power terminal rail block. The Airspy R2 is used for HF/UHF/UHF reception and the antennas and upconverter are all controlled via a web connected relay system. All equipment is enclosed in an outdoor rated box, and André notes everything has been working well from temperatures range from -10C to 35C.
Inside the satellite dish feed is housed an Adalm Pluto SDR, and a wideband LNA and a USB to LAN converter with power over Ethernet. A small log periodic Yagi serves as the feed. In order to work the wideband DATV band on Qo-100, André' swaps out this feed for a custom feed and brings the PlutoSDR indoors where it is connected to a 120W Spectran Amplifier and modulator.
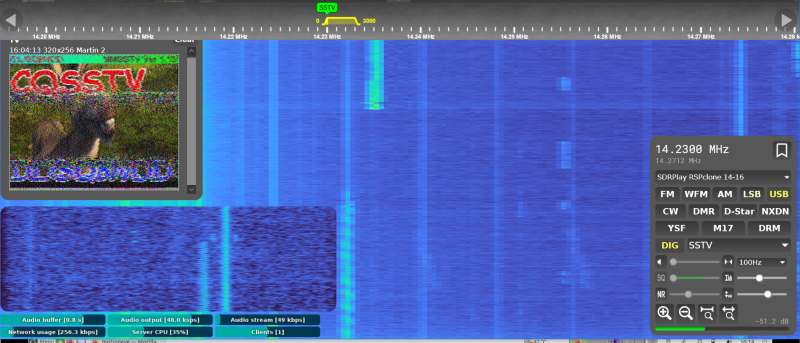
Back in March of this year we posted about an OpenWebRX fork called OpenWebRX+, which adds multiple built-in and ready to use decoders such as SSTV, AIS, CW and RTTY. OpenWebRX+ is a fork of the OpenWebRX project which is now officially maintained by DD5JFK.
Since our last post OpenWebRX+ has progressed in development further, and now includes a HFDL decoder via dumphfdl, various ISM band equipment decoders via rtl_433, FLEX pager decoding via multimon-ng, and a SELCALL decoder has also been added. Many other improvements and changes to the software have also been added, and the full changelog can be viewed here.
OpenWebRX+ is software for Linux. If you want to install OpenWebRX+, an easy path is to use the ready to use Raspberry Pi 4 image available on the releases page, or to use their PPA.
SSTV Image received by the luarvique fork of OpenWebRX. Credit: Neil Howard