Tagged: rtl2832

OpenEar: An Easy to Use Windows TETRA Voice Decoder

A new TETRA voice decoder called "OpenEar" has just been released. The program is a standalone Windows app that directly connects to an RTL-SDR. Decoding a TETRA voice signal is as simple as opening the program, tuning to the TETRA frequency and clicking on the signal. With good signal strength voice comes through very clearly. CPU usage on our PC is also minimal. 

The program source is currently not available as the author notes that he only intends to release it as open source in the future once the project is completed, and right now this is only the first early release. Right now the program is just an .exe with a few .dlls. You'll need to first install the Microsoft Visual C++ Redistributable Package linked in the Git readme. Just in case, we virus scanned the exe and tested the program in Sandboxie. It appears to be clean, and it works as intended.

In the future the author hopes to support many more protocols such as DMR, MPT1327, ACARS, AIR, GSM and more. In order to support his work he is asking for Bitcoin donations, and the donations link can be found on the Git readme.

UPDATE 1: If you're getting missing dll errors and you already installed the Visual C++ Redistributable, try downloading the missing dll's from dll-files.com. There should only be about 5 missing.

UPDATE 2: As pointed out in the comments by Steve M. from Osmocom, this software may be in violation of several GPL licences as no source code has been released and it appears to rely on GPL code and libraries. Please take this into account.

UPDATE 3: As per update 2, the author has decided to temporarily disable the TETRA functionality pending a rewrite of the code that he will complete within one to two months). Instead he has added DMR decoding.
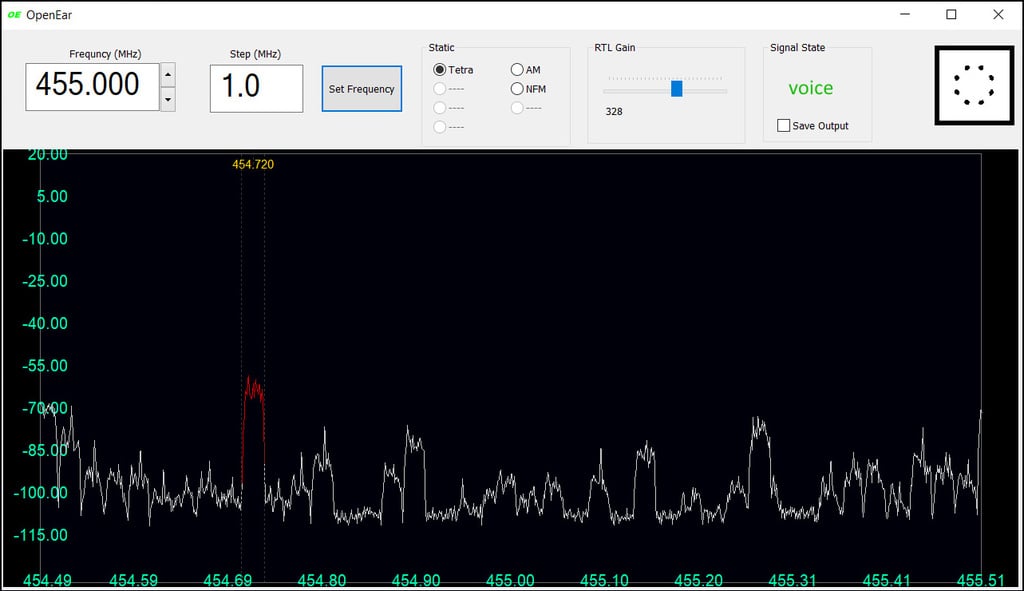
OpenEar TETRA Voice Decoder Screenshot

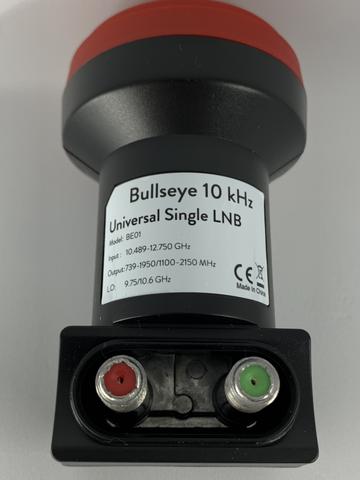
The Othernet Bullseye TCXO LNB for QO-100 Reception

Othernet have recently released their new "Bullseye" 10 kHz Ultra High Stability Universal LNB. It is currently on sale and available for US$39.95 + shipping on their store.

The LNB is designed for receiving QO-100 which is a popular geostationary amateur radio satellite positioned at 25.5°E which covers Africa, Europe, the Middle East, India, eastern Brazil and the west half of Russia/Asia. In the past we've seen several posts about people using RTL-SDRs to set up ground station monitors for this satellite, as well as special WebSDR software designed for QO-100 monitoring.

Typically an LNB with small satellite dish is used to receive QO-100 which downlinks at 10.489550 GHz. These LNB's have a built in LNA, and downconvert the signal into a frequency range receivable by an RTL-SDR. One problem is that most commercial LNBs were intended for satellite TV reception, and hence they do not need to use a very stable local oscillator. So reception of the narrowband signals on QO-100 can become a challenge if they are continuously drifting in frequency as temperature changes.

Othernet's new Bullsye LNB uses a 2PPM TCXO as the local oscillator which gives it high stability in the face of changing temperatures. To power it you'll need a bias tee or LNB power source capable of injecting 13 - 18v onto the coax line. The product description reads:

The Bullseye LNB is the world's most precise and stable Ku-band down converter. Even a VSAT LNBF costing hundreds of dollars more is no match for the performance of the Bullseye 10K LNB. Each unit is calibrated at the factory to within 1 kHz of absolute precision against a GPS-locked spectrum analyzer. As a bonus feature, the Bullseye 10K provides access to its internal 25 MHz TCXO through the secondary F-connector. This reference output can be used to directly monitor the performance of the TCXO over time.

  • Bullseye 10 kHz BE01
  • Phase locked loop with 2 PPM TCXO
  • Factory calibration within 1 kHz utilizing GPS-locked spectrum analyzers
  • Ultra high precision PLL employing proprietary frequency control system (patent pending)
  • Digitally controlled carrier offset with optional programmer
  • 25 MHz output reference available on secondary F-connector (red)
     
  • Input frequency: 10489 - 12750 MHz
  • LO frequency 9750/10600 MHz
  • LO frequency stability at 23C: +/- 10 kHz
  • LO frequency stability -20 - 60C: +/- 30 kHz
  • Gain: 50 - 66 dB
  • Output frequency: 739 - 1950 MHz (low band) and 1100 - 2150 (high band)
  • Return loss of 8 dB (739 - 1950 MHz) and 10 dB (1100 - 2150 MHz)
  • Noise figure: 0.5 dB

Over on his blog @F4DAV has uploaded a comprehensive review of the Othernet LNB which goes over the specs, construction and testing of the LNB. The review is an excellent read and he concludes with the statement:

As far as I know the BE01 is the first affordable mass-produced Ku-band TCXO LNB. Specifications are not entirely clear but these early tests suggest that it can be a game changer for amateur radio and other narrowband applications in the 10 GHz band. The stability and ability to recalibrate should allow even unsophisticated analog stations to tune to a 5 kHz channel and remain there for hours at a time. For SDR stations with beacon-based frequency correction, the absolute accuracy removes the need to oversample by several hundred kHz or to scan for the initial frequency offset.

The Othernet Bulleye High Stability LNB
The Othernet Bullseye High Stability LNB

YouTube Tutorial on Receiving Weather Images from NOAA Satellites

Over on YouTube the "Ham Radio Crash Course" channel has uploaded a new video showing how to receive APT images from NOAA weather satellites. There are many tutorials (such as ours here) and videos on this topic already, but more cannot hurt, and this one makes specific reference to how to download the WXtoIMG software now that the official website has been abandoned.

In the tutorial he uses an SDRplay with SDRuno as the receiver software, VBCable as the audio piping software, and WXtoIMG as the decoding software.

How To Receive Images Directly From NOAA Satellites

A Seminar on Setting up and Understanding a SatNOGS Satellite Ground Station

At the 2019 TAPR Digital Communications Conference (DCC), Corey Shields (KB9JHU) and Dan White (AD0CQ) presented a comprehensive guide on setting up your own SatNOGS satellite ground receiver station. The video of the presentation has just recently been uploaded to YouTube by Ham Radio 2.0.

SatNOGS is an open source project that aims to make it easy for volunteers to build and run satellite ground stations (typically based on RTL-SDR and Raspberry Pi hardware) that automatically receive RF satellite data, and automatically upload that data to the internet for public access. This is very useful for low budget cubesats launched by schools and small organizations who don't have the resources to run a worldwide satellite ground station network. Without global ground stations the majority of data and telemetry collected by the satellite could be lost as it would only pass over the owners ground station once or twice a day with limited time and bandwidth to downlink data. SatNOGS volunteers with distributed ground stations placed all over the world provide a free solution for this problem. 

Setting up a SatNOGS station and understanding the data coming down can be a pretty involved project, so Corey and Dan's 3.5 hr presentation gently guides us through the steps required. The guide focuses most on the software side, and does not include information about building their open source Yagi antenna rotator which can be used to receive satellites with lower power weak signals. Instead they focus on using a simpler fixed QFH antenna which is still capable of receiving data from a majority of satellites.

Learn to build and operate your own SatNOGS ground station. The Sunday Seminar is somewhat like the "anchor" topic of the entire weekend of the TAPR Digital Communications Conference. In 2019 we had the privilege of hearing from Corey, KB9JHU and Dan AD0CQ from the SatNOGS Team and they are going to give us, in detail, instructions for setting up a home satellite station.

(2:38) Intro
(7:46) Section 1: Satellite Building 101
(1:14:50) Section 2: Using SatNOGS
(2:19:55) Section 3: API and Contributing
(2:51:55) Section 4: RF Stack and Decoders

SatNOGS Ground Station Building Guide from TAPR DCC 2019

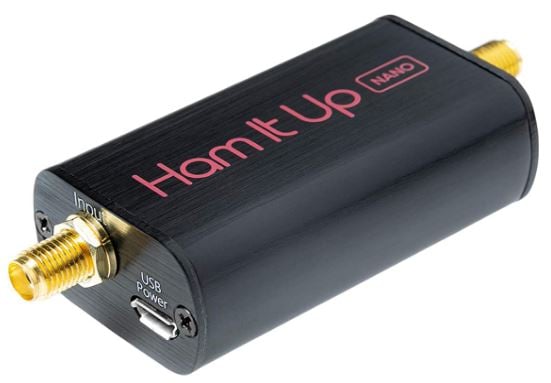
NooElec Releases the Ham-It-Up Nano HF Upconverter

Today NooElec have released a new product called the "Ham-it-up Nano" for US$49.95 on their store and Amazon. The original Ham-it-up is an HF upconverter that enables reception of the HF bands with SDRs that do not natively support HF. Upconverters work by shifting these low HF frequencies "up" into a range receivable by most VHF/UHF capable SDRs.

The new nano version is much smaller than the original design and about $15 cheaper if you compare against the version with metal case. The nano can also be powered directly via bias tee capable SDRs, so no external power source is required. Compared to the original version the nano misses out on the pass through switch and bonus noise source circuit.

The Ham-it-up Nano probably most directly competes with the SpyVerter from Airspy, which is another small form factor and bias tee powered upconverter for US$49.00. Spec-wise, the SpyVerter appears to remain superior with better LF/VLF support, less conversion loss and it's ability to use a 10 MHz external reference clock for advanced users. But the Ham-It-Up Nano is designed and made in the USA vs designed in France and made in China for the SpyVerter. The nano may also be a little cheaper and faster in terms of shipping to obtain via Amazon.

Below is a table comparing the advertised specifications with specs taken from the Ham-it-up Nano datasheet and SpyVerter sales page. Overall, most HF dabblers probably won't notice a major difference between the two unless you are truly setting up HF DX antennas. And as always our advice is if you are heavily interested in HF and DX, then it may be wiser to spend a little more and get yourself an Airspy HF+ Discovery (US$169) or an SDRplay RSP1A (US$109) or RSPdx (US$199.95) instead of an RTL-SDR + upconverter (US$20 + US$50 = $70).

Spec Ham-It-Up Nano SpyVerter
Frequency Range 100 kHz - 65 MHz 1 kHz - 60 MHz
Conversion Loss 10dB (typ) 5.2 dB (typ)
LO Frequency 125 MHz 120 MHz
IIP3 Not Specified 35 dBm
Max Input Power 1 dBm 10 dBm
Operating Voltage 4 V - 5.5 V 4.2 V - 5.5 V
Current Consumption 65 mA (typ) 10 mA (typ)
Power Methods Bias Tee, microUSB, Pin Header Bias Tee, microUSB
LO Stability 0.5 PPM 0.5 PPM
10 MHz External LO Capable? No Yes
Input Return Loss -10 dB (max) -10 dB (max)
Output Return Loss -10 dB (max) -10 dB (max)
Phase Noise @ 10kHz Not Specified -122 dBc/Hz
Dimensions 2.0" x 1.2" x 0.75" (50 x 30 x 18mm) 2.1" x 1.6" x 1" (53 x 40 x 25 mm)
Weight 45g 108g
Design & Manufacture Country Designed and Made USA & Canada Designed in France, Made in China
Price US$49.95 + shipping (free US shipping on Amazon) US$49.00 + shipping (~US$5 to US, or US$10 via US reseller)
The Ham-it-up Nano
The Ham-it-up Nano

Thesis on Locating Transmitters with TDoA and RTL-SDRs

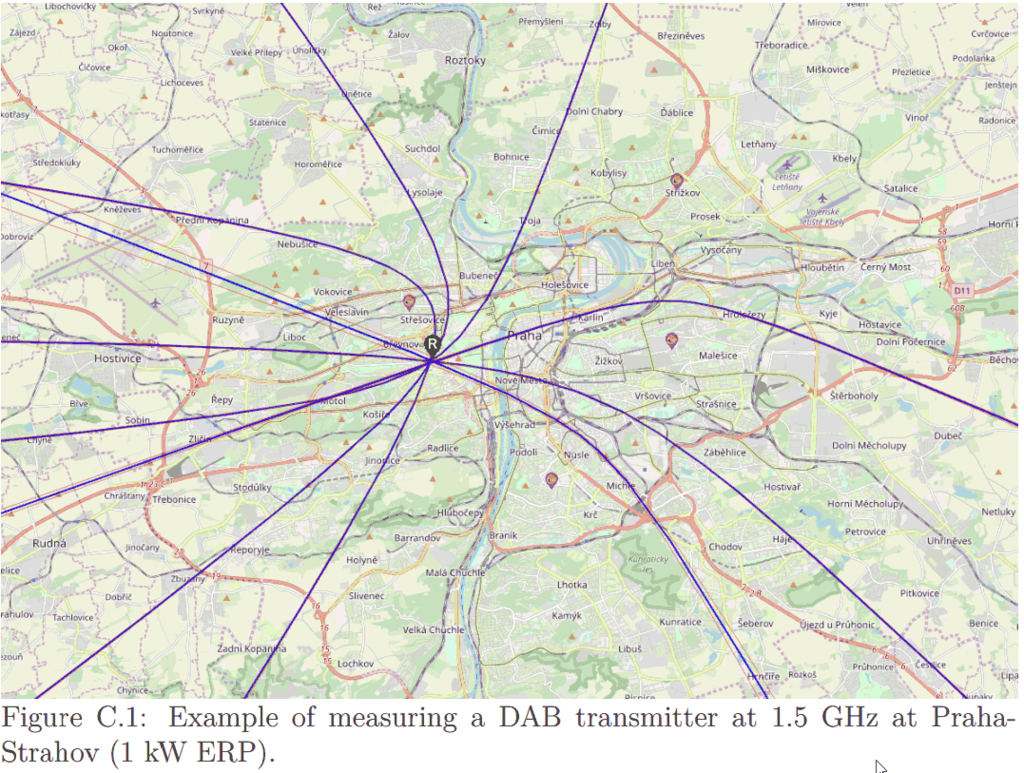
Jan Hrach of the Faculty of Mathematics and Physics at Univerzita Karlova in the Czech Republic recently defended his Masters thesis titled "Passive emitter tracking". The main theme of the thesis was the use of RTL-SDRs for tracking transmitters via the Time Difference of Arrival (TDoA) technique. TDoA works by having multiple receivers spread out over a region. As long as the receivers are synchronized in time, we can calculate the difference in time that a signal took to arrive at each receiver, which allows us to pinpoint the location of a transmitter. The challenge is in the timing synchronization, and receiver placement. The thesis abstract reads:

We have implemented a TDOA multilateration of transmitters on an unmodified rtl-sdr receiver using transmitters with known location as a timing reference. We present a brief theoretical background and describe the measurement process which includes several approaches that correct the timing and frequency errors between the receivers. Additionally, we have implemented an angle of arrival direction finder using coherent rtl-sdr.

The thesis and associated code is available on the universities website at this link and it is written in English. Jan also does have a presentation available on YouTube, however it is presented in Czech and automated subtitles do not appear to be available. The video and results section of the thesis shows some good results that indicate that transmitters were able to be pinpointed with very good accuracy, however, localization only worked well on signals with good cross-correlation properties, like DVB-T. Only about half the tested broadcast FM stations could be located due to interference, FM being low bandwidth and FM being transmitted at lower frequencies which suffer from reflections and multipath all of which result in poorer correlation.

TDoA results achieved with RTL-SDRs distributed around Prague.

Combining Android Tasker and an RTL-SDR for Mobile Automated Frequency Power Scans

Over on YouTube Ian Grody has uploaded two videos demonstrating an early alpha project that he is working on which combines Android Tasker with RTL-SDR frequency scanning. Tasker is an Android automation app which allows users to define a task based on a context. For example, you could set it to turn on WiFi and open an app (task) every time you arrive at a certain location (context).

Ian's idea is to create a Tasker application that performs an rtl_power scan with the RTL-SDR whenever a certain context is detected. The current version of his Tasker app can perform an rtl_power scan over a certain frequency range at the tap of a button, detect the strongest frequencies in that range, and plot a marker at the current location on a Google map which displays the strongest frequency detected at that location. He eventually hopes to turn the application into a wardriving application that will scan 27 MHz - 1.7 GHz for active signals while on the move.

His Tasker alpha application is available via the link on his Reddit post.

Tasker and a Software Defined Radio

Tasker and an RTL SDR - Part II

IGate2: An RTL-SDR Compatible APRS iGate for Android

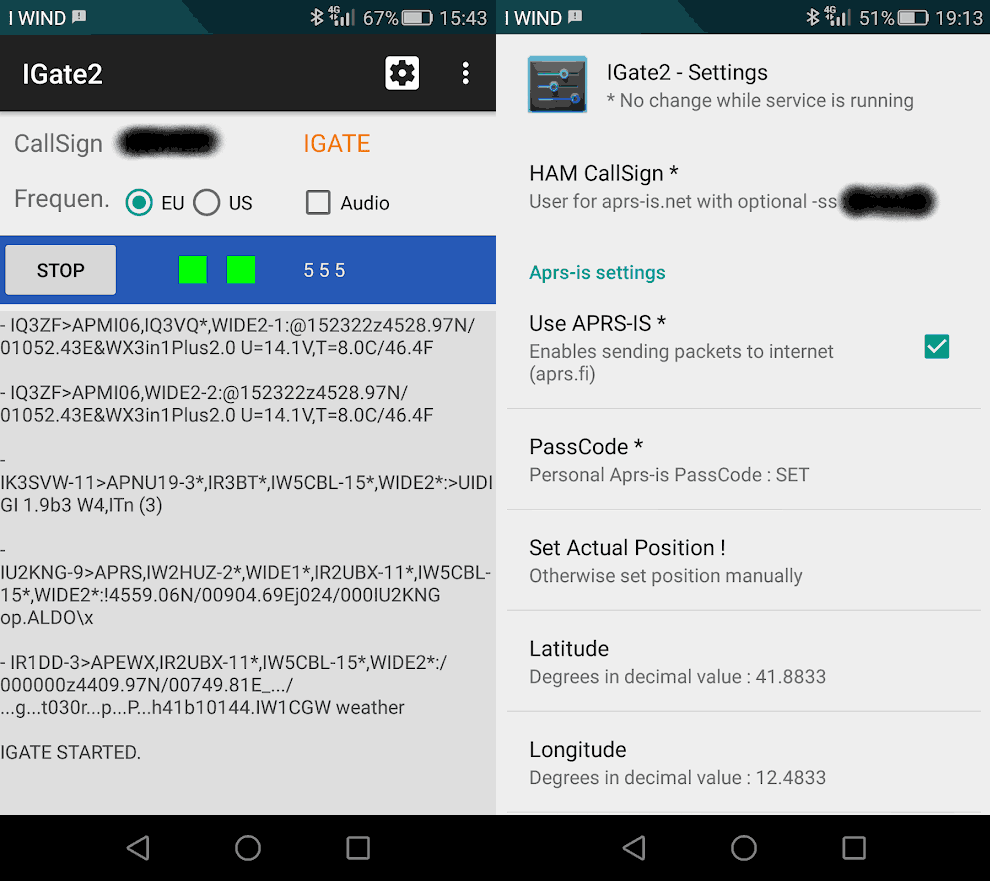
Thank you to Agrosi Luciano for submitting news about his new RTL-SDR compatible Android App called "IGate2". IGate2 is a receive only APRS IGate written for Android devices. There is a free and paid version of the app. The free version is limited to 100 packets forwarded per session. The paid version costs US$3.49 and has unlimited packet forwards. The description of the app is pasted below:

The RTL-SDR dongle tuner (cost starting from 10 €) and its antenna, receives the information contained in APRS packets transmitted from HAM radio stations, and then a phone device, with IGate2, forwards them to the world wide web using its internet connection (WiFi or 3G).

IGate2 acts as a Software Defined Radio Demodulator, a TNC Modem and an Internet Gate.

It needs the installation of a driver (Martin Marinov’s driver) for the SDR dongle that you can find in: https://play.google.com/store/apps/developer?id=Martin+Marinov.

If you already own an unused cellular phone or tablet, IGate2 represents a very cheap, compact and easy-to-use solution for suppling an IGATE service to radio amateur community.

Raw data contained in radio packets are visible on the phone screen and may be routed (if you check this option) to the APRS-IS network. All data convoyed and shared in APRS-IS network can be seen in maps and bulletins on particular websites, for example: http://aprs.fi/ .

To be authorized to send data to APRS-IS you must have a HAM CallSign and a PassCode. See aprs-is.net. If you are not a radio amateur, you may only use your equipment in receive only mode.
The app has an audio monitor useful for tuning the parameters of the Sdr receiver (it may not work well in old devices with low memory). In the main page there is a frequency switch, a hub with the text of received packets, two indicator lights: one for the Sdr connection and one for the Aprs-Is connection, three counters reporting the number of: received, forwardable and forwarded packets. When you leave the main page while the IGate is running, the app service will continue working in the background, you can recall the main page by tapping the service icon in the android status bar.

Since the device and the Sdr dongle drains much power from the phone battery, it is recommended to use the phone charger or a power bank. You will need an OTG power cable. It is not easy to find a working cable, maybe you can do it yourself. The reception quality of the IGate depends, above all, on the antenna connected to the Sdr dongle. With very strong FM broadcasts in your area, it may be helpful to manually adjust the gain of the receiver or use a band-stop filter.

If you weren't already aware, Automatic Packet Reporting System (APRS) is a digital VHF mode used in amateur radio. It allows for packets of data to be sent to receiving nodes over a local area via RF. Typical uses for it are vehicle tracking, weather station telemetry, text messages, announcements and other wireless device telemetry like high altitude balloons. An IGate is an internet connected node which receives local APRS RF signals and uploads them to the internet, to be seen on sites like aprs.fi. TX capable IGates may also broadcast to the local RF network messages from APRS transmitters on the other side of the world.

IGate2: Android App that turns your phone and RTL-SDR into an APRS IGate.