A new software defined radio blog called onesdr.com has recently posted a useful article for radio world newbies called "How Not to Break your Software-defined Radio Hardware". The article goes over a few important precautions like avoiding input power which is too high from transmitters and LNAs, avoiding DC input, and avoiding ESD.
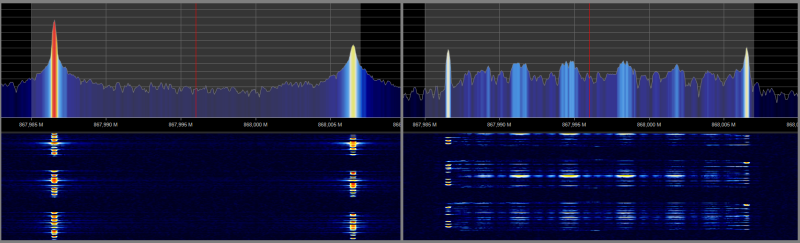
Hackaday writer Danie Conradie has recently posted a new tutorial explaining the difference between some common RF modulation choices. To do this he uses various RF hardware modules, and an RTL-SDR Blog V3 unit to view the spectrum of each modulation type. In the post he compares Amplitude Shift Keying (ASK), Frequency Shift Keying (FSK), and LoRa. He also explains the differences between ASK and OOK modulation, and FSK and GFSK modulation.
The key takeaways are that ASK modulation is simple, but prone to interference. FSK is less prone to interference, but requires more bandwidth. LoRa is good for receiver sensitivity and interference immunity, but comes at the expense of bandwidth efficiency. In addition LoRa modulation is patented, resulting in higher hardware costs.
Comparing the spectrum of a pure FSK signal, versus a Gaussian FSK signal.
SpaceAustralia.com have recently been hosting a community science project that involves encouraging teams to build backyard radio telescopes that can detect the arms of our Milky Way Galaxy by receiving the Hydrogen line frequency of 1420 MHz.
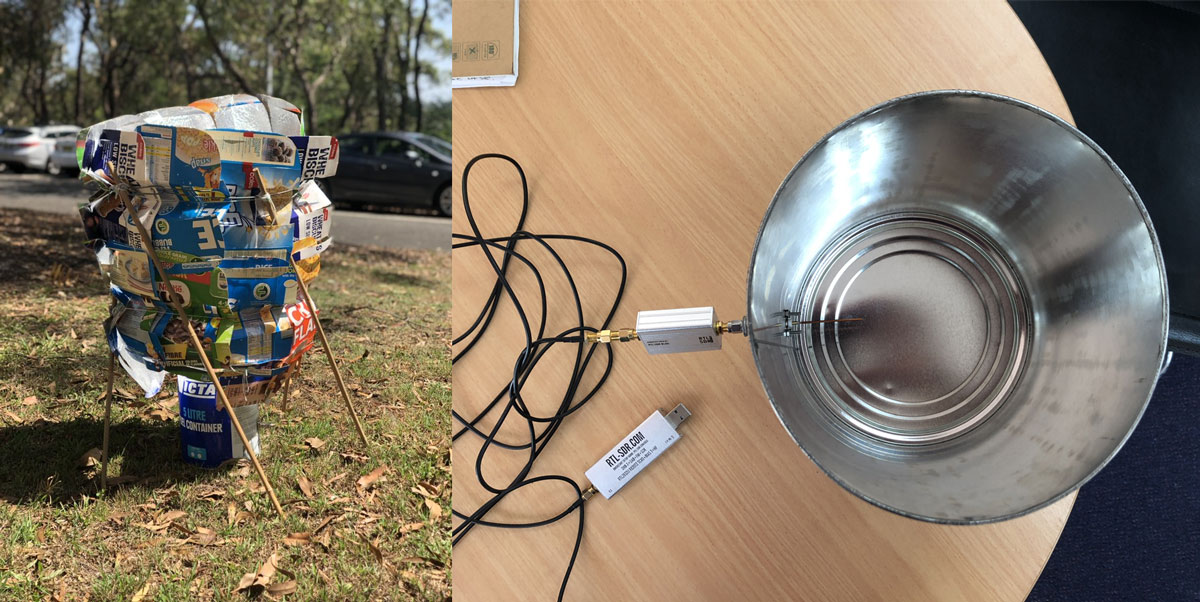
This can be achieved at home by building a horn antenna out of cardboard and aluminum foil, and a feed from a tin can. Then the Hydrogen line and galactic plane can be detected by using an RTL-SDR, LNA, and software capable of averaging an FFT spectrum over a long period of time.
While most horn antennas are typically made from four walls, one participant, Vanessa Chapman, has shown that even trash can be used to observe the galaxy. Vanessa's horn antenna is made from multiple cereal boxes lined with aluminum foil and an old tin fuel can. The boxes are held together by some string and propped up by some sticks.
With her cereal box horn antenna combined with an RTL-SDR Blog V3, and an RTL-SDR Blog Wideband LNA, Vanessa was able to use software to average the spectrum over time as the galactic plane passed overhead, revealing the Hydrogen line peak and corresponding doppler shift from the galactic plane.
Vanessa's Hydrogen Line Radio Telescope made from Cereal Boxes
If you don't know what the Hydrogen line is, we'll explain it here. Hydrogen atoms randomly emit photons at a wavelength of 21cm (1420.4058 MHz). Normally a single hydrogen atom will only very rarely emit a photon, but space and the galaxy is filled with many hydrogen atoms so the average effect is an observable RF power spike at 1420.4058 MHz. By pointing a radio telescope at the night sky and integrating/averaging the RF power over time, a power spike indicating the hydrogen line can be observed in a frequency spectrum plot. This can be used for some interesting experiments, for example you could measure the size and shape of our galaxy. Thicker areas of the galaxy will have more hydrogen and thus a larger spike, whereas the spike will be significantly smaller when not pointing within the galactic plane. You can also measure the rotational speed of our galaxy by noting the frequency doppler shift.
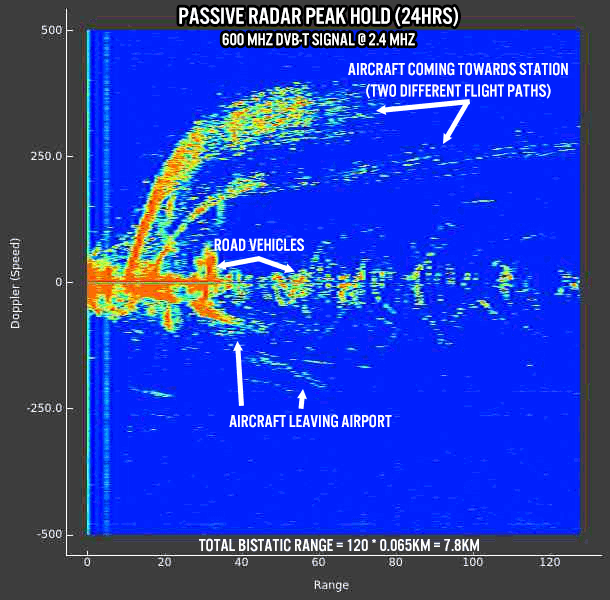
Recently we've been testing a simple peak hold for the KerberosSDR passive radar display. This results in some nice graphs that show aircraft and vehicle activity over time.
Passive radar works by using already existing transmitters such as those for HDTV and listening for reflections that bounce off of RF reflective objects. With a two antenna setup, it is possible to generate a bistatic range/doppler speed graph of reflected objects.
With the reference Yagi antenna pointed towards a 600 MHz DVB-T tower, and the surveillance antenna pointed to an airport we were able to obtain the graph below. The top two large traces show aircraft heading towards our station, whereas the bottom traces show aircraft leaving the airport. Also visible are multiple blips with smaller doppler speeds, and these correspond to vehicles.
KerberosSDR Passive Radar Display Peak Hold
The code on the KerberosSDR git will be updated in a few days time. We are also working on a more comprehensive passive radar tutorial that will try to explain concepts like processing gain, bistatic ranges and other important tips for getting good passive radar results. At the same time we're also working on improving direction finding ease of use by prototyping antenna switches for calibration, and working on getting 4-channel beamformed passive radar working which will allow us to plot passive radar returns on a real map.
The KerberosSDR is our 4-channel phase coherent capable RTL-SDR unit that we previously crowdfunded back in 2018. With a 4-channel phase coherent RTL-SDR interesting applications like radio direction finding, passive radar and beam forming become possible. It can also be used as 4 separate RTL-SDRs for multichannel monitoring. KerberosSDR is currently available from the Othernet store and Hacker Warehouse for US$149.95.
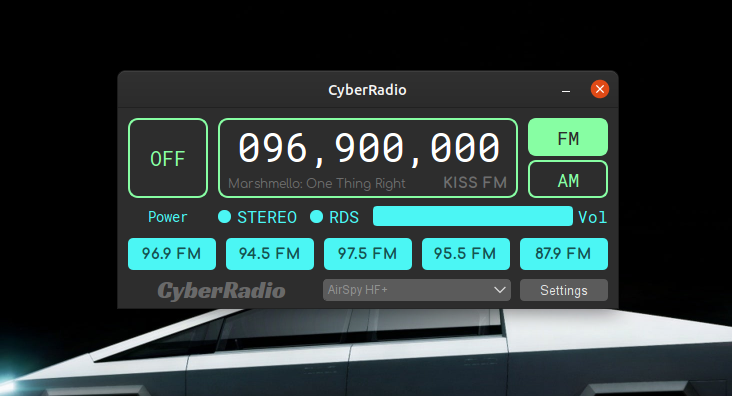
Programmer Luigi F. Cruz has recently released a new SDR app called "CyberRadio". CyberRadio is a minimal SDR app, which allows you to listen to FM and AM radio. It does not have any spectrum analyzer or waterfall display. As it is based on SoapySDR, it supports almost every SDR including the RTL-SDR, and runs on Linux, maxOS Sierra, Windows 10 and ARM SoCs.
Luigi also notes that he has made use of cuSignal and Numba functions which enable GPU acceleration on CUDA compatible graphics cards.
The app is still in pre-release status, so no binaries are available. However, Luigi has provided installation instructions for Linux on the GitHub.
To do this he used an Android app called "DRM+SDR Receiver" which is available for US$4.99 on the Play store. The app supports RTL-SDR and HackRF devices. So all you need to do is set the RTL-SDR Android driver to run in Q-branch direct sampling mode, then tune to a DRM signal for it to begin decoding.
A demonstration video uploaded to his Google drive account shows clean decoding of the DRM AAC audio, as well as the app displaying Journaline and live metadata. He notes that his signal was very strong, so he only required a short wire, but DXers would need an appropriate antenna.
DRM Received on an Android phone with an RTL-SDR Blog V3 running in direct sampling mode.
In late December 2019 we posted about Russian weather satellite Meteor M N2-2 which had unfortunately been struck by a micro-meteorite on Dec 18, causing it to lose control and go offline. Meteor M N2 and N2-2 satellites are often monitored with RTL-SDR dongles as it is relatively simple to receive their LRPT signal at 137 MHz which contains a high resolution weather satellite image.
Recently Happysat updated his Meteor M status page, noting that Meteor M N2-2 has been partially recovered, but due to low power it can no longer transmit a 137 MHz LRPT signal ever again. However, the L and X-bands are transmitting while the satellite is in daylight. Happysat writes:
January 2020 There will be only short-term power-ups in the radio visibility zone, and the battery life will be reduced tenfold.
Of particular concern are the batteries they are very quickly overheated and switching from regular to backup.
Unfortunately the power supply features do not allow the 137 MHz transmitter to be used in abnormal power, mode (from solar panels) which is used now although technically it is working fine.
There will be no LRPT Transmission's anymore.
The older Meteor M N2 satellite remains operational transmitting at 137.100 MHz.
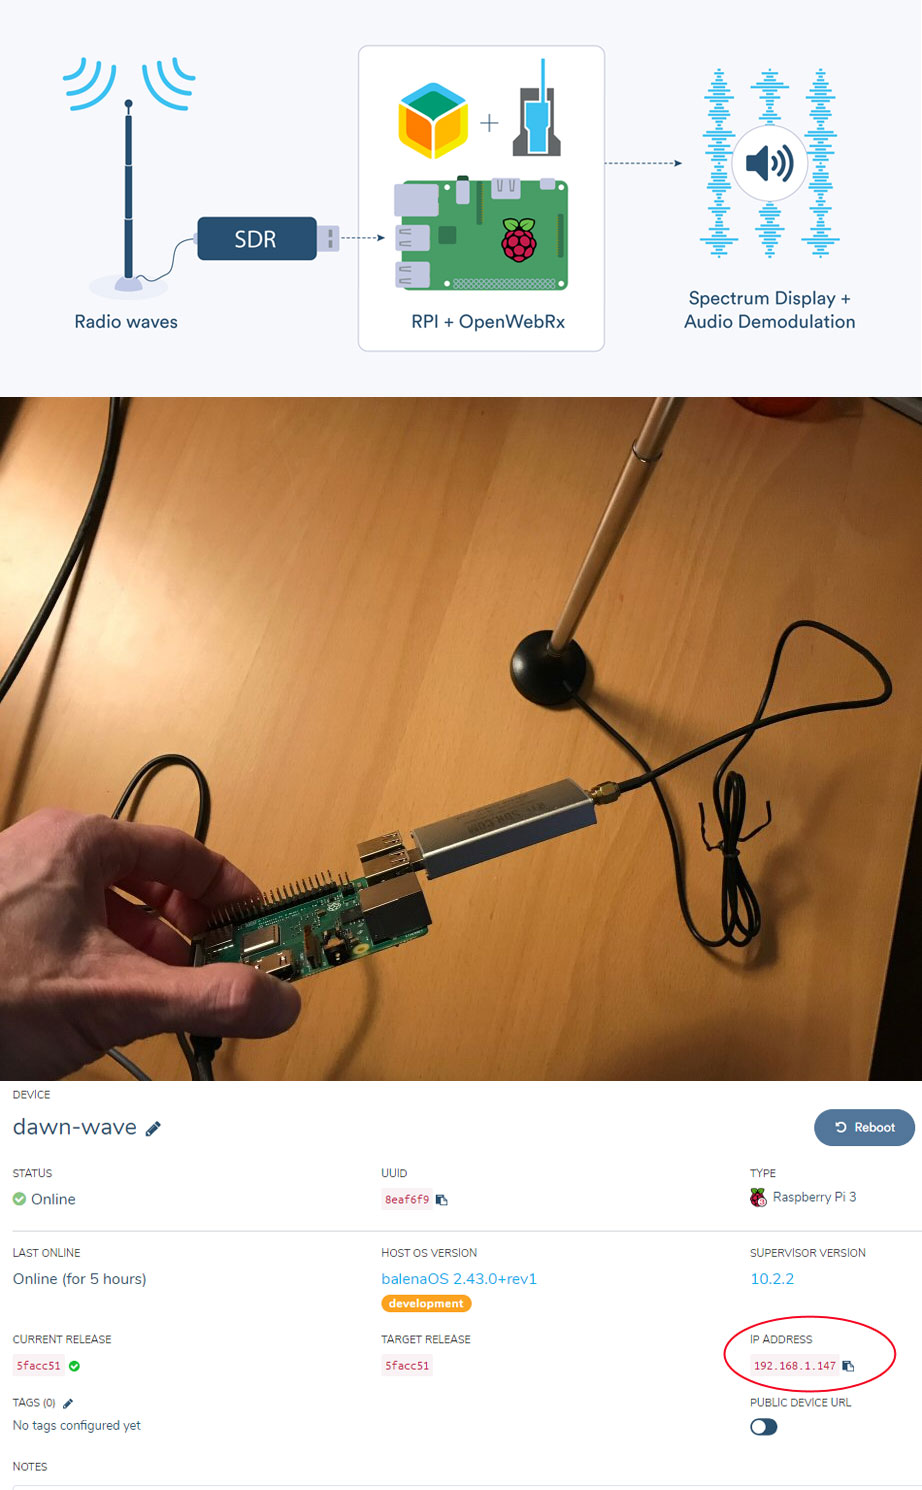
In the blog post, they show how it's possible to use a RTL-SDR and Raspberry Pi running OpenWebRX to remotely monitor the radio spectrum over the internet. This of course has been done many times before, however, the novel thing here is the use of the Balena cloud platform which makes installing and managing the Raspberry Pi running OpenWebRX much easier.
Balena has a has a special balenaOS image that is first burned on the Raspberry Pi's SD card. The OS image is pre-generated with your home WiFi details, so upon boot it automatically connects to the internet and can be accessed on the balenaCloud dashboard. At that point you can easily remotely push the pre-made Balena "sdr-spectrum-monitor" docker image to the Pi from the Balena online dashboard. This docker image has OpenWebRX and the RTL-SDR drivers already installed on it. It's then a simple matter of connecting to OpenWebRX via the local IP address as you would normally.
This is quite a nice system as it avoids needing to perform the "fiddly" steps of setting up WiFi, connecting to the Pi, determining the Pi's IP address, and installing the RTL-SDR drivers and OpenWebRX software manually.
Balena also has a very simple way to make the OpenWebRX server accessible from outside your network. The only steps required are to set a port variable in the Balena cloud dashboard, and enable the "public device URL" option. No need to fiddle around with unblocking ports or dynamic DNS services.
Balena.io appears to be free for personal use, allowing you to add and manage up to 10 devices before needing to pay.
RTL-SDR & OpenWebRX Installed and Managed via Balena Cloud.