Using a KerberosSDR to Monitor Air Traffic Control Voice, ADS-B, ACARS & VDL2 Simultaneously on a Raspberry Pi 3B+
The KerberosSDR is our 4-channel phase coherent capable RTL-SDR unit that we previously crowdfunded back in 2018. With a 4-channel phase coherent RTL-SDR interesting applications like radio direction finding, passive radar and beam forming become possible. KerberosSDR is currently available from the Othernet store and Hacker Warehouse for US$149.95.
Although the KerberosSDR was mostly created to help unlock projects requiring phase coherency, we've had interest from multiple users asking for information on how to use the KerberosSDR as a tool for monitoring multiple separate signals at once.
Doing this is actually very simple. If you ignore the extra circuitry to make the KerberosSDR phase coherent, the KerberosSDR is at it's core just 4 separate RTL-SDR dongles connected to a quality USB hub. So if you're not using our coherent demo software, then plugging a KerberosSDR into a PC or single board PC will result in four RTL-SDR dongles that can be accessed individually.
The tutorial below could also be done with four individual RTL-SDR dongles, but you would also want to have a reliable powered USB hub.
Example Aviation Radio Monitor
Below we show an example tutorial of how the KerberosSDR could be used as a 4-channel aviation monitor for monitoring air traffic control, ADS-B, ACARS and VDL2 simultaneously on a single Raspberry Pi 3B+. The video below shows a demo.
The first step is to simply burn the latest Raspbian Buster to an SD Card, and set up your WiFi wpa_supplicant file as you would on any standard Raspbian install. Also add a blank file called "SSH" or "SSH.txt" to the boot directly to enable an SSH connection. Alternatively you could set this up with a monitor. We used Raspbian Buster Lite, as we are not intending to use the desktop GUI.
Next use PuTTY or your preferred terminal software to connect to your Raspberry Pi via SSH. You may need to use your routers config software/page to find the IP address of the Raspberry Pi. The default SSH port is 22.
Finally, update the repos on your install before continuing with the software installation process.
sudo apt update
sudo apt install librtlsdr-dev rtl-sdr
KerberosSDR Hardware Setup
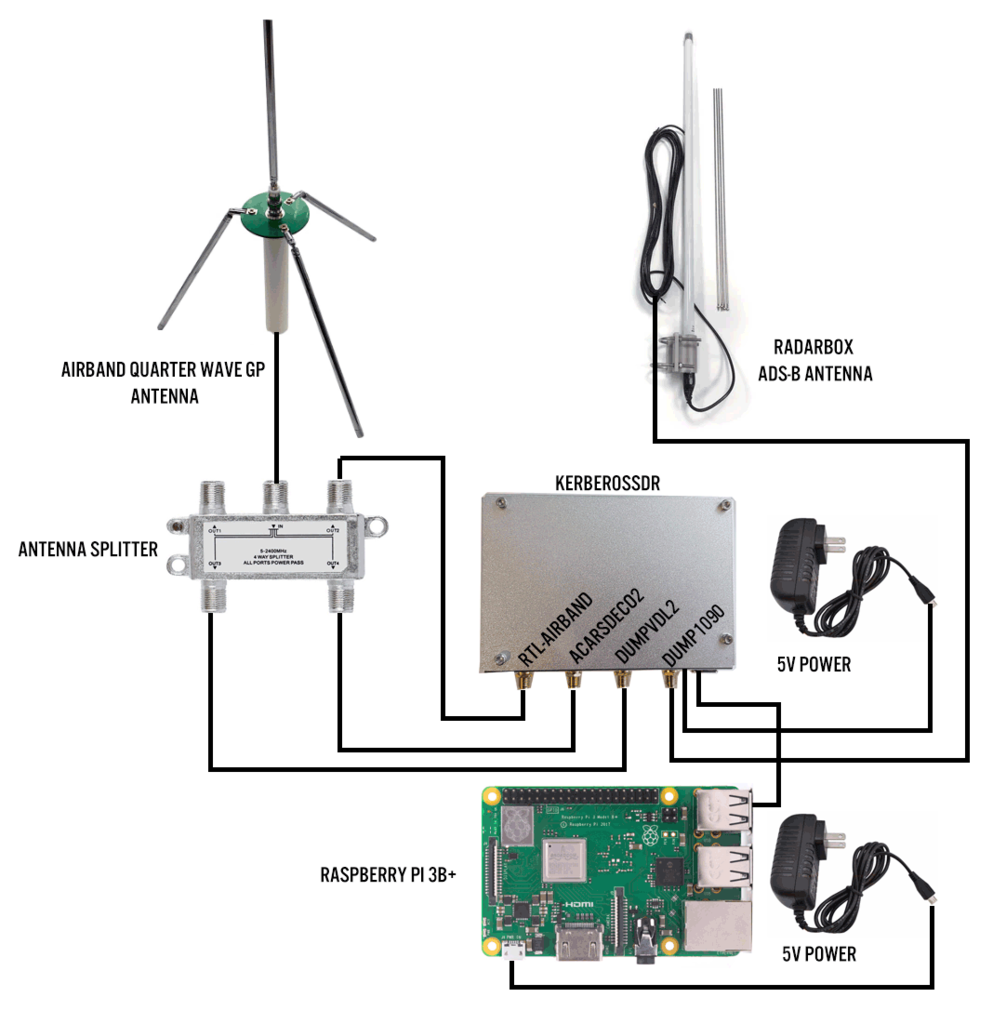
Here we connected a single quarterwave ground plane antenna tuned to the airband frequencies to three input ports on the KerberosSDR via a cheap RF TV splitter. The fourth antenna input was to a RadarBox ADS-B antenna.
The KerberosSDR and Raspberry Pi are powered via two official Raspberry Pi 5V plug packs, and the KerberosSDR is connected to the Pi via a single short high quality USB cable.
Installing RTL-Airband
RTLSDR-Airband is an efficient command line based scanner program for the RTL-SDR. It works by rapidly scanning over a set of frequencies and looking for active signals, and playing the active AM or FM transmission. When an active signal is found it can be configured to stream the audio to an Icecast server, record to a file, or to play directly to your speakers. Alternatively you can also configure it to stream multiple channels simultaneously. If set up to stream to an Icecast server you can listen to the scanned audio from any device on your network with an internet browser.
Here we will use RTL-Airband to scan the air traffic control voice bands which are used by air traffic controllers and pilots to communicate by voice with one another. The transmissions are in AM and are found between 118–136.975 MHz.
First install the pre-requisites, and then install RTL-Airband.
sudo apt-get install -y build-essential libmp3lame-dev libshout3-dev libconfig++-dev libraspberrypi-dev librtlsdr-dev

cd
wget -O RTLSDR-Airband-3.0.1.tar.gz https://github.com/szpajder/RTLSDR-Airband/archive/v3.0.1.tar.gz
tar xvfz RTLSDR-Airband-3.0.1.tar.gz
cd RTLSDR-Airband-3.0.1
make PLATFORM=rpiv2
sudo make install
Next install an Icecast server onto your Raspberry Pi. This will allow us to connect to the Pi via a web browser to listen in to the audio.
sudo apt-get install icecast2 -y
The install steps will ask you to input admin passwords of your choice, make sure you remember or write these down.
Now edit the rtl_airband.conf file with:
sudo nano /usr/local/etc/rtl_airband.conf
Paste in the configuration below making sure to set the actual frequencies used by air traffic control and airlines in your particular area by adding or removing frequencies from the "freqs" line.
Also be sure to set the "index" to whatever antenna input you have used (0 - 3) on your KerberosSDR for your VHF air band antenna. You may want to experiment with the gain value, but for now you can leave it as default.
If you are using another template for the config file, ensure that the "correction" value is set to 0 as the KerberosSDR uses a TCXO and requires no PPM correction.
Finally, don't forget to also set the Icecast server password that you set up in the previous step, making sure to leave the username as "source".
devices:
({
type = "rtlsdr";
index = 2;
gain = 32;
correction = 0;
mode = "scan";
channels:
(
{
freqs = ( 118.1, 118.7, 119.5 );
labels = ( "Tower A", "Tower B", "Tower Control");
outputs: (
{
type = "icecast";
server = "127.0.0.1";
port = 8000;
mountpoint = "stream.mp3";
name = "Airband Voice";
genre = "ATC";
description = "My local airport - aggregated feed";
username = "source";
password = "kerberos";
send_scan_freq_tags = false;
}
);
}
);
}
);
Next set up the Icecast server if required using the instructions here. If the default port and number of source is fine for you, you can leave everything as default.
Now to start RTL-Airband run:
sudo rtl_airband -f
To listen to the scanned audio, browse to http://RASPI_IP_ADDRESS:8000/stream.mp3 on any device connected to the same network
Installing dump1090
Leave the RTL-Airband PuTTy window open, and open a new instance of PuTTy and once again connect to the Raspberry Pi in a new session. We will install the FlightAware branch of dump1090, as this is the most up to date version. dump1090 allows you to track aircraft that are transmitted ADS-B.
sudo apt-get install build-essential debhelper librtlsdr-dev pkg-config dh-systemd libncurses5-dev libbladerf-dev
git clone https://github.com/flightaware/dump1090
cd dump1090
dpkg-buildpackage -b
Now we can run dump1090 with the following line. Make sure to set the "--device 3" flag to the antenna input that you have connected your ADS-B antenna to. In our case we connected it to the last SMA input which is input 3.
./dump1090 --device 3 --interactive --net
Now to view the data on a map, you can install Virtual Radar Server on any Windows PC on the same network. Once installed, add an "AVR or Beast Raw Feed" receiver, with the IP address of your Raspberry Pi and Port 30002.
Installing ACARSDeco2
Again, leave both PuTTy windows open, and open a new PuTTy SSH terminal and connect again. Here we'll install ACARSDeco2 which is a multiband ACARS decoder. ACARS is an acronym for Aircraft Communications Addressing and Reporting System which is a digital communications system that aircraft use to send and receive short messages to and from ground stations. Most messages are unreadable telemetry data intended for computers, but often you will see messages about weather, wind, dangerous cargo warnings, fuel loading information and more.
ACARSDeco2 is not an open source program, so you'll need to first download the compressed file from http://xdeco.org/?page_id=30 on a PC. Make sure to get the Raspberry Pi 2/3 version of ACARSdeco2 for Stretch.
Now use a program like WinSCP to transfer the .tgz file to the Raspberry Pi. In WinSCP select SCP as the file transfer protocol, log in with "pi/raspberry" and drag the file over to the Pi's home folder.
Then back on the Raspberry Pi, simply move the file into it's own folder, and extract the files.
mkdir acarsdeco2
mv acarsdeco2_rpi2-3_debian9_20181201.tgz acarsdeco2
cd acarsdeco2
tar -xvzf acarsdeco.tgz
Now you can run the program with the following command. Make sure to specify the ACARS frequencies used in your area if they are different. Also here we used antenna input 1 for the ACARS antenna and specified that with "--device-index 1". If you are running Virtual Radar Server on your Windows PC as explained in the dump1090 install, you can enter the Windows VRS server IP address, so that location data will be sent back to the ACARSdeco2 server.
./acarsdeco2 --device-index 1 --freq 131550000 --freq 131450000 --gain 34 --http-port 8081 --vrs-url http://192.168.86.36:8081
Now on your Windows PC, open a browser and open PI_IP_ADDR:8081 to view the incoming ACARS messages.
Installing dumpvdl2
Again, leave both PuTTy windows open, and open a new PuTTy SSH terminal and connect again. Here we will install dumpvdl2 which is a VDL2 decoder. VDL2 is a replacement for the aging ACARS system which is being phased out in some areas. In some areas VDL2 is now more common than ACARS, and in some areas it's the opposite.
First install pre-requisites.
sudo apt-get install build-essential cmake git libglib2.0-dev pkg-config librtlsdr-dev
Dumpvdl2 requires libacars to work, so install libacars first:
cd
git clone https://github.com/szpajder/libacars
cd libacars
mkdir build
cd build
cmake ../
make
sudo make install
sudo ldconfig
Finally, install dumpvdl2
cd
git clone https://github.com/szpajder/dumpvdl2.git
cd dumpvdl2
mkdir build
cd build
cmake ../
make
sudo make install
Now to run dumpvdl2:
dumpvdl2 --rtlsdr 2 --gain 35
dumpvdl2 has no webserver so it can only be viewed from the terminal window.
Alternative Tools
Stations in the USA could replace one program with dump978, which decodes UAT positional data from smaller aircraft. If you live near a glider range, a FLARM decoder could also be used. You could also run an AIS receiver if you live near a water way.
Further Steps
If setting this up as a permanent station, you might want to go ahead and create a startup script that runs these programs on boot. Then you won't need to open up PuTTy terminals to start all the programs. The easiest way to do this is to use the @reboot code in crontab to run your script. Be sure to use sudo crontab -e for running RTL-Airband as this requires root.
