Tagged: rtl2832u

RasPad 3.0 Review: Building a Portable Raspberry Pi 4 Tablet with Built in RTL-SDR

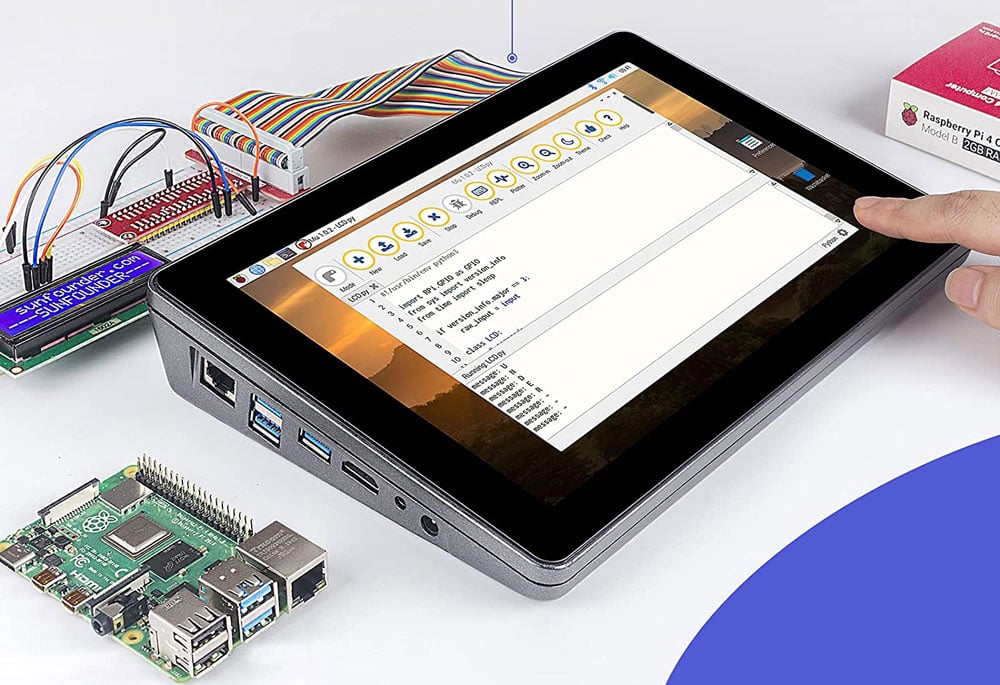
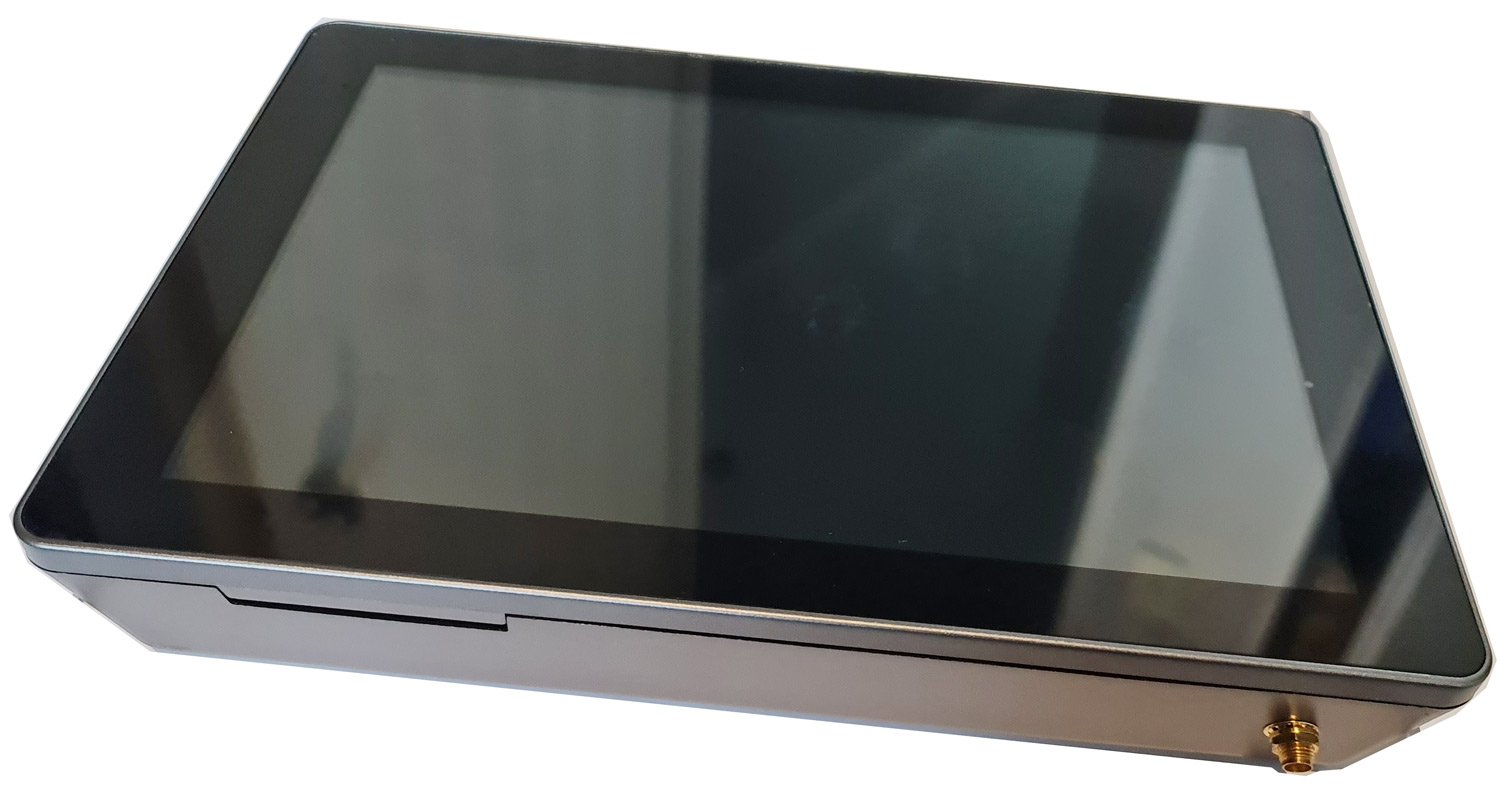
The Raspad 3.0 is a portable tablet enclosure for the Raspberry Pi 4B. It comes with a high resolution 1280 x 800 10.1 inch touch LCD screen, built in speakers, built in battery and a plastic enclosure that houses the LCD driver board and Raspberry Pi. Accessible on the side of the enclosure are the USB, HDMI, ethernet and audio ports which connect via the LCD driver board. They also include an accelerometer shim which allows the screen to autorotate.

The Raspad 3.0 is available on Amazon USA for $259, or directly via their website for $219 with free worldwide shipping.

A few months ago SunFounder, the company behind the RasPad 3.0 reached out to us and asked if we wanted to review the product with a free sample. Normally we don't review products unrelated to SDR like this, but given the amount of RTL-SDR software available for the Raspberry Pi, and what appeared to be sufficient internal space, we were curious if there was a way to turn this into a portable RTL-SDR tablet...

The RasPad 3.0

Unboxing

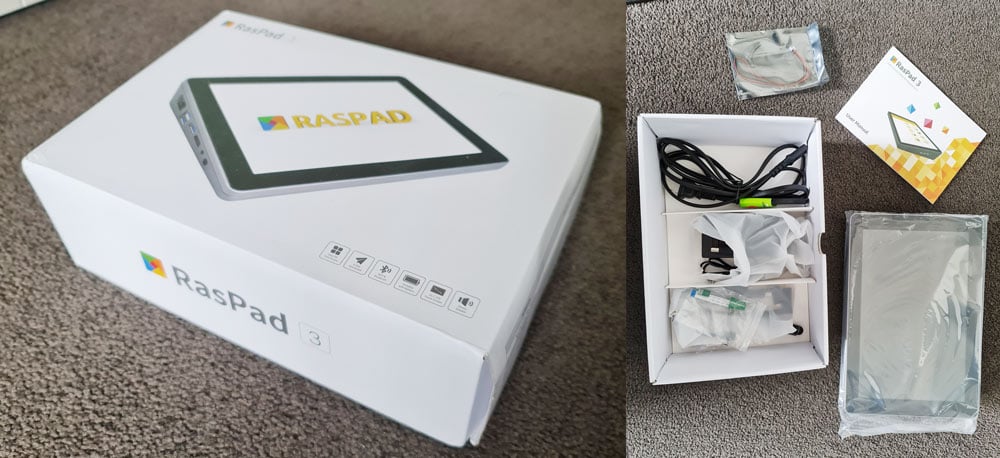
A few weeks ago the Raspad 3.0 arrived, well packed and with all the advertised components. Note that the Raspad 3.0 does not come with a Raspberry Pi 4B, this is something you will need to provide on your own.

Inside was a mains power cable, 15V DC power brick, two HDMI jumpers, a USB jumper, accelerometer shim, SD card ribbon, small 5V fan, heatsinks for the Pi, screwdriver and mounting screws, a manual and the RasPad LCD screen itself.  

The Raspad 3.0 Box and Unboxing

Assembly

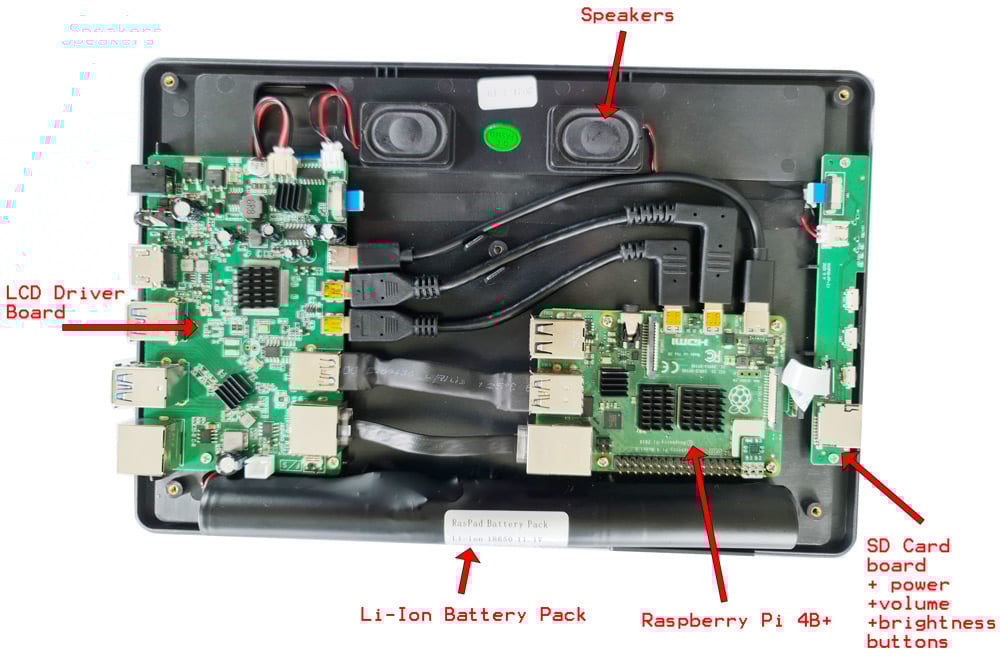
Assembly is straight forward. You unscrew the enclosure using the provided screw driver, insert the Pi 4B, screw it down, connect all the cables from the Pi to the LCD driver board and SD card slot, then reassemble. After inserting the Raspberry Pi 4B and attaching all the cables this is what the inside looks like.

Inside an assembled RasPad 3.0

Now we could have reassembled the enclosure here, but we wanted this to be a portable RTL-SDR tablet, with the RTL-SDR and an SMA antenna port built in. 

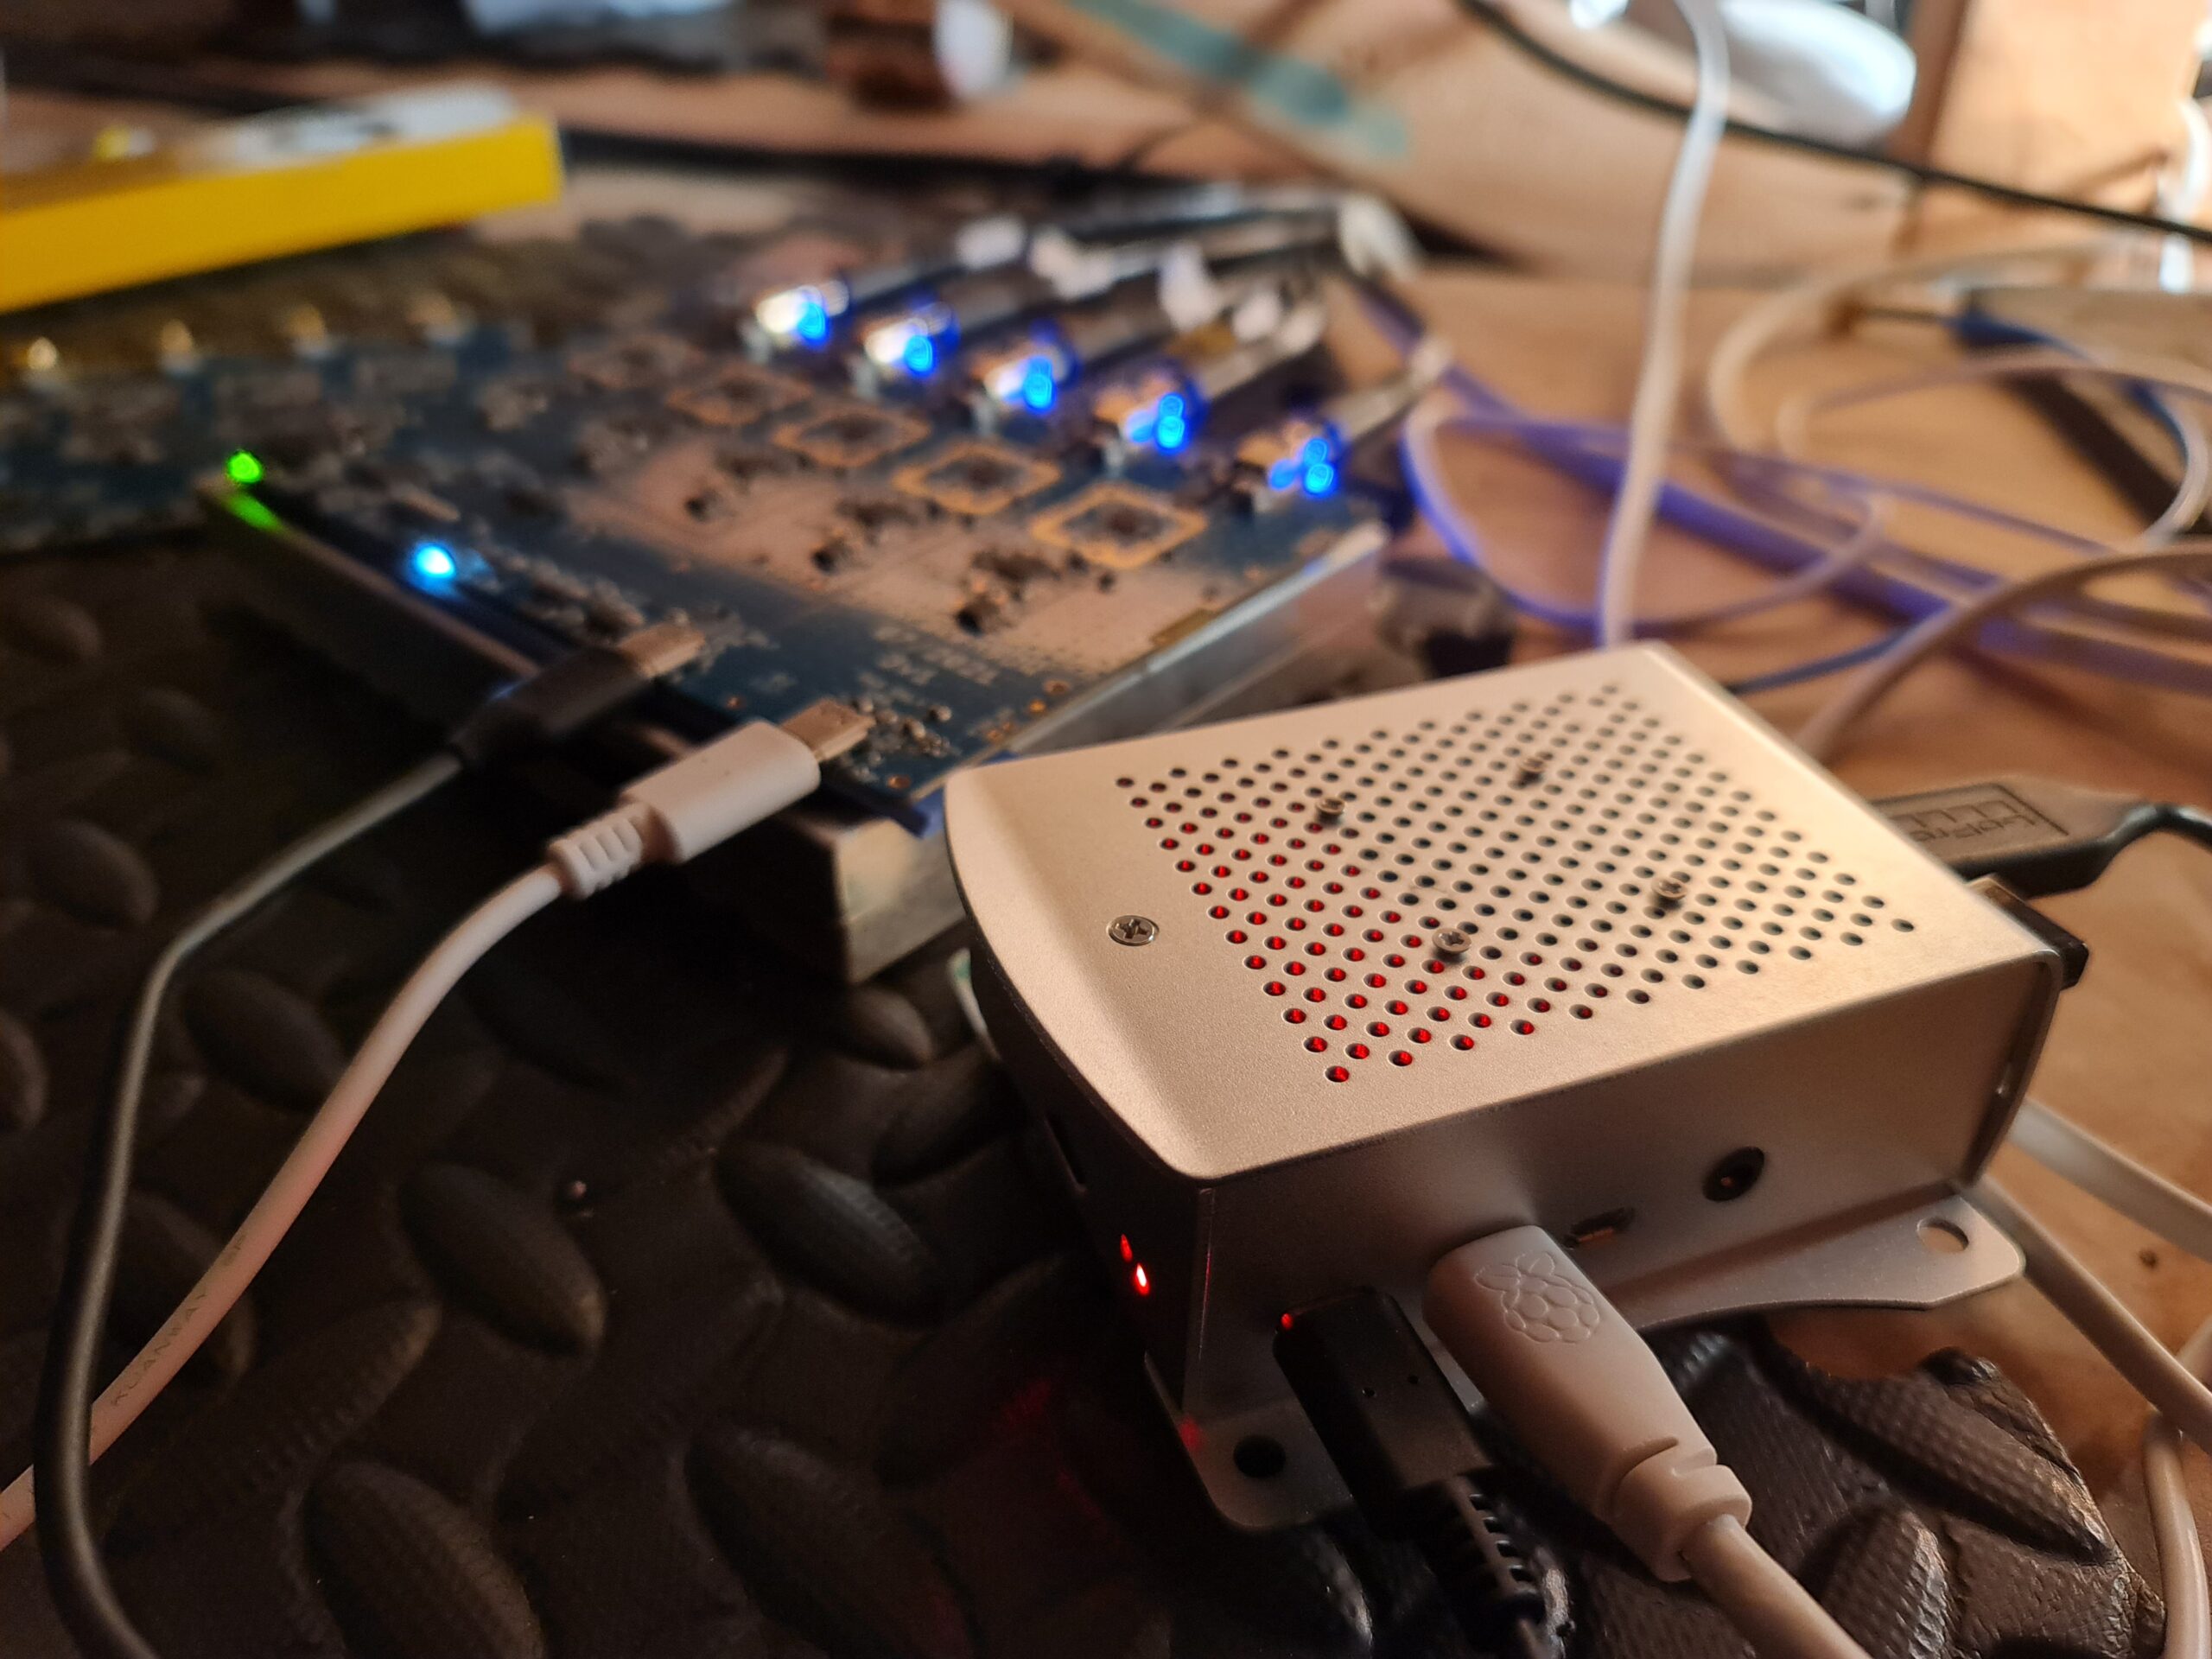
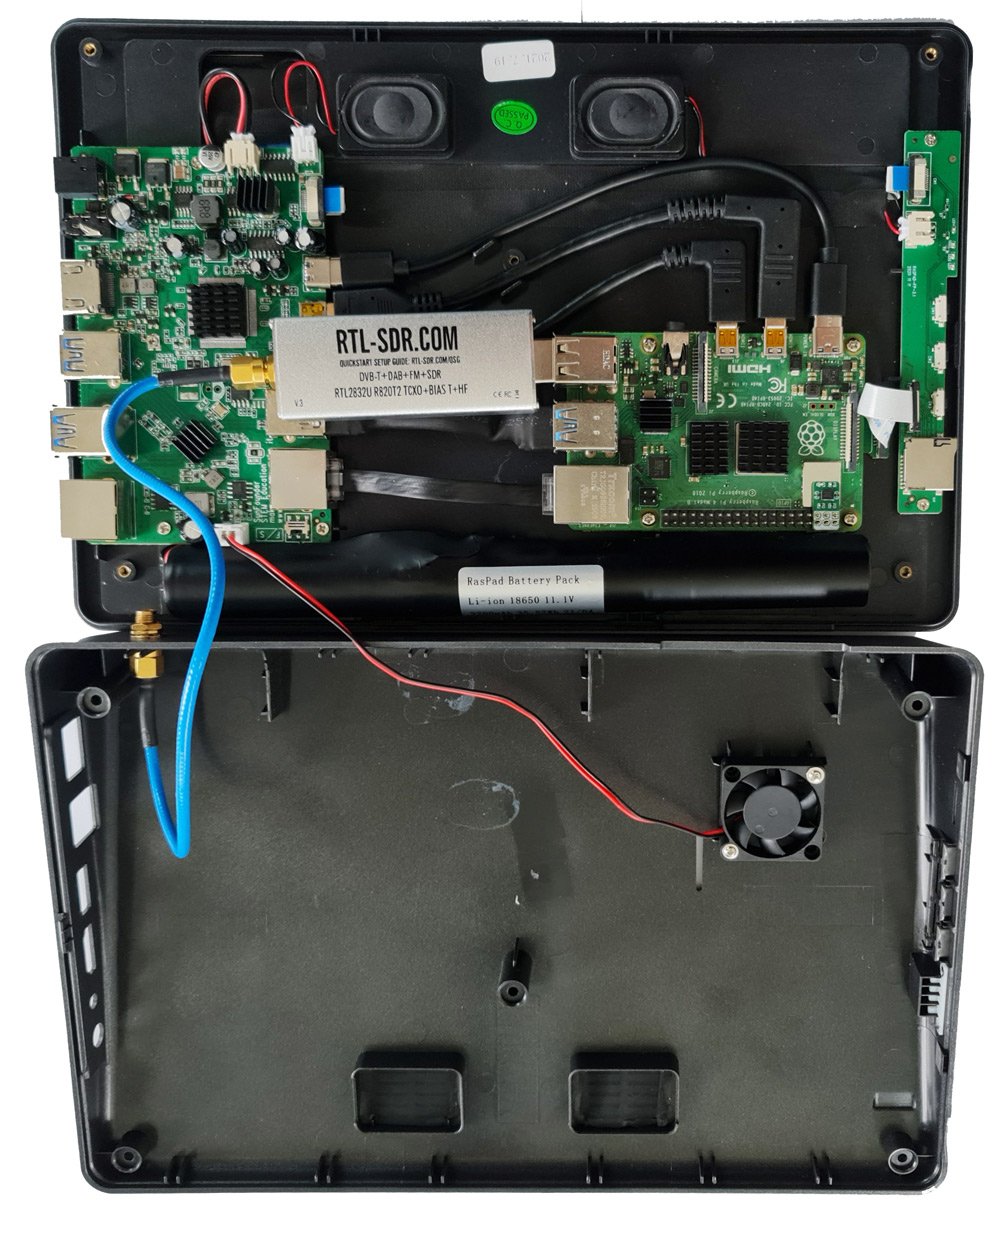
It turns out that the best way to fit in an RTL-SDR Blog V3 is to directly connect it to the spare USB port on the Pi. You might also consider using a micro style RTL-SDR which would fit more easily, but those do tend to get quite hot in a small package, and can be quite bad with internal noise. Also good shielding is probably quite critical in this application due to the dongles proximity with the LCD driver board which could be an RFI source.

The SMA side of the RTL-SDR Blog V3 rests nicely on top of the USB port of the LCD driver board providing some stability, and when the bottom lid is assembled there is plenty of clearance and no squashing.

Next we drilled a hole on the rear wall of the bottom half of the enclosure for the SMA female port, and tightened the SMA connector down with a nut. In the future we'll be upgrading this to a long barrel style SMA female connector, as a regular SMA female connector is a bit short. Then a short well shielded SS405 coax cable was used to connect to the RTL-SDR dongle.

RasPad 3.0 with RTL-SDR Blog V3 Inside
Raspad 3.0 with SMA port hacked in

ProTip: Do take care to remember to remove the SD card when disassembling the RasPad! If you don't you'll end up with the SDcard slot getting ripped from it's ground traces. This happened to us, but we were able to easily solder it back on. There is a sticker on the backside of the enclosure warning about this.

Software & Testing

SunFounder provide a custom Raspbian distribution designed specially for the RasPad. However, we decided to instead install the DragonOS Pi64 Distro which is an Ubuntu distribution for the Raspberry Pi 4B that has many built in SDR programs. We burnt the image to a SD card, inserted it on the side, plugged the Raspad in to the power connector, and held the power button down for a few seconds to turn it on. Despite a few initial error messages saying it cannot enable the USB ports, everything eventually booted just fine.

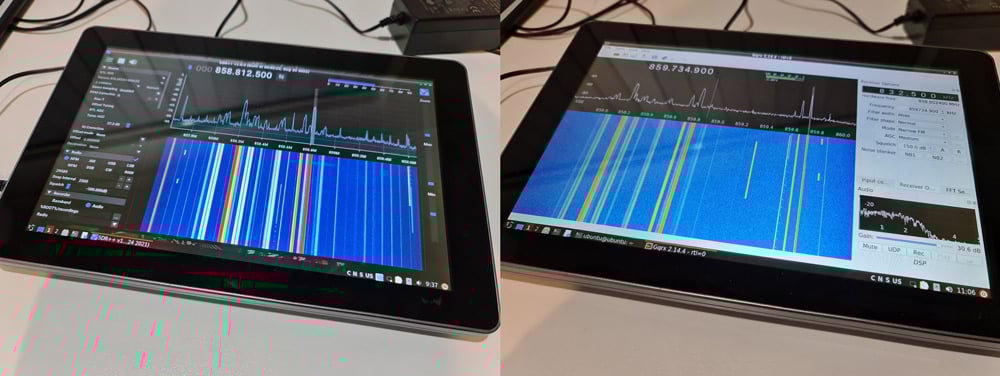
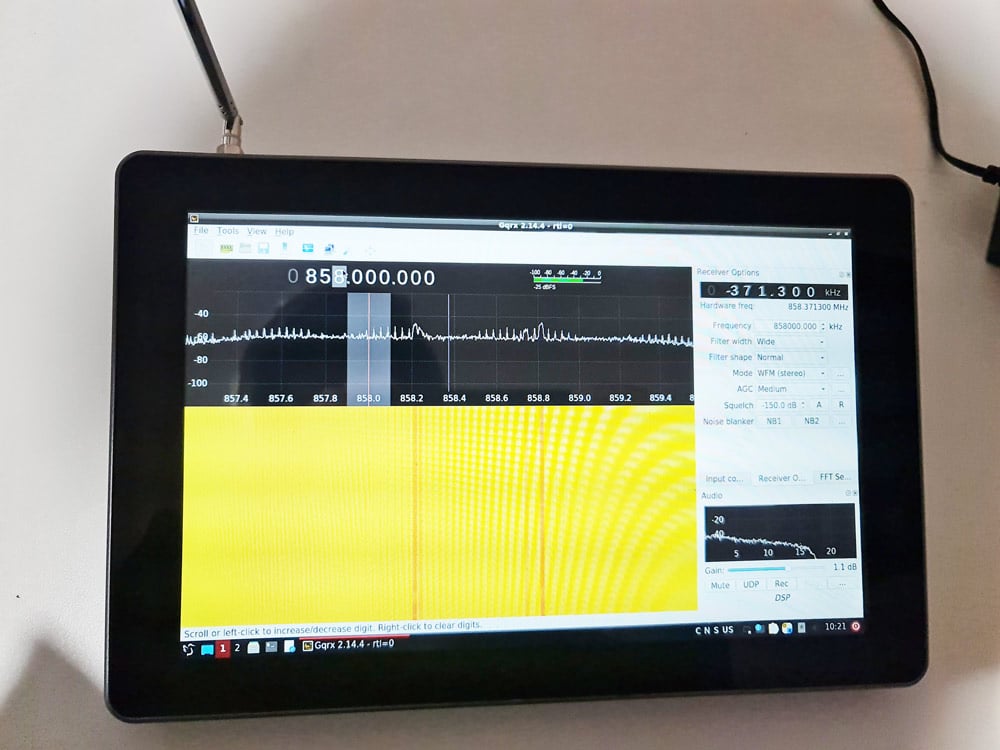
We then plugged in a cable going to one of our multipurpose dipole antennas mounted just outside the office window, and tested both SDR++ and GQRX. In both cases we were immediately able to connect to the RTL-SDR and receive signals with signal strength equivalent to that received by our desktop PC, indicating that LCD interference was not a problem.

The resolution of the screen is high enough and images and text are clear. The screen is also decently bright, and brightness can be adjusted using the buttons on the side.

RasPad 3.0 with built in RTL-SDR running SDR++ and GQRX

DragonOS Tablet Compatibility Issues & Fixes

As DragonOS is not designed for a tablet setup, there were a few bugs. It should be noted however that these issues are not a reflection on the Raspad hardware, as obviously the official Raspad OS will not have these issues as it's designed specifically for tablet use.

We initially had no sound in SDR++ from the built in speakers. After some troubleshooting we managed to get sound by disabling the headphone jack in the audio mixer settings, which appears to be the default output in DragonOS. To do this, click on the speaker icon on the bottom right task bar and click on Mixer. Then go to the Configuration tab and uncheck the second Built-in Audio entry. Close it, and open SDR++.

Disabling the headphone jack to get the built in speakers working.

In DragonOS the touch screen works fine, although it is difficult to click on small buttons. There is no onscreen keyboard available by default. We couldn't find a way to enable a tablet mode in DragonOS, so instead opted to install an onscreen keyboard called 'onboard' via 'sudo apt install onboard'. The accelerometer is also not enabled in DragonOS. We did not attempt to fix this as we have no need for screen rotation.

Interference

LCD screens are well known to be sources of RF interference, and putting an SDR in close proximity to one could result in the spectrum being very noisy. However, without an antenna connected we did not notice any interference across the spectrum from the LCD screen. It appears that the LCD RFI noise levels are not too bad, and the shielding on the RTL-SDR Blog V3 and the coax jumper cable is good enough to prevent any being received. When an antenna with a few meters of coax was connected (such as a magwhip or our portable dipole) we also didn't notice any LCD interference. 

However, when a SMA telescopic antenna was connected directly to the SMA port we did start noticing the telltale spikes across the spectrum that are typically generated from LCD screens. If the magwhip or dipole was also moved within 2-3cm of the LCD screen, we also saw these interference spikes appear.

LCD Screen interference appears with a telescopic whip connected directly to the SMA port.

So it would be recommended to use a magwhip or dipole that has a coax run that can sit a few centimeters away from the screen. This limits the handheld ability of the RasPad a little, but you'd probably want a magwhip, dipole or other antenna over a directly connected telescopic whip for better reception anyway. 

Battery Life

We tested a worst case scenario, with the RasPad running the RTL-SDR and SDR++ continuously at the brightest screen setting. With this test the battery lasted 2 hours and 10 minutes from a full charge. Presumably if the screen was dimmed and turned off for some periods of time, it would easily last 3-4 hours.

Portability

The total weight of the Raspad including our mods is just under 1 kg (2.2 lbs). About double the weight of a modern tablet, but still light enough to be easily carried.

Other Notes

The small 5V fan provided in the kit is unfortunately a bit noisy, and it's cooling ability is seems limited. We've seen these small fans on other Raspberry Pi cooling accessories and found that they are next to useless at cooling. It would be good to see a slightly larger and quieter fan, or perhaps a better passive cooling heatsink.

The power brick output is 15V, 2A. Ideally we would be able to charge the RasPad via a car/boat 12V connection as well. We're awaiting a response to see if this is possible. Update: Unfortunately 12V seems to be a no-go, quoting SunFounder "the 12v supply may cause the Raspad to fail to charge, as the minimum is 15v".

Conclusion

The RasPad 3.0 in our opinion overall a good product. It allows you to easily go portable with your Raspberry Pi 4. While it was designed for other projects, there was just enough hackability left in it for us to fit a RTL-SDR Blog V3 and antenna port into the enclosure, yielding us a clean and portable SDR solution.

With at least 2 hours of battery life when running an RTL-SDR and software, we can easily see this being taken out in the field for spectrum analysis, decoding with rtl_433, or for portable listening to the airband, trunking etc. However, some customization of DragonOS or the RaspadOS is going to be needed to get the most out of the touchscreen.

There are also alternative LCD screen products designed for the Raspberry Pi where you sit the Raspberry Pi on the back of the screen. But it's unclear if there would be enough space inside to fit an RTL-SDR, and not to mention the lack of a battery. We also previously reviewed the Elecrow CrowPi which is somewhat similar, but a lot more clunky if you're just after a pick up and go portable SDR tablet solution. There are also higher end higher priced laptop style enclosure products for the Pi, like the Pi-Top but we're unsure if they're likely to fit the RTL-SDR internally this easily.

Disclaimer: We do not receive any compensation for this review apart from a free Raspad 3.0.

We also recently came across this review from German YouTuber Manuel Lausmann who installed and ran SDR++ on the Raspad with an SDRplay RSP SDR. 

SDR ++ mit dem RASPAD 3 -Raspberry PI 4-

CCERA Memo on Building Small Introductory 21cm Telescopes for use with SDRs

CCERA is the Canadian Centre for Experimental Radio Astronomy which is run by Marcus Leech who is well known for experimenting with low cost SDR based radio astronomy projects. In the past we've seen information from him about pulsar observations, meteor detections, solar transit observations, and hydrogen line observations.

In his latest memo Marcus details his findings with the use of small radio telescopes for making hydrogen line observations. His first tests are with a 30 x 60 cm 2.4 GHz WiFi grid antenna where he discovers that the out of the box unmodified feed gives good results. We note that in our own Hydrogen line tutorial we made use of a 60x100cm WiFi grid.

While these WiFi grids are relatively cheap, Marcus tests an order of magnitude cheaper solution based on a tall metal "Maple-Sap" bucket which are commonly found in Canada. A horn antenna is constructed out of the 24cm diameter bucket simply by attaching a feed (wire) connected to a type-N connector, fitted ~8.8cm from the bottom of the bucket. This results in a signal almost as strong as the 60cm WiFi grid. A second test with a larger 30cm bucket fitted onto an existing 24cm horn antenna yielded results on par with the WiFi grid. A third test was done with a 6-turn Helix antenna, however it resulted in poor performance.

Marcus notes that almost anything that is shaped like cone could be modified into a horn antenna with a little DIY construction. He mentions that one alternative to the maple-sap bucket which could be hard to find outside of Canada might be a "French Style" steel floral bucket.

A low cost bucket based horn antenna for hydrogen line observations

KrakenSDR Update: New Prototypes, Software Updates, Campaign to Release Soon

KrakenSDR is our 5-tuner coherent software defined radio based on RTL-SDR. It is the successor to the KerberosSDR and will be crowdfunded on Crowd Supply with the campaign due to begin soon. Please sign up to the KrakenSDR Crowd Supply mailing list to be notified as soon as the campaign begins, and to check out our previous videos demonstrating the unit in action.

With a 5-channel phase coherent RTL-SDR interesting applications like radio direction finding (RDF), passive radar and beam forming become possible. It can also be used as five separate RTL-SDRs for multichannel monitoring.

KrakenSDR Updates

Like many other projects we have been severely delayed by COVID work restrictions and the effects it's having on the supply chain, and I'd like to thank everyone who is keen to get a hold of a KrakenSDR for their patience. But the ball is rolling faster now and we have finally received our latest KrakenSDR prototypes! Testing has been ongoing for the last few days, and apart from a few minor issues everything is working brilliantly. At this stage we are confident in the design and are making plans to begin the crowdfunding campaign soon.

The latest KrakenSDR Prototype PCB running on a Pi 4.

Supply Chain Constraints

The first batch will unfortunately be limited to 1000 units maximum due to supply constraints and we expect this first batch to be ready 2-3 months after the campaign finishes. So if you are after a unit ASAP, please ensure you are on the CrowdSupply mailing list as we fully expect demand for the first batch to outstrip the supply.

But if you are willing to wait, batch 2 will be still be available at the campaign special price. we will have a second batch available for early preorder at a discount (sorry due to higher than expected shipping and skyrocketing component prices we can't discount the second batch at the moment). Please keep in mind that the second batch will be at least 6 months away due to the long supply chain resulting from the pandemic.

Next Steps

The next stages in hardware development will involve finalizing our custom milled aluminum enclosure, testing one last prototype, and beginning mass manufacturing when the crowd funding campaign is over.

Work on the software is ongoing, but the beta version of our new DAQ firmware and direction finding DSP software layer is stable and already available on the krakensdr GitHub at https://github.com/krakenrf. Everything resides in the development branches and there is full documentation on the code structure available in the Documentation folder. This code can also be used on the KerberosSDR by editing the configuration files to specify 4 receivers instead of 5.

By the time the units ship out we will have a ready to use SD card image for the Raspberry Pi 4 and a quickstart guide available.

KrakenSDR DAQ and DOA DSP Web Interface

Android App

We have also been working at improving the Android direction finding companion app. This app was made during the KerberosSDR release a couple of years ago, and is used to plot and log the direction finding bearings being generated by the Kerberos/KrakenSDR unit, combining it against the GPS and movement data generated by the Android phone. This Android phone + KrakenSDR combination results in a powerful multipath resistant radio direction finding tool, and once enough data has been collected (usually after a few minutes of driving) it is able to determine where the most likely transmitter location is.

The upgraded app makes use of the full 360 degrees of direction of arrival and multipath data that is generated by the KrakenSDR, resulting in a more accurate determination of the transmitter location, and a better understanding of the uncertainties. It also allows users to visualize multipath. There are also various bug fixes and improvements made overall. We are planning to transition this app into a paid app, but all KrakenSDR backers will receive a license for free and the older KerberosSDR app will remain free.

KrakenSDR Android App Improvements

KrakenSDR Antennas

To work as a radio direction finder, KrakenSDR needs five antennas. If you plan to use them in a circular array, they need to be omnidirectional antennas such as whips or dipoles. So to go along with the KrakenSDR we will be selling an optional set of five magnetic whip antennas which can be mounted on for example, the roof of a car. (Please note the magwhips shown in the photo may differ slightly from the final ones sold).

KrakenSDR Magnetic Whips on a Car Roof

We have also been working with Arrow Antennas in the USA, who are producing a KrakenSDR 5-element dipole array antenna which is great for use in fixed sites (for example on the roof of a house). The antenna will be sold by Arrow antennas (not by us), and the future link (not active yet) will be http://www.arrowantennas.com/arrowii/kraken.html. We expect them to generate this page within the next few days. This antenna has been used in all our fixed site experiments as you can see in some of the YouTube videos, and works very well. (The image below show a prototype, we're told the final version may look slightly different.)

Arrow Antenna 5-element antenna array for the KrakenSDR

Future Work

DAQ & Direction of Arrival (DOA / Radio Direction Finding) :
Work on the DAQ and DSP software is coming along well and this is mostly complete and runs stable on a Raspberry Pi 4. There are just now bug fixes and minor features being added. Intermittent 'bursty' signal handing is already working, but we are working on improving it's sensitivity to weak bursty narrowband CW signals which can still be problematic to detect. The Android app is also currently being field tested.

Passive Radar:
Work on new passive radar software is also ongoing and we expect to have something ready for experimentation and with quickstart guides before shipping. At the moment it is also still possible to use the older KerberosSDR software for passive radar, but we believe the new DAQ core software will run things much smoother. The goal for the new software is to not only plot a range-doppler map, but to combine it with direction finding and be able to plot radar detections on a map. This feature may require operation on a device faster than the Raspberry Pi 4, such as GPU based device like a NVIDIA Jetson.

Beam Forming, Interferometry:
One application we think the KrakenSDR would be great with is amateur radio astronomy via interferometry. The ability to combine multiple small hydrogen line dishes spread out over several meters of area should result in much greater radio imaging resolution, without needing to deal with a single huge dish. It may also allow for electrically steering a beam without needing to rotate the dishes.

Advanced Direction Finding + Advanced Log Management:
At the moment networked direction finding (direction finding via multiple fixed or mobile sites spread out around a city or area) is possible via the third party RDF Mapper software, but we aim to create our own advanced platform in the near future. The goal is to have software that will automatically log and alert when a signal of interest appears. For some examples we can see this being used to help coastguard locate distressed marine pleasurecraft that typically do not have AIS via their VHF radios, locate emergency beacons, for animal/wildlife/asset tracking, and monitoring for illegal/interference transmissions.

At this stage the core DAQ+DSP software will also be updated to support monitoring multiple simultaneous channels within the available 2.56 MHz bandwidth, and with a scanning and beacon ID detection feature.

Research into field applications:
One example we hope to test is the operation of KrakenSDR on a drone. With great line of sight from up in the sky, localizing a transmitter should be fast. Another example could be actually visualizing signals like light via augmented reality.

Some of our previous KerberosSDR and KrakenSDR posts might also be of interest.

TechMinds: Testing SDR++ The Bloat Free SDR Software

Over on YouTube TechMinds has recently released a video where he overview SDR++, dubbed as the "bloat free SDR software". We've been following the development of SDR++ for a while, and recently posted about the release of version V1.0.0. SDR++ is an open source, cross platform, C++ based GUI general receiver program for various SDRs including the RTL-SDR. In another recent post we also saw a video review from Sarah at SignalsEverywhere.

The the video TechMinds gives an overview of the SDR++ features and GUI, and also shows DSD+ and WSJT-X running together with it. He notes that SDR++ lives up to it's expectations and lives up to it's bloat free tagline.

SDR++ Multi Platform SDR Application

Decoding the RF Output of a VCR with an RTL-SDR

Over on YouTube use Scelly has uploaded a video showing how he has used an RTL-SDR dongle and the TVSharp SDR# plugin to decode video from the RF output of an old VCR (videocassette recorder). VCR players were designed to output the same PAL or NTSC signal that old analog TV transmissions used, and the RF output of the VCR was connected directly to the TV's antenna input.

The TVSharp plugin for SDR# can be used to decode these signals, however as the bandwidth of PAL/NTSC signals is much larger than the 2.4 MHz provided by the RTL-SDR, only a black and white image can be received. Scelly writes:

RF Output from VCR connected directly to input of my RTL-SDR. The RF output is tuned to channel 22 (487.25 MHz), and as the signal is so wide, my RTL-SDR can only display the luminance data (black and white video) and audio, although not at the same time. If I had two RTL-SDRs or an SDR with a larger bandwidth, I could have both audio and video playing at the same time.

The video playing is "The Prince of Egypt" on VHS Video Cassette.

Decoding RF Output of a VCR with RTL-SDR Dongle

Video on Using RF Filters with an RTL-SDR

Over on YouTube channel TheSmokinApe has uploaded a video about using RF filters with an RTL-SDR. In the video he first explains why FM bandstop and AM high pass filters might be required when using a software defined radio in order to avoid overloading the SDR with very strong signals. He goes on to test and review our RTL-SDR Blog FM Bandstop and AM Highpass filters, by testing them on a spectrum analyzer.

RTL-SDR RF Filters

Near Field Localization with Machine Learning and 7 Coherent RTL-SDRs

Thanks to Laakso Mikko and Risto Wichman researchers at the Department of Signal Processing and Acoustics in Aalto University, Finland for submitting news that their recent paper titled "Near-field localization using machine learning: an empirical study" is available on IEEE Xplore. (To access the paper you need an IEEE subscription, but we see no harm in letting individuals know that they can search for the DOI on sci-hub to get it for free).

The work described in the paper uses 7 RTL-SDR dongles with their clocks connected together. Combined with noise source calibration, this results in a coherent SDR. They then train a Deep Neural Network to perform near field localization using an antenna array. If you are interested, we have out own 5-channel coherent SDR called "KrakenSDR" which will soon be released for crowd funding. The abstract reads:

Estimation methods for passive near-field localization have been studied to an appreciable extent in signal processing research. Such localization methods find use in various applications, for instance in medical imaging. However, methods based on the standard near-field signal model can be inaccurate in real-world applications, due to deficiencies of the model itself and hardware imperfections. It is expected that deep neural network (DNN) based estimation methods trained on the nonideal sensor array signals could outperform the model-driven alternatives. In this work, a DNN based estimator is trained and validated on a set of real world measured data. The series of measurements was conducted with an inexpensive custom built multichannel software-defined radio (SDR) receiver, which makes the nonidealities more prominent. The results show that a DNN based localization estimator clearly outperforms the compared model-driven method.

The paper notes that the code used in the experiments is open source and available on GitHub.

If you're interested, we also posted about Laakso's previous work on beamforming with a phase coherent 21-channel RTL-SDR array back in February.

Examples of MUSIC pseudospectra. The units are [m] for range r on the vertical axis and degrees for θ on the horizontal axis. Red crosses mark the true location and black circles the NFLOPnet estimated location.

Installing Remote SDR V2 on a Raspberry Pi 4B

Remote SDR V2 is software that allows you to easily remotely access either a PlutoSDR, HackRF or RTL-SDR software defined radio. It was originally designed to be used with the amateur radio QO-100 satellite, but version 2.0 includes multiple demodulation modes, NBFM/SSB transmission capability, CTCSS and DTMF encoders, modulation compression and a programmable frequency shift for relays.

Over on the programmers blog, F1ATB has put out a new post showing how to install Remote SDR V2 on a Raspberry Pi 4B. The installation has been made simple thanks for a ready to use SD card image.

If you're interested in an overview of Remote SDR V2, we have posted previously about a Tech Minds review of the software.

Remote SDR V2 with a PlutoSDR